In January, Scott and I planned and went on a three day hiking trip in New Zealand. NZ is famous for “tramping” and “trekking”, and since we were in the country for a conference (you can see my talk at LinuxConfAU here!), we decided to give it a try. This was my first true “backpacking” type trip where you carry all your stuff on your back; and the first multi-day hiking experience. You could either rent a cot in a hut and carry all your food and cooking utensils and bedding on your back; or you could pay to hike with a company who has a lodge you can stay at (with hot showers and amazing food) and also has guides who hike with your pack. They had me at “gluten free food” and “hot showers”, so I convinced Scott that was the way we should do our Routeburn Track hike!
I planned ahead well for the hike; they gave us a packing list of recommended things to carry and bring. I learned from a friend in NZ, Martin, who had gone trekking a few weeks prior: his pack went over a cliff and was lost – yikes! Therefore, I planned one set of supplies in baggies and put them in both Scott & my pack just in case something happened to one of our packs, we’d still be completely covered.
Day 1 of the hike was awesome – it was overcast and felt like hiking in Seattle, but the scenery and wildlife were still great to experience. Since it was raining off and on, the waterfalls were spectacular.
Day 2 also started awesome – it was a breathtakingly clear morning with blue skies and sunshine as we hiked up above the tree line and over a mountain ridge, along the valley, and onward toward the lunch spot. I was feeling great and enjoying my hike – this was one of my all-time favorite places to hike in terms of the view of the valley and lake that we hiked from; and the mountain views on the other side of the ridge once we topped the mountain and crossed over.
However, about 30 min from the lunch shelter (and about 300 feet of elevation to go), I noticed the lady hiking in front of us decided to sit and slide down a particularly large and angled rock on the trail. I approached the rock planning to stop and assess my plan before continuing on. Before I even decided what to do, I somehow slipped and vaulted (for lack of a better word) left and off the trail…and down the slope. I flipped over multiple times and knew I had to grab something to stop my flight and be able to save myself from going all the way off the mountain slope. I amazingly only ended up about 10 feet off the trail, clinging to a giant bush/fern-like plant.
I had to be pulled back up to the trail by Scott and another hiker who came running after hearing my yell for help as I went down the mountain. (Scott came down off the trail few feet, and had to hold onto the hand of another hiker with one hand while pulling me up with the other, just like in the movies. It’s not a lot of fun to be at the end of the human chain, though!) At that point, I knew I had injured my right ankle and could only use my left foot/leg and right knee to try to climb back up to the trail while they pulled on my backpack. We got me back on to the trail and over to a rock to rest. We waited a few minutes for the back-of-the-pack guides who showed up and taped around my ankle and boot to see if I could walk on it – they thought it was sprained. I could flex, but couldn’t really put weight on it without excruciatingly sharp pain on the right side. I’d never sprained my foot before or broken any bones in my life, so I was frustrated by how painful the ‘sprain’ was. I had an overwhelming wave of nausea that I knew was in response to the pain, too, so at one point I had to sit there and lean back with my eyes closed while everyone else talked around me.
The guides wanted to see if we could get to a nearby river to ice my leg in. I used my poles as pseudo-crutches in front of me, with my arms bent at 90 degree angles, and with Scott behind me to check my balance, would crutch and hop on one leg. It wasn’t like regular crutching, though, where you can press your weight down on your arms and hands. It was really an act of placing the poles slightly forward for balance and then hopping up and forward, pressing off my left leg. My left leg was quickly exhausted and cramping from the effort of hopping forward with my entire body weight. It was also complicated by the rain making things more slippery; and of course; this is a mountain trail with rocks and boulders of different sizes. What I didn’t even notice walking normally on two feet became incredibly frustrating for figuring out when and how to jump up onto a small rock; or around to the side; etc.
“Lucky” for me (eye roll), we happened to be in an ascending section of the trail with quite a few large rocky sections, and there was no way I could hop up the uneven rocks on foot. So instead, I chose to crawl up and over those sections on my hands and knees. Then I would get up at the top and hop again through the “flatter” gravel and rock sections, then crawl again. It was slow and exhausting, and painful when I would get up one one leg again and start hopping again. I was in the most physical pain I’d ever been in my life.
After about a very slow and painful quarter of a mile, and as rain was dripping down more steadily, the guides decided I wouldn’t make it the remaining 300ft of elevation/30 minute (normal) hike to the lunch spot. They radioed for a medevac helicopter to come pick me up. I was incredibly upset and disappointed that I had ruined our hike… but also knew I absolutely wouldn’t even make it to the lunch shelter. I remember saying “I feel so stupid!” to Scott.
The helicopter came in a surprisingly quick amount of time, and they let out one of the EMT’s nearby and then flew over to a hill across from the trail. The EMT saw that I was decently clothed and covered (I had 3/4 length running pants on; a rain jacket and hood; and had a second rain jacket to cover my legs against the rain and wind) and did a verbal status check to confirm I was decent enough for them to lift me off the mountain. They weren’t able to land safely anywhere nearby on the trail because it was so steep and narrow; so they put me in a “sack” that went around my back and looped over my arms and between my legs, and was hooked on to the EMT’s harness. Scott and the guide stood back, while the helicopter came back and lowered the winch. I was winched up from there. However, the EMT had told me once we got up to the helicopter that the team inside would pull me straight back. And that didn’t happen, which was slightly more terrifying because we started flying away from the mountain while still *outside* the helicopter. It turns out the helicopter had unloaded a stretcher and supplies on the nearby hill, and so we were lowered down – with me and the EMT still perched outside the skids – to the hillside there, so the team could then gather the supplies & then load me in so I could sit on the stretcher.
The other terrifying factor about being evacuated off the mountain was that due to the weather that was blowing in hours ahead of schedule, and the “we have to winch you off the mountain” aspect: they couldn’t take Scott with us. So I had to start making plans & preparing myself for going to the hospital by myself in a foreign country. I was terrified about my BGs & diabetes & how I know hospitals don’t always know what to do with people with T1D, let alone someone on a (DIY) closed loop. I tried to tamp down on my worries & make some plans while we waited for the helicopter, so Scott would know I was okay-ish and worry slightly less about me. But at that point, we knew he would have to finish the day’s hike (another 3-4 hours); spend the night; and hike down the next day as planned in order to meet up with me at the hospital.
As we lifted off in the helicopter, I handed the EMT my phone, where I had made a note with my name, age, medical information (T1D & celiac), and the situation about my ankle. He loved it, because he could just write down my information on the accident forms without yelling over the headset. Once he gave me my phone back, a few minutes later we passed back into an area with signal, and I was able to send text messages for the first time in 2 days.
I sent one to my mom, as carefully worded as I could possibly do:
“Slipped off the trail. Hurt ankle. BGs ok. In a helicopter to the hospital in Queenstown. Just got signal in helicopter. Don’t freak out. Will text or call later. Love you”
It had all the key information – something happened; here’s where I’m heading; BGs are fine; pleeeeeeeease don’t freak out.
I also sent a text to Scott’s dad, Howard, who’s an ER doc, with a tad different description:
“Slipped and flipped off the trail. Possible ankle fracture or serious sprain. Being medevac’d off in a helicopter. BGs are fine. But please stand by for any calls in case I need medical advice. Just got signal in the chopper. Scott is still on the trail until tomorrow so I am solo.”
I was quite nervous when we arrived at the hospital. I haven’t been in an ER since high school (when I was dehydrated from a virus). I’ve heard horror stories about T1D & hospitals. However, most of my fears related to T1D were completely unfounded. When I arrived, the EMT did some more paperwork, I talked briefly to a nurse, and then was left alone for quite a while (maybe an hour). Other than mentioning T1D (and that my BGs were fine) and celiac to the nurse, no one ever asked about my BGs throughout the rest of the time in the ER. Which was fine with me. What my BGs had actually done was rise steadily from about 120 up to 160, then stayed there flat. That’s a bit high, but given I was trying to manage pain and sort out my situation, I was comfortable being slightly elevated in case I crashed/dropped later when the adrenaline came down. I just let OpenAPS keep plugging away.
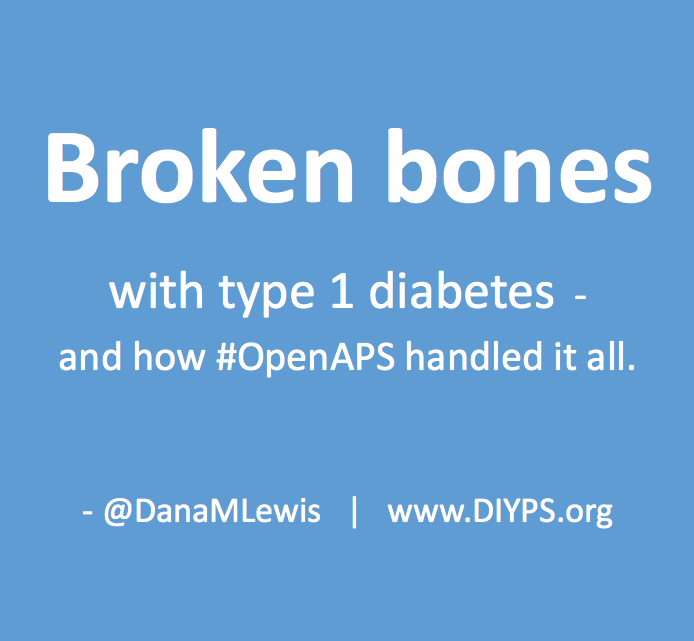
The first thing that was done in the ER about an hour after I arrived was wheeling me to go get an x-ray. It was quick and not too painful. I remember vividly that the radiologist came back out and and said “yes, your ankle is definitely broken. In two places.” I started at her and thought an expletive or two. But for some reason, that made me feel a lot better: my pain and the experience I had on the mountain was not totally disproportionate to the injury. I relaxed a lot then, and could feel a lot of the stress ebbing away. My BGs started a slow sloping drop down almost immediately, and ended up going from 160 down to 90 where I leveled out nicely and stayed for the next few hours.
After I was wheeled back to my area of the ER, the ER doc showed up. He started asking, “So I heard you hopped and climbed off the mountain?” and then followed up by saying yes, my ankle was broken…in three places.
Me: “WHAT? Did you say ::three::?”
The ER doc said he had already consulted ortho who confirmed I would need surgery. However, it didn’t have to be that night (halleluljah), and they usually waited ’til swelling went down to operate, so I had a choice of doing it in NZ or going home and doing it there. He asked when I was planning to leave: this was Sunday evening now; and we planned to fly out Wednesday morning. I asked if there were any downsides to waiting to do surgery at home; any risk to my long-term health? He said no, because they usually wait ~10 days for the swelling to go down to operate. So I could wait in NZ (me: uhhh, no) or fly home and see someone locally. I was absolutely thrilled I wouldn’t need to operate then and there, and without Scott. I asked for more details so I could get my FIL’s opinion (he concurred, coming home was reasonable), and then confirmed that I liked the plan to cast me; send me on my way; and let me get surgery at home.
It took them another 2 hours to get me to the procedure room and start my cast. This was a small, 6-bed ER. When they finally started my cast, the ER doc had his hands on my ankle holding it up…and another nurse rushed in warning that a critical patient was in route, 5 minutes out. The ER doc and the other nurse looked at each other, said “we can do this by then”, and literally casted me in 2 minutes and were wheeling me out in the third minute! It was a tad amusing. I was taken back to x-ray where they confirmed that the cast was done with my ankle in a good position. After that, I just needed my cast to be split so I could accommodate swelling for the long plane rides home; get my prescriptions for pain med; get crutches; and go home.
All that sounds fast, but due to the critical patient that had come in, it took another two hours. They finally came and split my cast (which is done by using the cast cutter to cut a line, then another line, then pull out the strip in between), sold me my crutches, and wrote my prescriptions. The ER doc handed me my script, and I asked if the first rx had acetaminophen (because it would mess up my G4). He said it did, so he scribbled that out and prescribed ibuprofen instead. The nurse then got & apologized for “having to sell me” crutches. New Zealand has a public health policy where they cover everything in an accident for foreigners: I didn’t have to pay for the medevac (!!), the ER visit (!!), the x-rays (!!), the cast …nothing. Just the crutches (which they normally lend for free to NZ but obviously I was taking these home). Then I was on my way.
Thankfully, the company we hiked with had of course radioed into Queenstown, and the operations manager had called the ER and left a message to give to me with his phone number. A few hours prior, when I found out I’d be casted & released that night, I had been texting my mom & had her call the hotel Scott & I were staying at the next (Monday) night to see if they had a room that (Sunday) night that I could check into. The hiking company guy offered to drive me wherever, so he came to pick me up. I had texted him to keep him posted on my progress/timeline of release (nice and vague and unhelpful for the most part). But I also asked as soon as we got in contact if he could radio a message to the lodge & tell Scott that: a) my ankle was broken; b) I was ok; c) I’d be at the hotel when he got in the next day and not to rush, I was ok. The guy said he could do me one better: when he came to pick me up, he’d bring the phone so I could ::call: and talk to Scott directly. (I almost cried with relief, there, at the idea of getting to talk to Scott so he wouldn’t be beside himself worrying for 22 hours). I did get to talk to Scott for about a minute and tell him everything directly, and convince him not to hike out himself in the morning, but stick with the group and the normal transport method back to Queenstown, and just come meet me at the hotel when he got back around 4pm the next day. He agreed.
(What I didn’t find out until later is that Scott had considered doing the rest of the hike completely that night. Two things ended up dissuading him: one was the fact that a guide would have had to go with him and then hike all the way back to the lodge that night. The other was the fact that he talked to me and I would be out of the hospital by the time he arrived; so since I said I was fine alone at the hotel, he’d wait until the next day.)
So, I was taken to the hotel and got help getting up to the hotel room and had ice delivered along with extra pillows to prop up, and our bags brought in. Thankfully, on the mountain, the EMT had agreed to winch my backpack up with me. This was huge, because I noted earlier, I had a full set of supplies in my backpack, and all we had to do on the mountain was grab an extra international adapter and my charger cords out of Scott’s bag and toss it into mine. That made it easy to just pull what I needed that night (my rig; charger cords & adapter; a snack) out of the top of my bag from my perch on the bed. I plugged in my rig; made sure I was looping, took my pain meds, and went to sleep.
 Amazingly, although you’re probably not any more surprised than I am at this point, my BGs stayed perfectly in range all night. Seriously: after that lowering from 160 once I relaxed and let some of the stress go? No lows. No highs. Perfectly in range. The pain/inflammation and my lack of eating didn’t throw me out of range at all. The day of the fall, all I ate was breakfast (8am); didn’t eat lunch and didn’t bother doing anything until 11pm when I had a beef jerky stick for some protein and half a granola bar (10g carbs). For the next two and a half weeks now, I’ve had no lows, and very few highs.
The one other high BG I really had was on Sunday after we got home (we got back on Wednesday). It happened after my crutch hit the door coming back to my bedroom from the bathroom, and I did such a good job hopping on my left foot and protecting my casted right foot, that I managed to break the smallest toe on my left foot. I pretty immediately knew that it was broken based on the pain; then my BG slowly rose from 110 up to 160; and then I started to have the same “shadow” bruising spread around my foot from the base of the toe. Scott wasn’t sure; when I had fallen off the trail I had yelled “help!” and “I think I broke my foot!”. I didn’t say it out loud this time; just thought it. Again, after some ibuprofen and icing and resting, within an hour my BG started coming back down slowly to below 100 mg/dL.
On Tuesday, I went to the orthopedic surgeon and confirmed: my left toe is definitely broken. My right ankle is definitely broken: the trimalleolar fracture diagnosis from NZ was confirmed. However, given that none of the ligaments were damaged, and the ankle was in a decent position, the ortho said there’s a good chance I can avoid surgery and heal in place inside a cast. The plan was to take off my split, plaster-based cast they did in NZ and give me a proper cast. We’d follow up in 10 days and confirm via x-ray that everything was going well. I asked how likely surgery would still be with this plan; and he said 20%. Well, given that I was assuming 100% before, that was huge progress! He also told me I shouldn’t travel within 4 weeks of the injury, which unfortunately means I had to cancel my trip to Berlin for ATTD later in February. It may or may not mean I have to cancel another trip; I’ll have to wait and see after the next follow up appointment, depending on whether or not I need surgery.
Up until this point, I had been fairly quiet (for me) on social media. I hadn’t posted the pictures of our hike; I didn’t talk about my fall or the trip home. One friend had texted and said “I wondered if you fell off the face of the earth!” to which I responded “uhhh…well…about that…I ::only:: fell off a mountain! Not earth!” Ha. Part of the reason was not knowing whether or not I would be able to travel as planned, and wanting to be courteous to informing the conferences who invited me to speak about the situation & what it meant for me being able to attend/not. Once I had done that, I was able to start posting & sharing with everyone what had happened.
To be perfectly honest, it’s one thing to have a broken limb and a cast and have to use crutches. It’s an entirely other ball of wax to have a broken toe on the foot that’s supposed to be your source of strength & balance. The ortho gave me a post-op surgical shoe to wear on my left foot to try to help, but it hurt so bad that I can’t use my knee scooter to move easily without my left foot burning from the pain. Thankfully, Scott’s parents’ neighbor also had a motorized sit-scooter that we borrowed. However, due to the snowpocalypse that hit Seattle, I’ve not been able to leave the house since Thursday. We haven’t been able to drive anywhere, or walk/scooter anywhere, in days. I’m not quite stir crazy yet; but; I’ll be really looking forward to the sidewalks being snow-free and hopefully lake-free (from all the melting snow) later in the week so I can get out again. I also picked up a cold somewhere, so I for the most part have been stationary in bed for the last week, propping up my feet and using endless boxes of Kleenex.
OpenAPS, as you can see, has done an excellent job responding to the changes in my insulin needs from being 100% sedentary. (Really – think trips to the bathroom and that’s it.) In addition to the increased resistance from my cold and being sedentary, there’s one other new factor I’ve been dealing with. I asked my ortho about nutrition, and he wants me to get 1g of protein per kg of body weight, plus 1000mg/day of calcium. He suggested getting the extra protein via a powder, instead of calories (e.g. eating extra food). I found a zero-carb, gluten free powder that’s 25g of protein per scoop, and have been trying it with chocolate milk (which is 13g of carb and 10g of protein).
I’ve been drinking that 2x a day. Interestingly, previous to my injury, unless I was eating a 100% no carb meal (such as eggs and bacon for breakfast), I didn’t need to bolus/account for protein. However, even though I’m entering carbs for chocolate milk (15), I was seeing a spike up to 150 mg/dL after drinking it. I tried entering 30g for the next time (13g of milk; plus about 50% for the 25+10g worth of protein), and that worked better and only resulted in a 10 mg/dL rise in response to it. But even a handful of nuts’ worth of protein, especially on days where I’m hardly eating anything, have a much stronger effect on my BGs. This could be because my body is adjusting to me eating a lot less (I don’t have much appetite); adjusting to the much-higher-protein diet overall; and/or responding to the 100% sedentary pattern of my body now.
Thankfully, it’s not been a big deal, and OpenAPS does such a good job tamping down on the other noise-based factors: it’s nice that my biggest problems are brief rises to 160 or 170 mg/dL (that then come back down on their own). My 7-day and 30-day BG averages have stayed the same; and my % time in range for 80-160 has stayed the same, even with what feels like a few extra protein-related blips, and even when some days I eat hardly anything and some days I manage 2-3 meals.
So to summarize a ridiculously long post:
- When I break bones, my BGs rise up (due to inflammation and/or the stress/other hormonal reaction) up to 160 mg/dL until I relax, when they’ll come back down. Otherwise, broken bones don’t really phase OpenAPS.
- Ditto for lack of movement and changes in activity patterns not phasing OpenAPS.
- The biggest “challenge” has been adjusting to the 3x amount of protein I’m getting as a dietary change.
- I have a trimalleolar fracture; and that’s about 7% of ankle fractures. I read a lot of blog posts about people needing surgery & the recovery from it taking a long time. I’m not sure I won’t need surgery; but I’m hoping I won’t need it. If so, here’s one data point for a trimalleolar fracture being non-surgical – I’ll update more later with full recovery timelines & details. Also, here is a Twitter thread where I’m tracking some of the most helpful things for life with crutches.
- Don’t break your littlest toe – it can hurt more than larger fractures if you have to walk on it!
A huge thank you goes to my parents and Scott’s parents; our siblings on both sides for being incredibly supportive and helpful as well; and Scott himself who has been waiting on me (literally hand and foot) and taking most excellent care of me.
And thank you as well to anyone who read this & for everyone who’s been sending positive thoughts and love and support. Thank you!
 —-
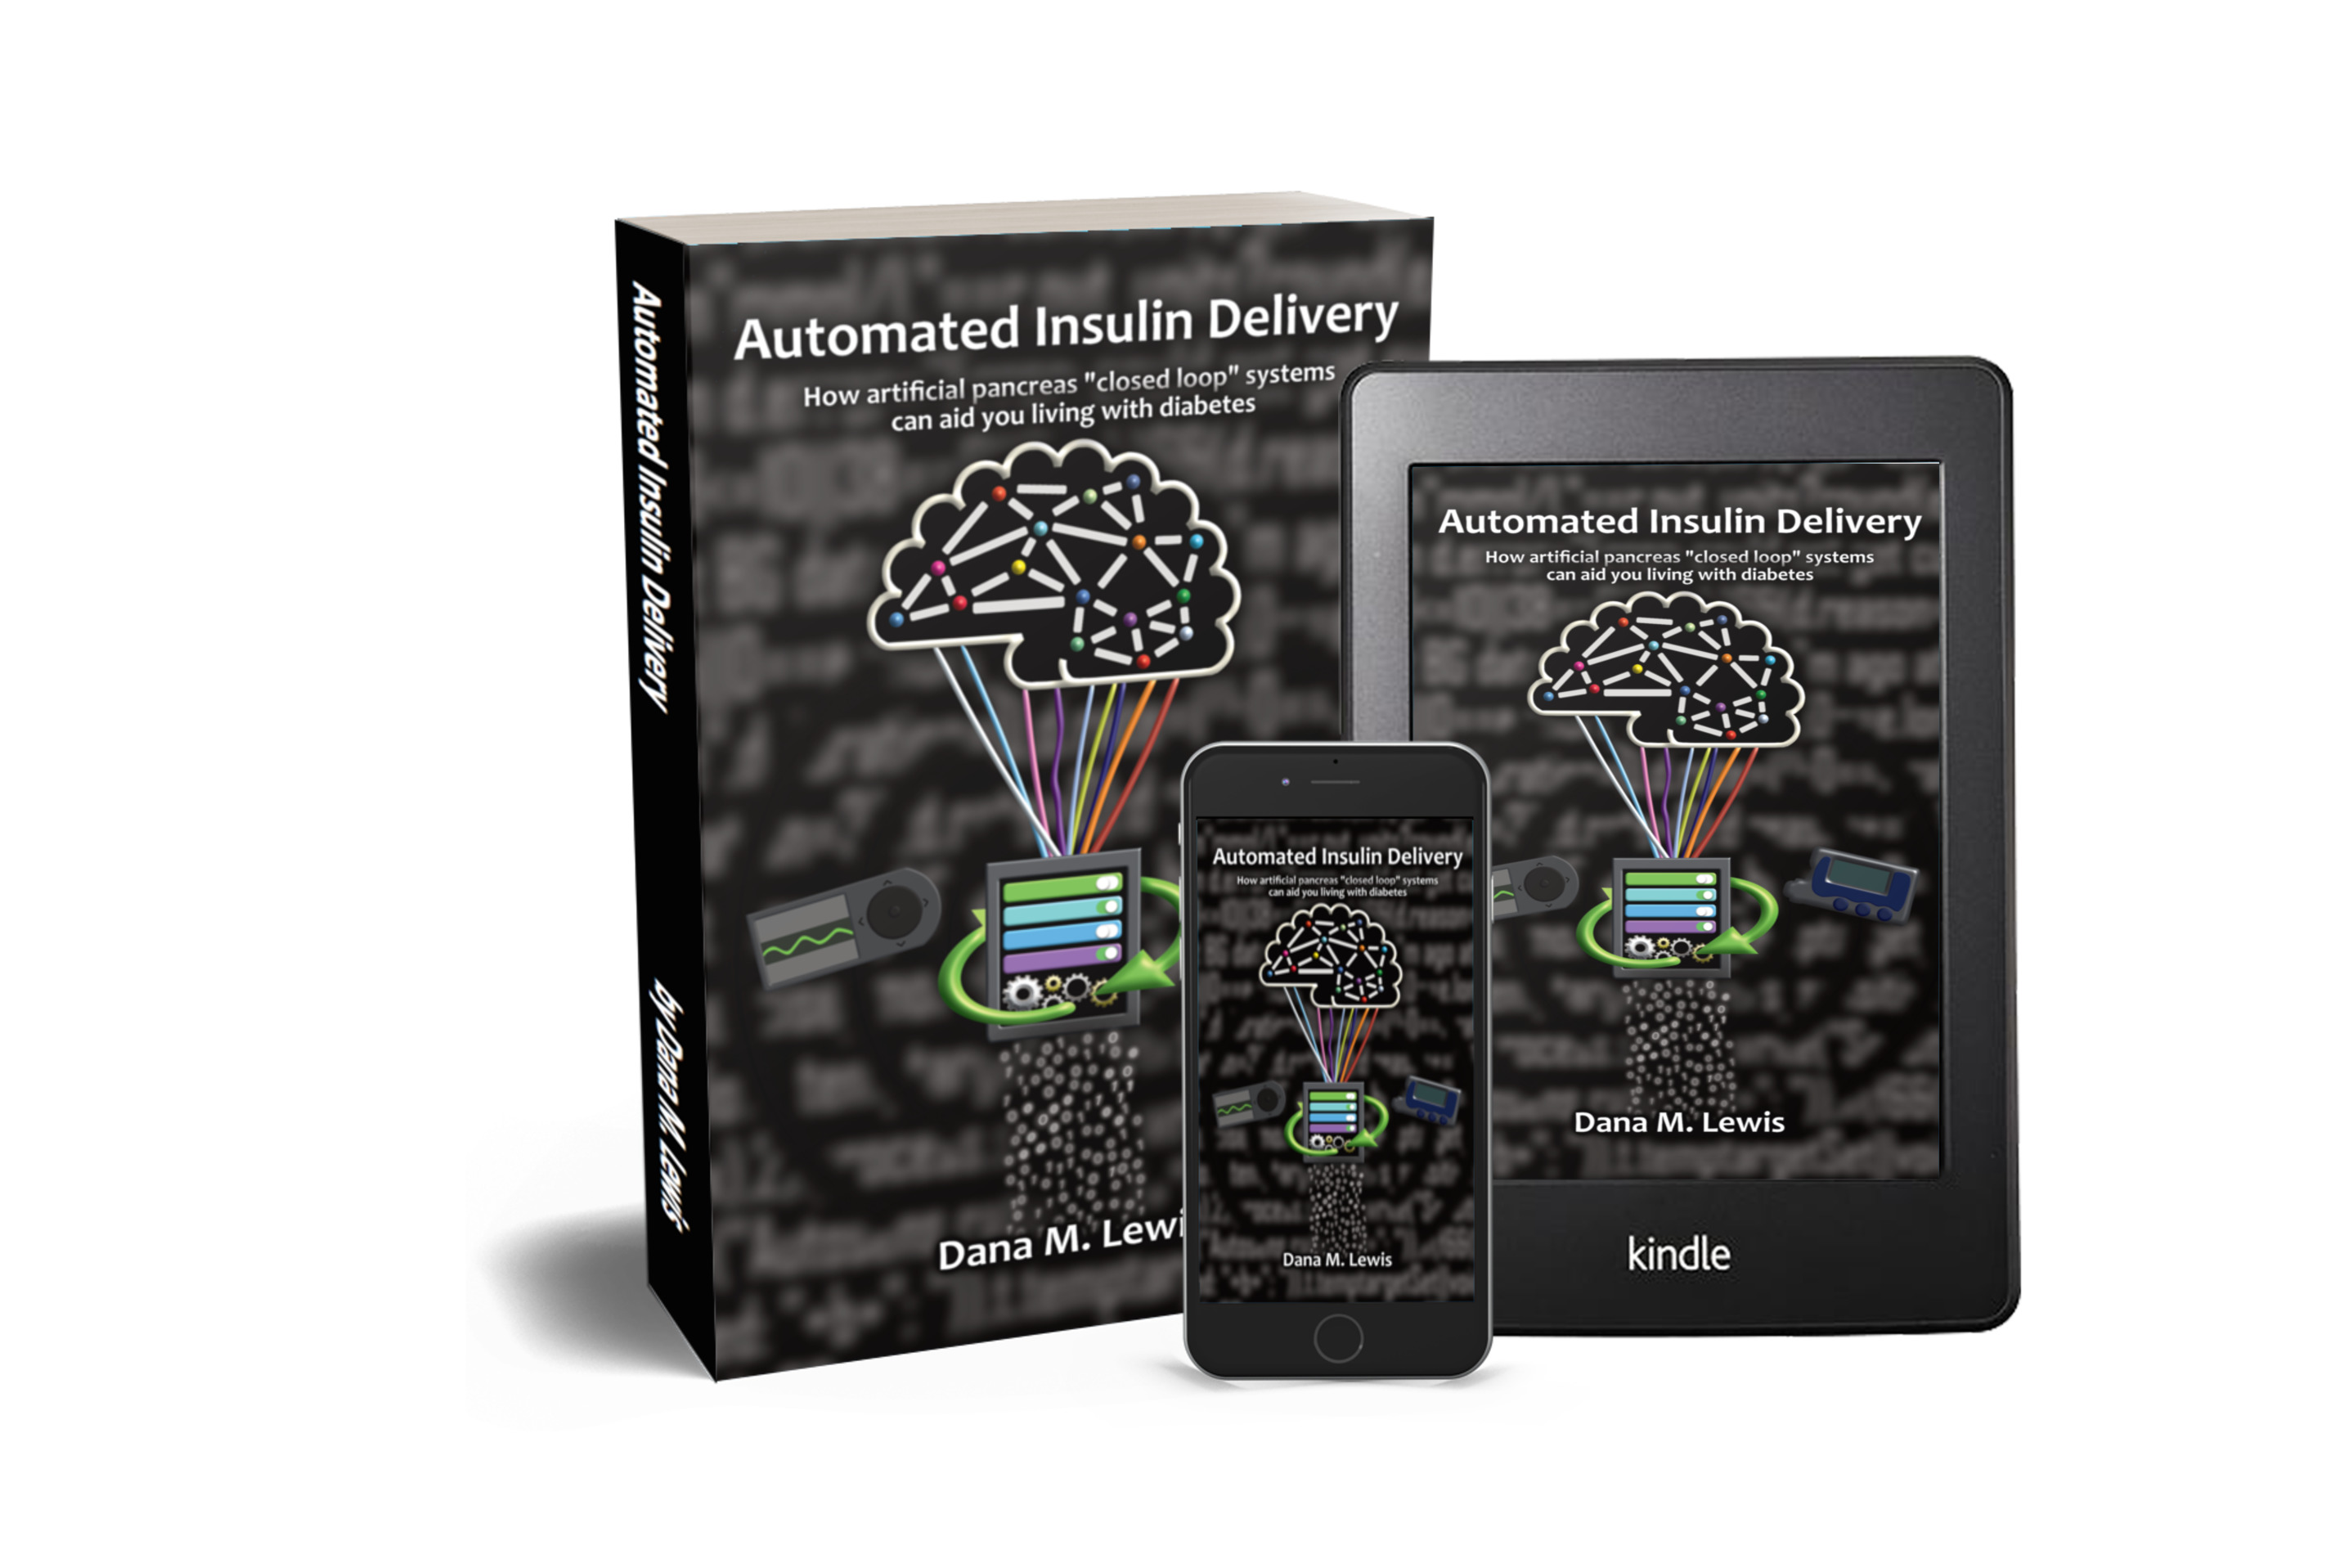
—-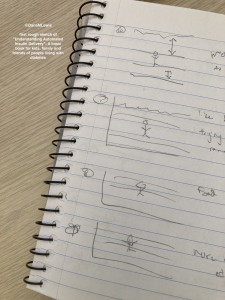 I started with a basic sketch of an idea to run it by Scott and a few other people to test the idea. I’m not much for drawing, so it was a *very* rough sketch. But the analogy seemed to resonate, so I moved on to mocking up a basic version on the computer. (I went down a rabbit hole because I thought it would be neat to make an animated video for people to see and share online, to accompany the book. But I don’t know how to illustrate on the computer, let alone animate, so I tried an open source illustration program called Synfig, then several other illustrator programs that were open source to do the basic design to import into Synfig to animate, but then realized what I had in mind was so simple that basic transitions and animations in PowerPoint would suffice for my animated video.) PowerPoint is also how I’ve made my other children’s books for self-publishing, so it was easy to do a widescreen, video design version and then modify a version for the print size book of choice (I chose an 8.5×8.5 to make it easiest to hold and read).
 Here is the link to the print book on Amazon.


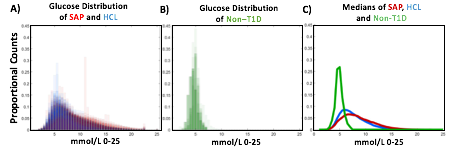
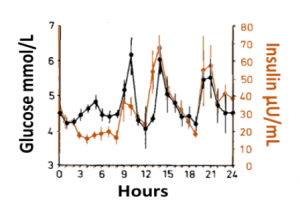 Blood glucose and insulin exhibit coupled biological rhythms at multiple timescales, including hours (ultradian, UR) and the day (circadian, CR) in individuals without diabetes. The presence and stability of these rhythms are associated with healthy glucose control in individuals without diabetes. (See right, adapted from
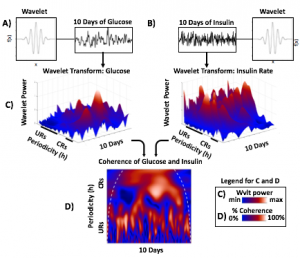

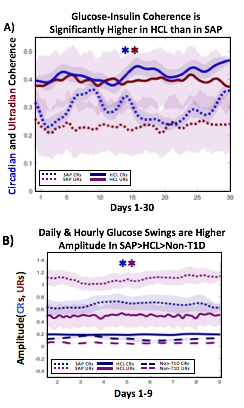 A) Circadian (blue) and 3-6 hour ultradian (maroon) coherence of glucose and insulin in HCL (solid) and SAP (dotted) users. Transparent shading indicates standard deviation. Although both HCL and SAP individuals have lower coherence than would be expected in a non-T1D individual, HCL CR and UR coherence are significantly greater than SAP CR and UR coherence (paired t-test p= 1.51*10-7 t=-5.77 and p= 5.01*10-14 t=-9.19, respectively). This brings HCL users’ glucose and insulin closer to the canonical non-T1D phenotype than SAP users’.

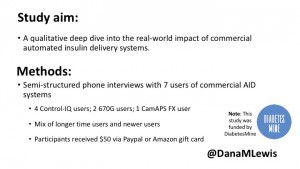
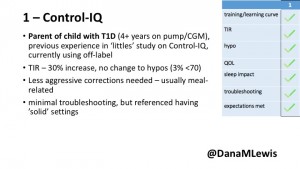
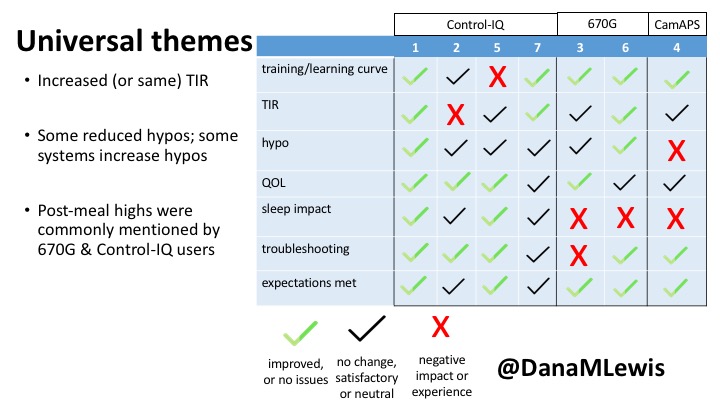
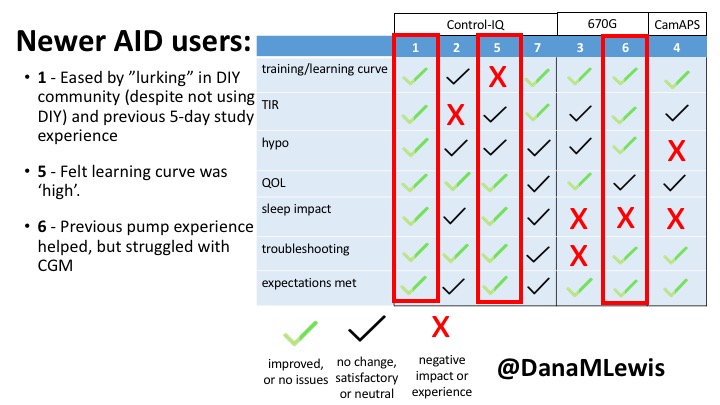
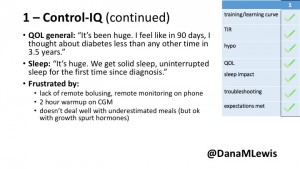 1 – A parent of a child using Control-IQ (off-label), with 30% increase in TIR with no increased hypoglycemia. They spend less time correcting than before; less time thinking about diabetes; and “get solid uninterrupted sleep for the first time since diagnosis”. They wish they had remote bolusing, more system information available in remote monitoring on phones. They miss using the system during the 2 hour CGM warmup, and found the system dealt well with growth spurt hormones but not as well with underestimated meals.
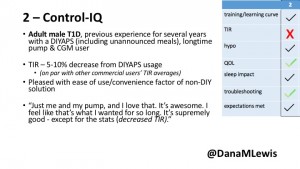
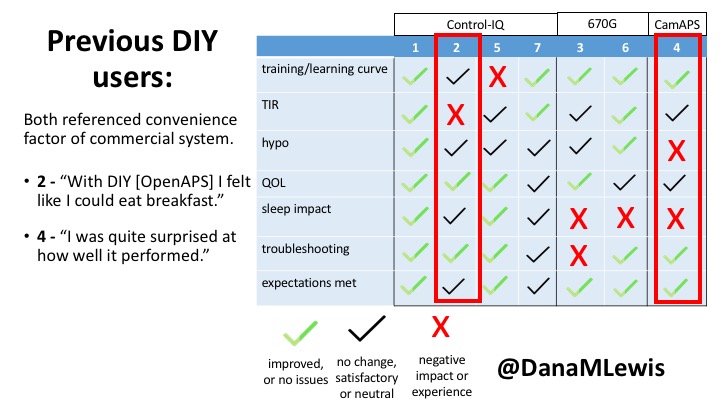
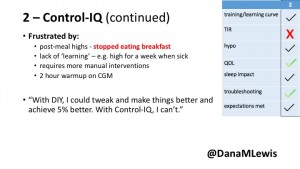 2 – An adult male with T1D who previously used DIYAPS saw 5-10% decrease in TIR (but it’s on par with other participants’ TIR) with Control-IQ, and is very pleased by the all-in-one convenience of his commercial system.He misses autosensitivity (a short-term learning feature of how insulin needs may very from base settings) from DIYAPS and has stopped eating breakfast, since he found it couldn’t manage that well. He is doing more manual corrections than he was before.
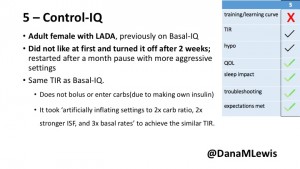
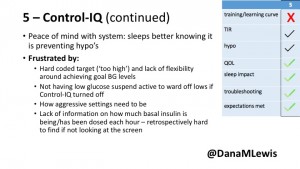 5 – An adult female with LADA started, stopped, and started using Control-IQ, getting the same TIR that she had before on Basal-IQ. It took artificially inflating settings to achieve these similar results. She likes peace of mind to sleep while the system prevents hypoglycemia. She is frustrated by ‘too high’ target; not having low prevention if she disables Control-IQ; and how much she had to inflate settings to achieve her outcomes. It’s hard to know how much insulin the system gives each hour (she still produces some of own insulin).
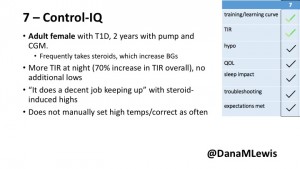
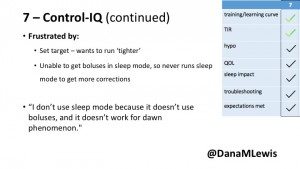 7 – An adult female with T1D who frequently has to take steroids for other reasons, causing increased BGs. With Control-IQ, she sees 70% increase in TIR overall and increased TIR overnight, and found it does a ‘decent job keeping up’ with steroid-induced highs. She also wants to run ‘tighter’ and have an adjustable target, and does not ever run in sleep mode so that she can always get the bolus corrections that are more likely to bring her closer to target.
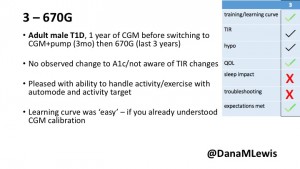
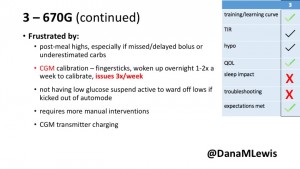 3 – An adult male with T1D using 670G for 3 years didn’t observe any changes to A1c or TIR, but is pleased with his outcomes, especially with the ability to handle his activity levels by using the higher activity target. He is frustrated by the CGM and is woken up 1-2x a week to calibrate overnight. He wishes he could still have low glucose suspend even if he’s kicked out of automode due to calibration issues. He also commented on post-meal highs and more manual interventions.
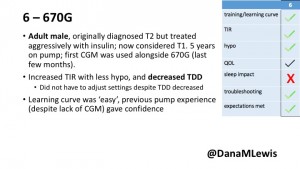
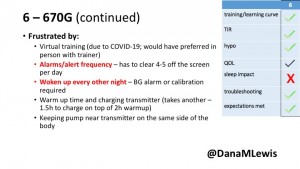 6 – Another adult male user with 670G was originally diagnosed with T2 (now considered T1) with a very high total daily insulin use that was able to decrease significantly when switching to AID. He’s happy with increased TIR and less hypo, plus decreased TDD. Due to #COVID19, he did virtually training but would have preferred in-person. He has 4-5 alerts/day and is woken up every other night due to BG alarms or calibration. He does not like the time it takes to charge CGM transmitter, in addition to sensor warmup.
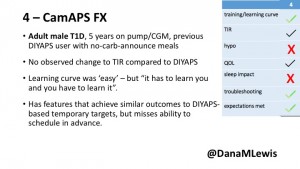
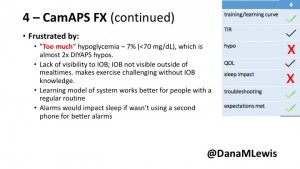 4 – The last participant is an adult male with T1 who previously used DIYAPS but was able to test-drive the CamAPS FX. He saw no TIR change to DIYAPS (which pleased him) and thought the learning curve was easy – but he had to learn the system and let it learn him. He experienced ‘too much’ hypoglycemia (~7% <70mg/dL, 2x his previous), and found it challenging to not have visibility of IOB. He also found the in-app CGM alarms annoying. He noted the system may work better for people with regular routines.
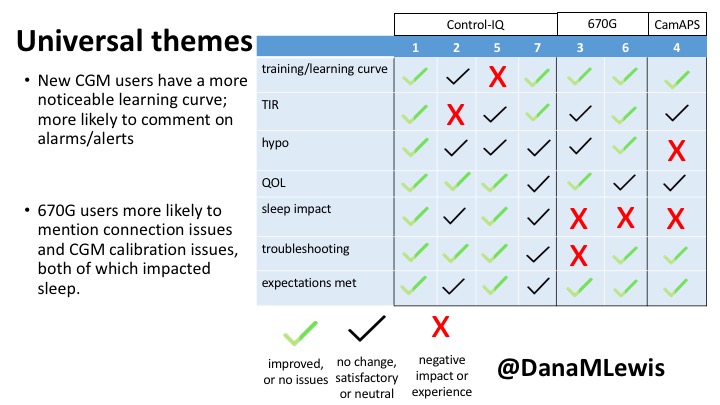


Recent Comments