How To Dose Pancreatic Enzyme Replacement Therapy (PERT) By What You Are Eating – And A Free Web Calculator To Calculate Enzyme Dosing

PS – check out PERT Pilot, the first iOS app for Exocrine Pancreatic Insufficiency! It’s an iOS app that allows you to record as many meals as you want, the PERT dosing and outcomes, to help you visualize and review more of your PERT dosing data!

I’ve had exocrine pancreatic insufficiency (known as EPI or PEI) for a year now. I have had type 1 diabetes for 20+ years and am experienced in adjusting my medication (previously insulin) in response to everything that I eat or drink.

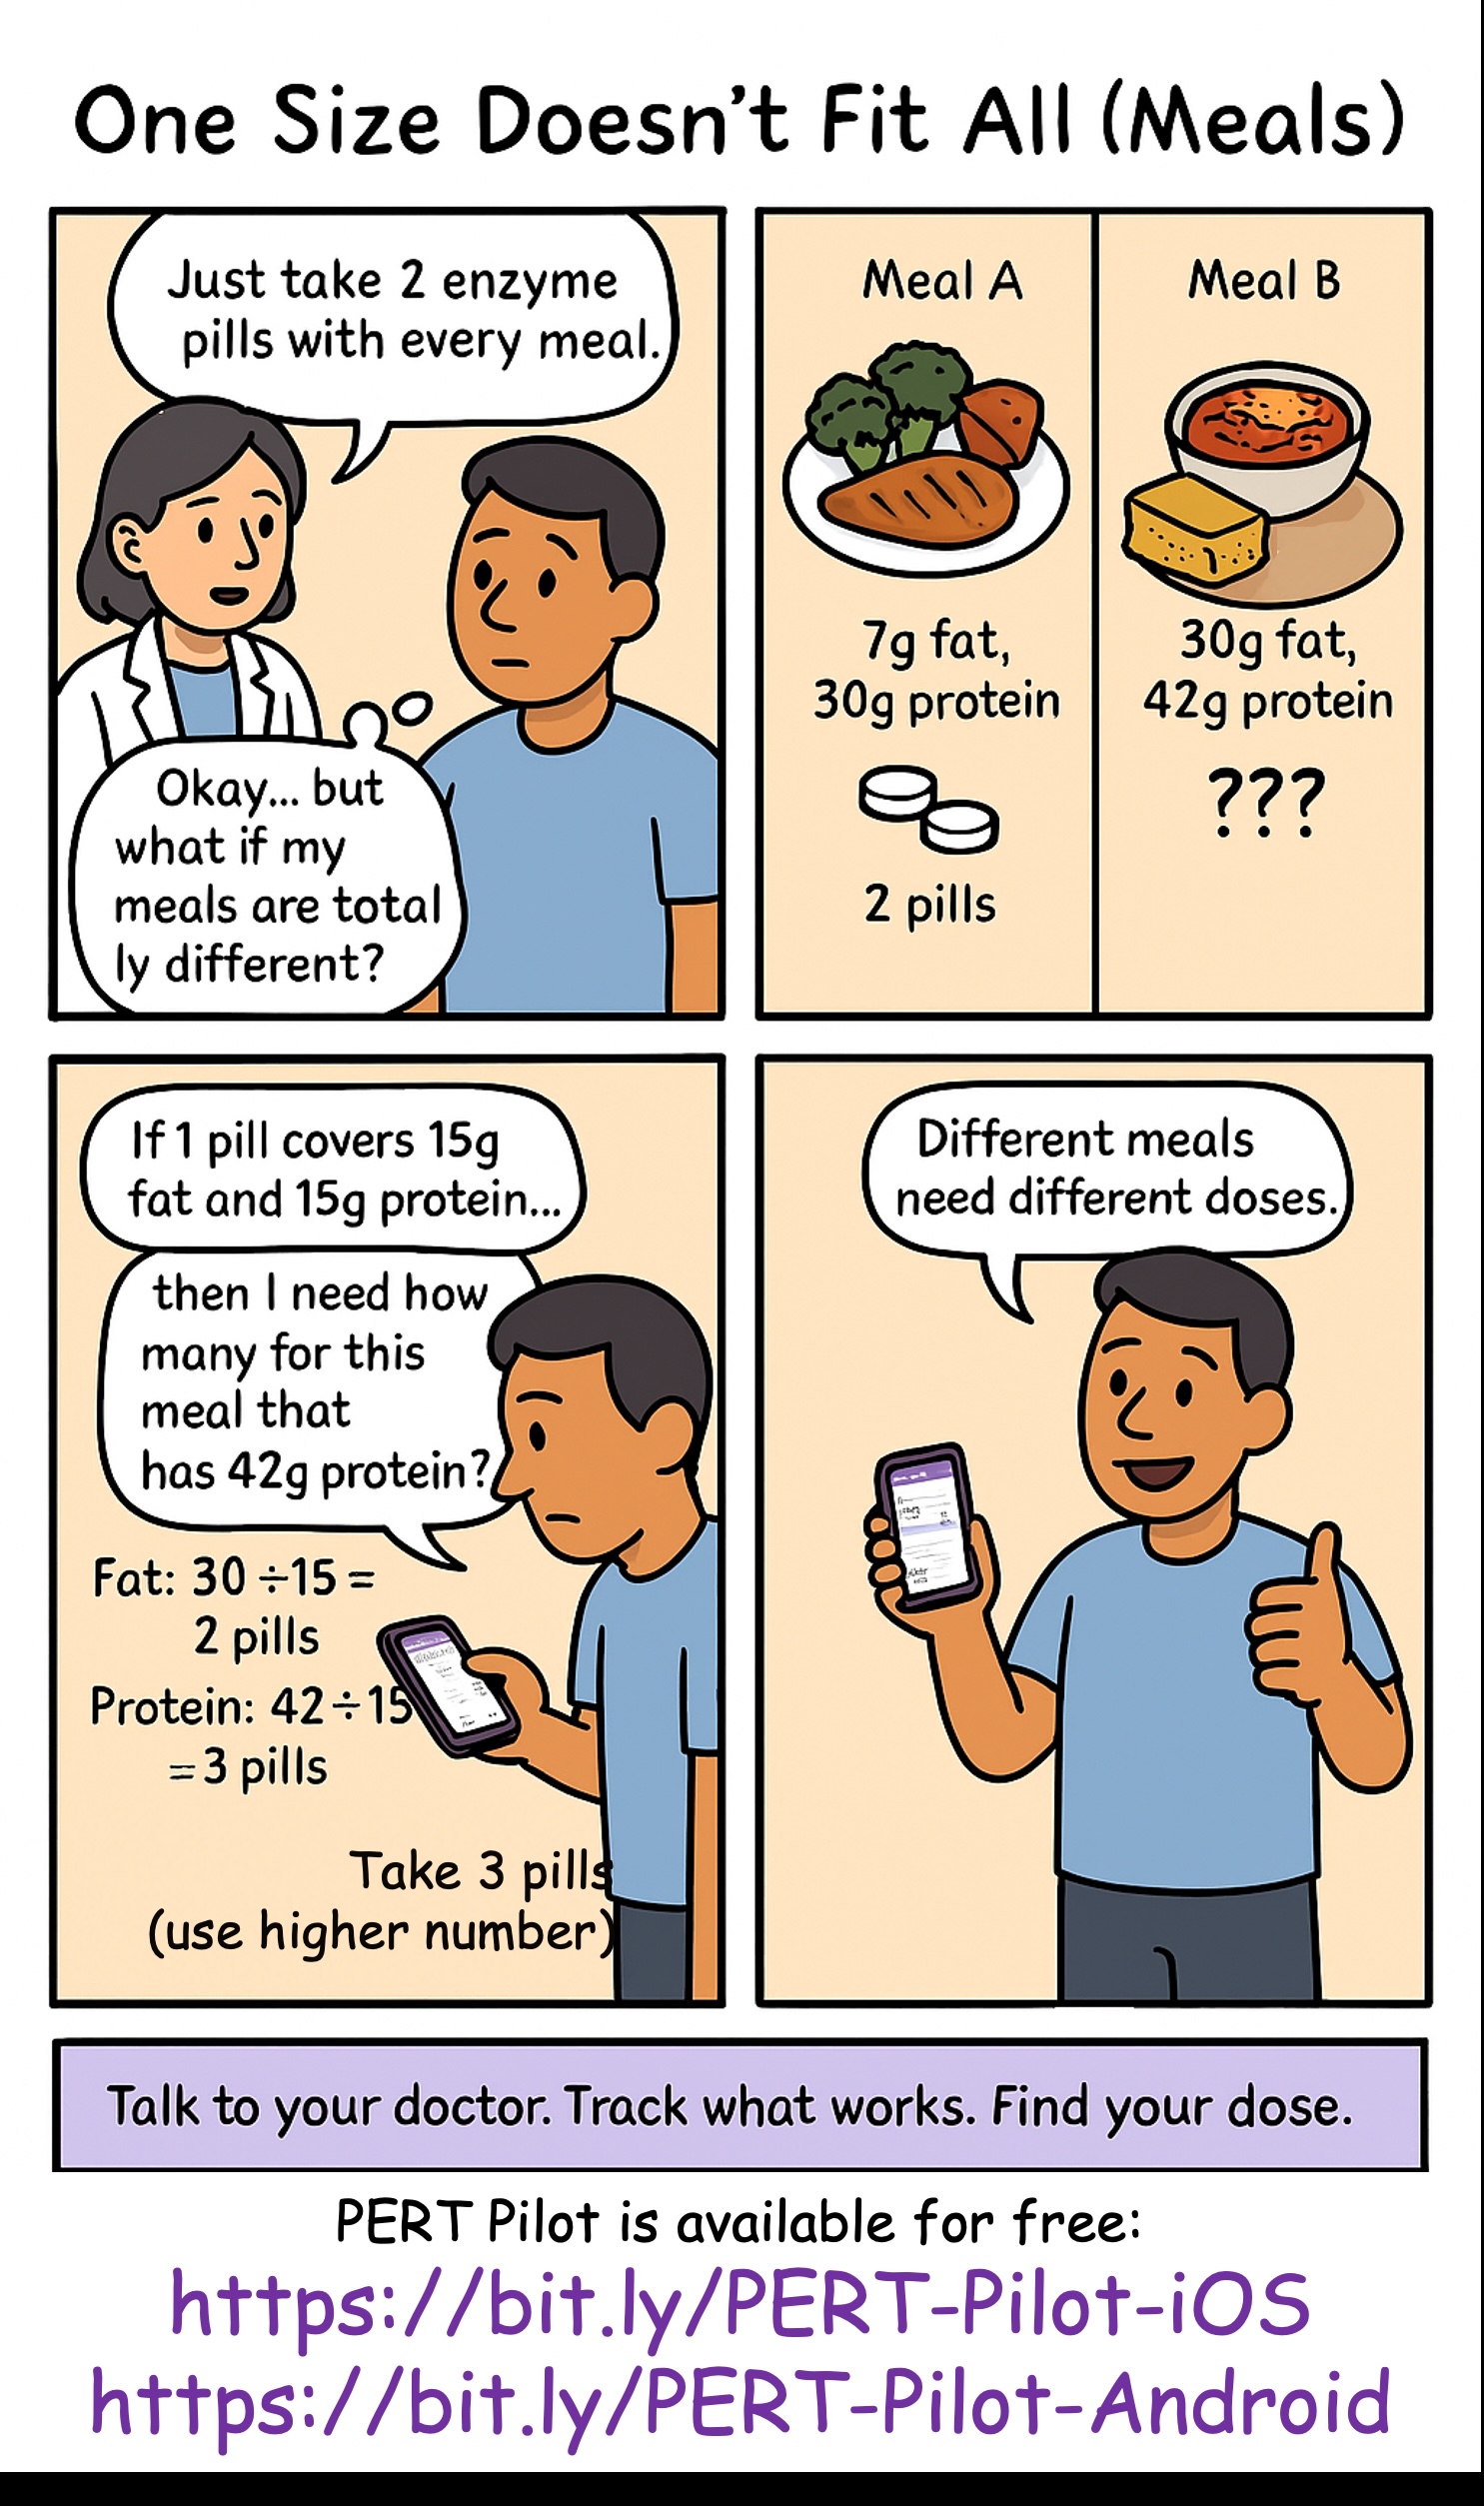
With EPI, though, most people are given a static prescription, such as one saying “take 3 pills with each meal”.

Well, what if every meal is not the same size?

Let’s think about a couple of hypothetical meals.

Meal A: Baked chicken, sweet potato, and broccoli. This meal likely results in ~31 grams of carbohydrates; 7 grams of fat; and ~30 grams of protein.

How would you dose for this meal? Most people do what they are told and dose based on the fat content of the meal. If they typically take 3 pills, they may take all 3 pills or take fewer pills if this is less fat than their typical meal.

Many people post in EPI social media groups post about restaurant dinners that sound like this complaining about side effects they experience with this type of meal. The commonly mentioned theory is that maybe the chicken is cooked in oil. However, the entire meal is so low in fat compared to other meals that it is unlikely to be the fat content causing symptoms if the typical meal dose of PERT is used, even if the chicken is cooked in oil.

Let’s discuss another meal.

Meal B: A bowl of chili topped with cheddar cheese and a piece of cornbread.

This meal results in ~45 grams of carbs; ~30 grams of fat; and ~42 grams of protein.

The fat content between these two meals is quite a bit different (7 grams of fat versus 30 grams of fat). Yet, again, most people are told simply to dose by the amount of fat, so someone might take a lower dose for the chicken meal because it has so little fat relative to other meals.

This could result in symptoms, though. The pancreas actually produces THREE kinds of enzymes. That’s why pancreatic enzyme replacement therapy medicine, called pancrelipase as a common name, has THREE types of enzymes: lipase, to help digest fat; protease, to help digest protein; and amylase, to help digest carbohydrates. A typical PERT pill has different amounts of these three enzymes, although it is usually described by the size/quantity of lipase it has – yet the other enzymes still play an important role in digestion.

I’ve observed that it’s pretty common for people to completely ignore the protein in what they’re eating. But as I mentioned, that seems to be the most obvious thing to try dosing for if “low fat” meals are causing issues. (It could also be sensitivity to carbohydrates, but the above example meal is fairly low carbohydrate.) My personal experience has also been that I am sensitive to fat and protein, and dose my meals based on these macronutrients, but other than eating fruit on an empty stomach (when I would add PERT/enzyme, despite the zero fat and protein in it), I don’t need to dose based on carbohydrates.

But I do need to dose for BOTH fat AND protein in what I’m eating. And I have a theory that a lot of other people with EPI do, too.

So how do you do this?

How do you dose for meals of different sizes, and take into account both fat and protein for these varying meals?

First, you need to figure out what dosing “works” for you and begin to estimate some “ratios” that you can use.

Most people begin experimenting and find a quantity of food that they can eat with the dose that they typically take. This meal size is going to vary person to person; it’ll also vary based on what it is in the meal they’re eating (such as chicken vs chili, from the above examples).

Once you find a dose that “works” and try it out a few times on the same meal, you can use this to determine what your ratios/dosing should be.

How?

Let’s use two examples with different dose sizes and types of PERT.

(PS – did you know there are 6 FDA-approved PERT brands in the US? Sometimes one works for someone where a different brand does not. If you’re struggling with the first type of PERT you’ve been prescribed, and you’ve already ruled out that you’re dosing correctly (see below), make sure to talk to your doctor and ask about trying a different brand.)

First, let’s calculate the ratios of lipase needed per gram of fat.

Let’s say the meal that “works” with your typical dose is 30 grams of fat. If 30 grams of fat is fine on your current dose, I would eat another meal with a slightly higher amount of fat (such as 35 or 40 grams of fat). When you get to an amount that “doesn’t work” – meaning you get symptoms – then you go back to the dose that does “work” to use in the math.

If the meal that “worked” was 30 grams of fat I would do the following math for each of these two examples:

Example A: You need 1 pill of Zenpep 25,000 to cover this meal

Example B: You need 3 pills of Creon 36,000 to cover this meal

Example A: 1 pill of Zenpep 25,000 is 1 multiplied by 25,000, or 25,000 units of lipase. Take that (25,000) and divide it by the grams of fat in the meal that works (30 grams). This would be 25,000/30 = 833. This means you need 833 units of lipase to “cover” 1 gram of fat. You can round up to ~1000 units of lipase to make it easier; your ratio would be 1000 units of lipase for every 1 gram of fat.

Example B: 3 pills of Creon 36,000 is 3 multiplied by 36,000, which is 108,000 units of lipase. Take that number (108,000) and divide it by the grams of fat in the meal that works (30 grams). This would be 108,000/30 = 3,600. This means you need 3,600 units of lipase to “cover” 1 gram of fat.

The next time you wanted to eat a meal, you would look at the grams of fat in a meal.

Let’s say you’re going to eat two bowls of chili and two pieces of cornbread. Let’s assume that is about 64 grams of fat. (Two bowls of chili and two cornbread is 30×2=60, plus a bit of butter for the cornbread so we’re calling it 64 grams of fat).

Example A: Take the meal and multiply it by your ratio. 64 (grams of fat) x 1,000 (how many units of lipase you need to cover 1 grant of fat) = 64,000. A Zenpep 25,000 has 25,000 lipase. Since you need 64,000 (units of lipase needed to cover the meal), you would divide it by your pill/dose size of 25,000. 64,000 divided by 25,000 is 2.56. That means for these ratios and a prescription of Zenpep 25,000 pill size, you need *3* Zenpep 25,000 to cover a meal of 64g of fat. (Remember, you can’t cut a PERT, so you have to round up to the next pill size.)

Example B: Take the meal and multiply it by your ratio. 64 (grams of fat) times 3,600 (how many units of lipase you need to cover 1 grant of fat) = 230,400. A Creon 36,000 has 36,000 lipase. Since you need 230,400 units of lipase to cover the meal, you would divide it by your pill/dose size of 36,000. 230,400 divided by 36,000 is 6.4. This means you need *7* Creon 36,000 to cover a meal of 64g of fat. (Again, you can’t cut a PERT, so you have to round up to 7 from 6.4.)

Another way to think about this and make it easier in the future is to determine how much one pill “covers”.

Example A: A Zenpep 25,000 “covers” 25 grams of fat if my ratio is 1000 units of lipase for every gram of fat (25,000/1000=25).

So if a meal is under 25g of fat? 1 pill. A meal under 50g (25×2)? 2 pills. 75g (25×3)? 3 pills. And so on. Once you know what a pill “covers”, it’s a little easier; you can simply assess whether a meal is above/below your pill size of 1 (25g), 2 (50g), 3 (75g) etc.

Example B: A Creon 36,000 “covers” 10 grams of fat if my ratio is 3,600 units of lipase for every gram of fat (36,000/3600=10).

So if a meal is under 10 grams of fat? 1 pill. 20 grams of fat is 2 pills (10×2); 30 grams of fat is 3 pills (10×3); etc.

When people with EPI share experiences online, they often describe their dose size (such as 1 x 25,000 or 3 x 36,000 like examples A and B above) for most meals, but the meal size and composition is rarely discussed.

Personally, I can eat pretty widely varying amounts of fat in each meal on a day to day basis.

That’s why, instead of a flat dosing that works for everything (because I would be taking a LOT of pills at every meal if I was trying to take enough to cover my highest fat meals every time), I have found it to be more effective to estimate each meal to determine my meal dosing.

Remember that meal estimates aren’t very precise. If you use a nutrition panel on a box serving, the serving size can vary a bit. Restaurants (especially chains) have nutrition information, but the serving size can vary. So recognize that if you are calculating or estimating 59 grams of fat and that means either 2 vs 3 pills or 6 vs 7 pills, that you should use your judgment on whether you want to round up to the next pill number – or not.

Let’s put the hypothetical meals side by side and compare dosing with examples A and B from above:

Example of how much PERT is needed for two different meals based on dose ratios from Examples A and B

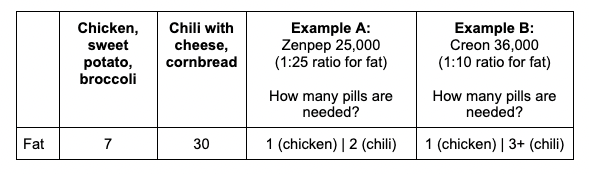
Using the previous meal examples with either 7 or 30 grams of fat:

  • With Example A (ratio of 25g of fat for every 1 pill, or 1000 units of lipase to cover 1 gram of fat), we would need 1 pill for the chicken meal and 2 for the chili meal. Why? The chili is >25 grams of fat which means we need to round up to 2 pills.
  • With Example B (ratio of 10 grams of fat for every 1 pill or 3600 units of lipase to cover 1 gram of fat), we would need 1 pill to cover the chicken (because it’s less than 10 grams of fat) and 3 – or more – pills for the chili. Why “or more”? Well, something like chili is likely to be imprecisely counted – and if you’re like me, you’d want a bit of extra cheese, so chances are I would round up to a 4th pill here to take in the imprecision of the measurements of the ingredients.

PERT Dosing for Protein

Wait, didn’t you say something about protein?

Yes, I did. Fat isn’t the only determinant in this math!

I do the same type of math with grams of protein and units of protease. (Remember, PERT has all 3 types of enzymes, even though it is labeled by the amount of lipase. You can look online or on the bottle label to see how much protease is in your PERT.)

For our examples, Zenpep 25,000 contains 85,000 units of protease. Creon 36,000 contains 114,000 units of protease.

For the meal that ‘worked’ of 30 grams of fat, we also want to know the protein that worked. For easy math, let’s also say 30 grams of protein is in this meal.

Following the same math as before:

Example A (Zenpep 25,000): 30 grams of protein divided by 1×85,000 units of protease is ~2,833 units of protease to every 1 gram of protein. Again, I like to think about how much 1 pill “covers” protein-wise. In this case, 1 Zenpep 25,000 “covers” 30 grams of protein.

Example B (Creon 36,000): 30 grams of protein divided into 3 x 114,000 units of protease is 11,400 units of protease per gram of protein. Again, I like to think about how much 1 pill “covers” protein-wise as well. In this case, 1 Creon 36,000 “covers” 10 grams of protein.

Here’s how many pills are needed for protein:

Example of how much PERT is needed for two different meals based on dose ratios from Examples A and B, showing both protein and fat quantities

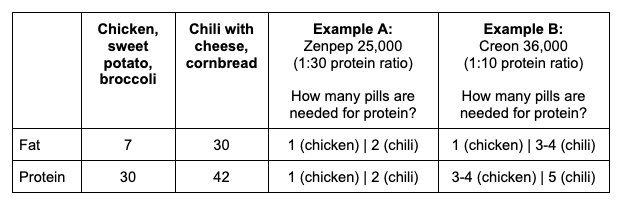
  • With Example A (ratio of 30g of protein for every 1 pill), we would need 1 pill for the chicken meal and 2 for the chili meal. Why? The chili is 42, which is greater than (30×1) grams of protein which means we need to round up to 2 pills.
  • With Example B (ratio of 10 grams of protein for every 1 pill), we would need 3 or more pills to cover the chicken. Why 3 or more? Again, it’s on the top edge of what 3 pills would cover, so I’d be likely to round up to 4 pills here. For the chili, 5 pills are needed (42 is more than 4 x 10 and is less than 5 x 10).

So how do you decide the number of pills to take for these meals? Let’s go back to our two example meals and compare the amount needed, pill-wise, for both fat and protein for each meal and each example.

Example of how much PERT is needed for two different meals based on dose ratios from Examples A and B and comparing the number of pills for fat and protein

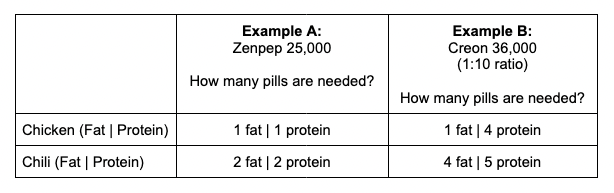
When the pill numbers MATCH (e.g. the same number needed for fat and protein), which is the case for both examples with Zenpep 25,000, it’s easy: take that number of pills total! For Zenpep 25,000, I would take 1 pill for the Chicken (1 fat | 1 protein); and I would take 2 pills for the Chili (2 fat | 2 protein). Remember that PERT pills contain all three enzymes, so the fat and protein are sufficiently *each* covered by the quantities of lipase and protease in this pill type.

When the pill numbers are DIFFERENT between your fat and protein estimates, you use the LARGER number of pills. For Creon 36,000, with the chicken meal the protein quantity is much larger than the fat quantity; I would in this case dose 4 total pills (1 fat | 4 protein), which would then cover the protein in this meal and would also sufficiently cover the amount of fat in this meal. For the chili meal, it is closer: I estimated needing 4 pills for fat and 5 for protein; in this case, I would take 5 total pills which would then successfully cover the protein and the fat in the meal.

If you find the math challenging to do, don’t worry: once you determine your ratios and figure out how much one pill “covers”, it gets a lot easier.

And I made a few tools to help you!

Check out this free enzyme calculator which does the math to determine the ratios on exactly how much one pill “covers” for your successful meal.

(The calculator is for entering one meal at a time, and doesn’t save them, but if you’d like AI to estimate what is in your meal and help you log and save multiple meals, check out PERT Pilot if you have an iPhone.)

Here’s what it looks like using the two examples above:

Example of Part 1 of the EPI Enzyme Calculator using Zenpep 25,000, where 1 pill covers 30 grams of fat and 30 grams of protein. Example of Part 1 of the EPI Enzyme Calculator using Creon 36,000, where 3 pills covers 30 grams of fat and 30 grams of protein.

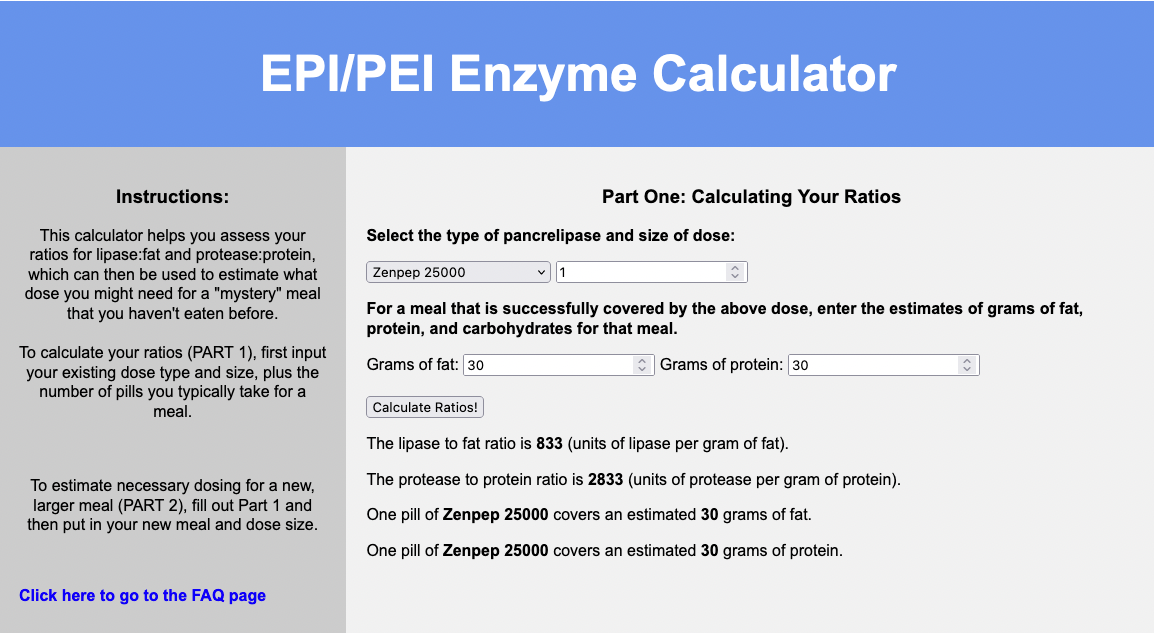
You can input your meal that “works”, what your dose is that “works” (the number of pills and pill type), and it will share what your ratios are and what one pill “covers”.

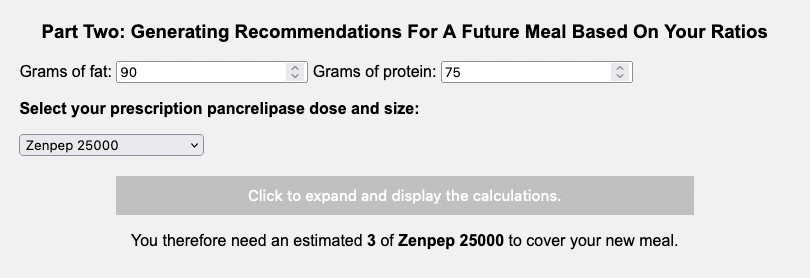
You can also use the second part of the calculator to estimate the amount you need for a future meal! Say it’s coming up on a holiday and you’re going to eat a much larger meal than you normally do.

You can input into the calculator that you’ll be eating 90 grams of fat and 75 grams of protein.

Here’s the example with our dose from Example A (Zenpep 25,000):

Example of Part 2 of the EPI Enzyme Calculator using Zenpep 25,000, with a future larger meal of 90 grams of fat and 75 grams of protein.

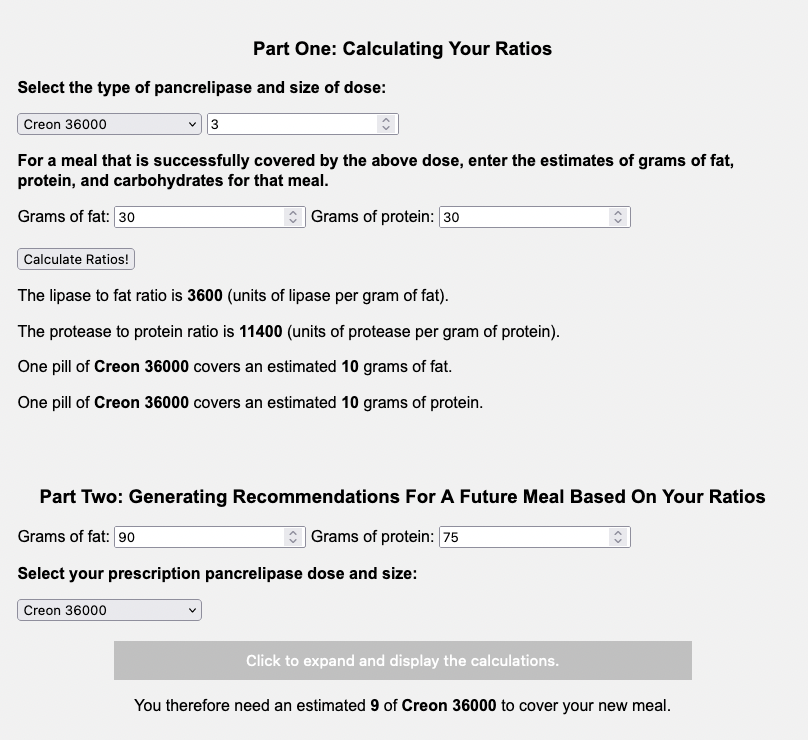
Here’s the example large meal with our dose from Example B (Creon 36,000):

Example of Part 2 of the EPI Enzyme Calculator using Creon 36,000, with a future larger meal of 90 grams of fat and 75 grams of protein.

You can also hit the button to expand the calculations to see the math it is doing, and how it compares between the fat and protein pill estimates to see what “drives” the total number of pills needed.

You can also hit the button to expand the calculations to see the math it is doing, and how it compares between the fat and protein pill estimates to see what “drives” the total number of pills needed, with the calculation view expanded to show all the details

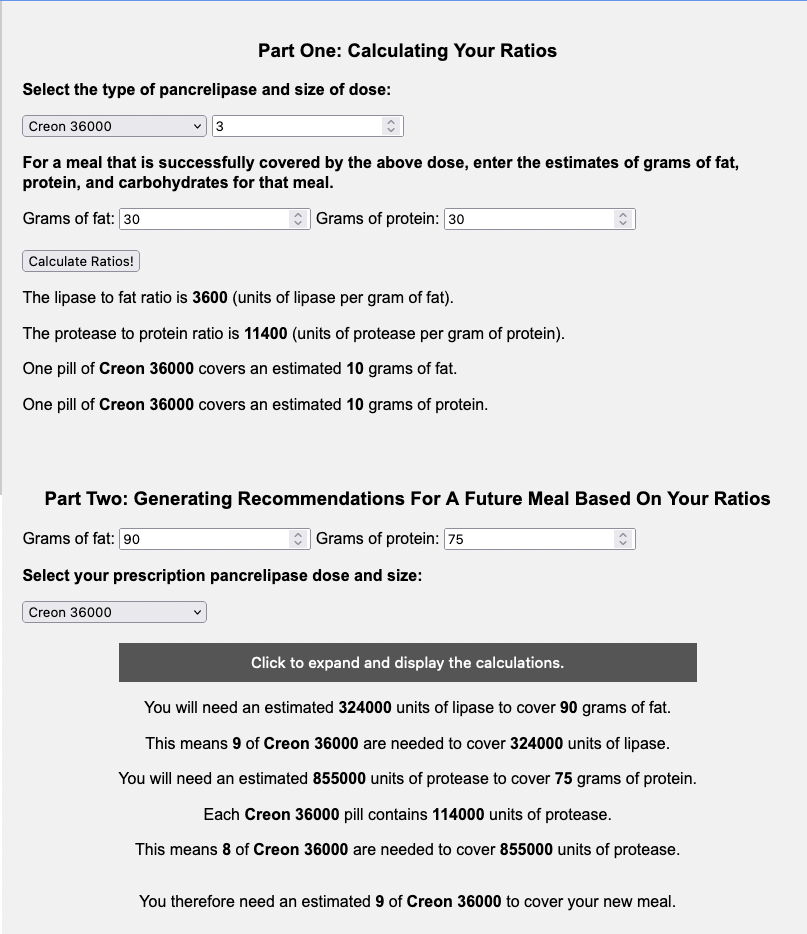
You can even download a PDF with this math to have on hand. Here’s what the PDF download looks like for Example B (Creon 36,000):

Example of a PDF print view of the same data from previous screenshots with a Creon 36000 example

Switching dose sizes or PERT brand types

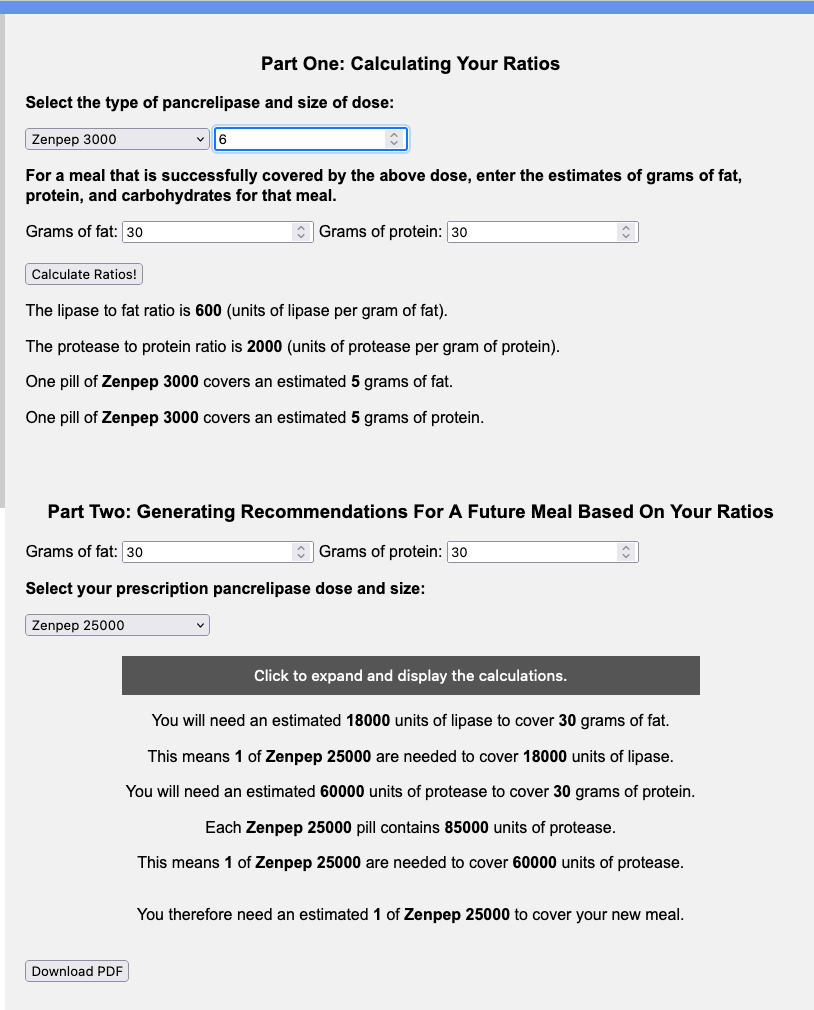
This calculator can also be useful if you were originally prescribed a smaller quantity of PERT (e.g. Creon 3000 or Zenpep 3000) and you find yourself taking many numbers of these pills (6 or more) to cover a small meal for you, let alone more pills for a larger meal.

You can input this into the calculator and get your ratios; then in the second part, identify a different pill size, to see how many numbers of pills you’d take on a different dose.

Example switching from one size of PERT pill to another size

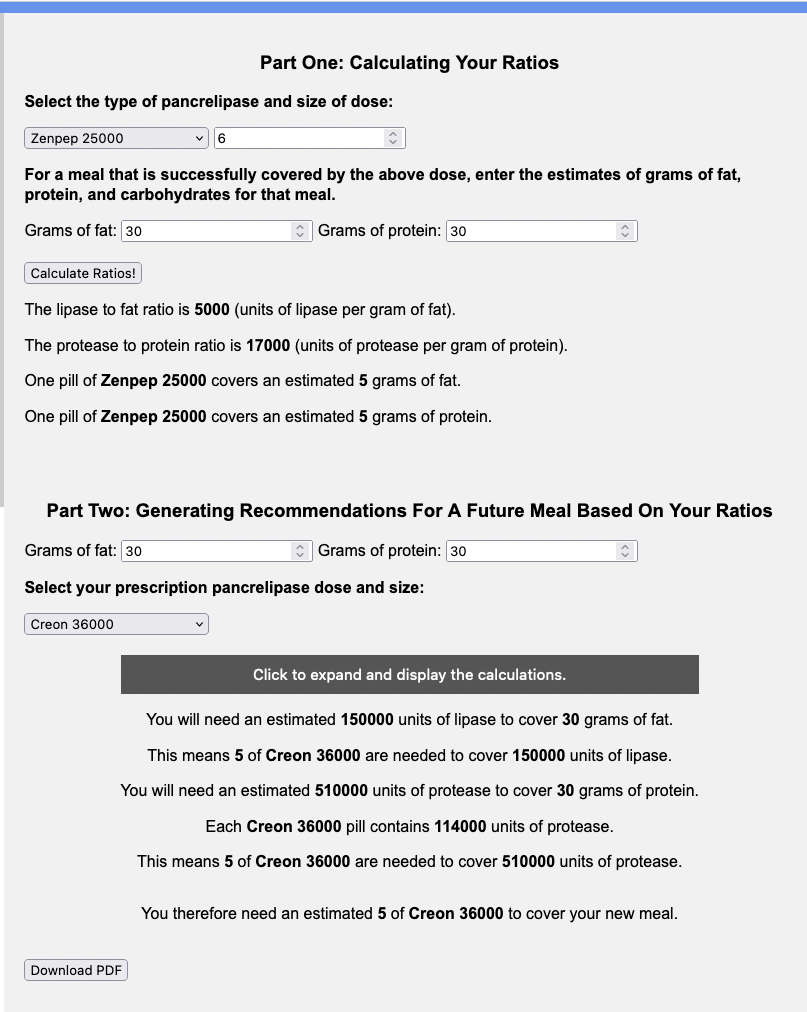
You can also use it to help you understand how much you might need if you are switching between brands. Let’s say you were prescribed Zenpep 25,000 and you need to try Creon, either because you don’t think Zenpep works well for you or your insurance is more willing to cover the Creon brand.

You would use the top part of the calculator with your current brand and size (e.g. Zenpep 25,000 of which you take 6 for a standard meal of 30 grams of fat and 30 grams of protein) and then input the new brand and size and the same size meal (e.g. Creon 36,000 and another 30 grams of fat and 30 grams of protein meal) to see that you’d likely need 5 Creon 36,000 to match the 6 Zenpep 25,000 you were taking for a standard size (30 gram of fat and 30 gram of protein) meal.

Example of using the calculator to estimate the different number of pills for a different brand and size of PERT pill

Note: I’m not suggesting 30 grams of fat and protein at each meal is “standard” or the “right” size of the meal – I picked arbitrary numbers here to illustrate these examples, so make sure to include the meal that your PERT dosing successfully covers for YOU!

As a reminder, I’m not a doctor – I’m a person living with EPI. None of this is medical advice. I use this math and this calculator for my own personal use and share it in case it’s helpful to others. If you have questions, please do talk to your doctor. If you’re still experiencing symptoms with your enzyme dosing, you definitely should talk with your doctor. Your prescription size might need updating compared to what you were originally prescribed.

Also, please note that the calculator is open source; you can find the code here, and I welcome contributions (pull requests) and suggestions! You can leave feedback on Github or share feedback in this form. For example, if you’re using a different type of enzyme not listed in the calculator (currently 2/6 of the US FDA-approved versions are listed), please let me know and I can work to add the relevant list.

PS – You can find my other posts about EPI at DIYPS.org/EPI, and you can also check out PERT Pilot, the first iOS app for Exocrine Pancreatic Insufficiency! It’s an iOS app that allows you to record as many meals as you want, the PERT dosing and outcomes, to help you visualize and review more of your PERT dosing data!


You can also contribute to a research study and help us learn more about EPI/PEI – take this anonymous survey to share your experiences with EPI-related symptoms!

More Tools To Help Diabetes Researchers and Other Researchers

A few years ago I made a big deal about a tool I had created, converting someone’s web tool into a command line tool to be able to take complex json data and convert it to csv. Years later, I (and thousands of others, it’s been downloaded 1600+ times!) am still using this tool because there’s nothing better that I’ve found when you have data that you don’t know the data structure for or the data structure varies across files.

I ended up creating a repository on Github to store it with details on running it, and have expanded it over the last (almost) six years as I and others have added additional tools. For example, it’s where Arsalan, one of my frequent collaborators, and I store open source code from some of our recent papers.

Recently, I added two more small scripts. This was motivated to help researchers who have been successfully using the OpenAPS Data Commons and want to update their dataset with a later version of the data. Chances are, they have cleaned and worked with a previous version of the dataset, and instead of having to re-clean all of the data all over again, this set of scripts should help narrow down what the “new” data is that needs to be pulled out, cleaned, and appended to a previously cleaned dataset.

You can check out the full tool repository here (it has several other scripts in addition to the ones mentioned above). The latest are two python scripts that checks the content of an existing folder and lists out the memberID and filenames for each. This is useful to run on an existing, already-cleaned dataset to see what you currently have. It can also be run on the latest/newest/bigger dataset available. Then, the second script can be run to compare the memberIDs and file names in the newer/biggest/larger dataset against the previously cleaned/smaller/older dataset. Those that “match” already exist in the version of the dataset they have; they don’t need to be pulled again. The others don’t exist in the current dataset, and can be popped into a script to pull out just those data files to then be cleaned and appended to the existing dataset.

As a heads up specifically for those working with the OpenAPS Data Commons, it is best practice to name/describe the version of the dataset via the size. For example, you might be working with the n=88 or n=122 version of the dataset. If you used the above method, you would then describe it along the lines of taking and cleaning the n=122 version; selecting new files available from the n=183 version and appending them to the n=122 version; and the resulting dataset is n=(122+number of new files used).

Folks who access the n=183 version of the dataset and haven’t previously used a smaller version of the dataset can reference using the n=183 and clarifying how many files they ended up using, e.g. describing that they followed X method to clean the data starting from the n=183 version and their resulting dataset is n=166, for example.

It is important to clarify which version and size of the dataset is being used.

PS – this method works on other data file types, too! You’d change the variable/column header names in the script to update this for other cases.

We Have Changed the Standards of Care for People With Diabetes

We’ve helped change the standard of care for people with diabetes, with open source automated insulin delivery.

I get citation alerts sometimes when my previous research papers or articles are cited. For the last few years, I get notifications when new consensus guidelines or research comes out that reference or include mention of open source automated insulin delivery (AID). At this time of year, the ADA Standards of Care is released for the following year, and I find out usually via these citation alerts.

Why?

This year, in 2023, there’s a section on open source automated insulin delivery!

A screenshot of the 2023 ADA Standards of Care section under Diabetes Technology (7) that lists DIY closed looping, meaning open source automated insulin delivery

But did you know, that’s not really new? Here’s what the 2022 version said:

A screenshot of the 2022 ADA Standards of Care section under Diabetes Technology (7) that lists DIY closed looping, meaning open source automated insulin delivery

And 2021 also included…

A screenshot of the 2021 ADA Standards of Care section under Diabetes Technology (7) that lists DIY closed looping, meaning open source automated insulin delivery

And 2020? Yup, it was there, too.

A screenshot of the 2020 ADA Standards of Care section under Diabetes Technology (7) that lists DIY closed looping, meaning open source automated insulin delivery

All the way back to 2019!

A screenshot of the 2019 ADA Standards of Care under Diabetes Technology (7) that lists DIY closed looping, meaning open source automated insulin delivery

If you read them in chronological order, you can see quite a shift.

In 2019, it was a single sentence noting their existence under a sub-heading of “Future Systems” under AID. In 2020, the content graduated to a full paragraph at the end of the AID section (that year just called “sensor-augmented pumps”). In 2021, it was the same paragraph under the AID section heading. 2022 was the year it graduated to having its own heading calling it out, with a specific evidence based recommendation! 2023 is basically the same as 2022.

So what does it say?

It points out patients are using open source AID (which they highlight as do-it-yourself closed loop systems). It sort of incorrectly suggests healthcare professionals can’t prescribe these systems (they can, actually – providers can prescribe all kinds of things that are off-label – there’s just not much point of a “prescription” unless it’s needed for a person’s elementary school (or similar) who has a policy to only support “prescribed” devices).

And then, most importantly, it points out that regardless, healthcare providers should assist in diabetes management and support patient choice to ensure the safety of people with diabetes. YAY!

“…it is crucial to keep people with diabetes safe if they are using these methods for automated insulin delivery. Part of this entails ensuring people have a backup plan in case of pump failure. Additionally, in most DIY systems, insulin doses are adjusted based on the pump settings for basal rates, carbohydrate ratios, correction doses, and insulin activity. Therefore, these settings can be evaluated and modified based on the individual’s insulin requirements.”

You’ll notice they call out having a backup plan in case of pump failure.

Well, yeah.

That should be true of *any* AID system or standalone insulin pump. This highlights that the needs of people using open source AID in terms of healthcare support are not that different from people choosing other types of diabetes therapies and technologies.

It is really meaningful that they are specifically calling out supporting people living with diabetes. Regardless of technology choices, people with diabetes should be supported by their healthcare providers. Full stop. This is highlighted and increasingly emphasized, thanks to the movement of individuals using open source automated insulin delivery. But the benefits of this is not limited to those of us using open source automated insulin delivery; this spills over and expands to people using different types of BG meters, CGM, insulin pumps, insulin pens, syringes, etc.

No matter their choice of tools or technologies, people with diabetes SHOULD be supported in THEIR choices. Not choices limited by healthcare providers, who might only suggest specific tools that they (healthcare providers) have been trained on or are familiar with – but the choices of the patient.

In future years, I expect the ADA Standard of Care for 2024 and beyond to evolve, in respect to the section on open source automated insulin delivery.

The evidence grading should increase from “E” (which stands for “Expert consensus or clinical experience”), because there is now a full randomized control trial in the New England Journal of Medicine on open source automated insulin delivery, in addition to the continuation results (24 weeks following the RCT; 48 full weeks of data) accepted for publication (presented at EASD 2022), and a myriad of other studies ranging from retrospective to prospective trials. The evidence is out there, so I expect that this evidence grading and the text of the recommendation text will evolve accordingly to catch up to the evidence that exists. (The standards of care are based on literature available up to the middle of the previous year; much of the things I’ve cited above came out in later 2022, so it matches the methodology to not be included until the following year; these newest articles should be scooped up by searches up to July 2023 for the 2024 edition.)

In the meantime, I wish more people with diabetes were aware of the Standards of Care and could use them in discussion with providers who may not be as happy with their choices. (That’s part of the reason I wrote this post!)

I also wish we patients didn’t have to be aware of this and don’t have to argue our cases for support of our choices from healthcare providers.

But hopefully over time, this paradigm of supporting patient choice will continue to grow in the culture of healthcare providers and truly become the standard of care for everyone, without any personal advocacy required.

Did you know? We helped change the standards of care for people living with diabetes. By Dana M. Lewis from DIYPS.org

Adding Lines On A Google Sheets Chart To Indicate Today’s Date And Other Dates

Filed under more micro hacks that I’ve been doing lately (see this script I wrote to flag embedded social media content so that I could switch it to an image instead), I have been building time series charts to track various things.

One thing I was doing was exporting the finished chart to an image, then manually adding a line to mark dates of interest on the chart.

Then I realized that I could insert lines automatically to reflect dates, without having to manually add it to the exported image.

How?

First, I added another column to my sheet. I created a value in that column on the date of interest (my date is in the adjacent column). For this particular chart, I had made the data points I was tracking by date as “1”, so to show a different size line I made the date of interest 1.2. I changed the min and max values to be 0.7 and 1.2, which means that the “1”s showed up in the middle of the graph and my “date” markers went the full height of the graph.

Here’s how the source data looks in my sheet:

Example of a spreadsheet with 4 columns. The first two columns have 1s as values to indicate tracking; the second column has a single 1.20 value shown next to a relevant date; the fourth column is a list of dates

Then, I expanded my chart to include the new line as a data source, and my chart then looked something like this:

Example of a generated chart with a date line displayed on top of the tracked data.

Because I am simply tracking the presence of things, I’ve hidden the left horizontal axis, because the value is not a meaningful data point and just an artifact of the numbers I’ve chosen to visualize the data on particular days. (Again, what’s displayed has a min of 0.7 and max of 1.2, so the blue and green lines have 1 values whereas the purple line I’m using to indicate a major date is a value of 1.2)

That’s a fixed date, though. I want to track data over time and be able to have the graph automatically update without me having to constantly expand the series of data the chart includes. I’d rather include a month or two of empty data in advance, and have today’s date flagged.

But that’s not a default feature, so how could I make this work? With a similar trick of graphing the date, but using a feature of Google Sheets where you can enter “=TODAY()” and have the cell fill with today’s value. It automatically updates, so it can therefore shift along my graph as long as I’ve gotten a sufficiently large selection of data past today’s date.

I struggled with having a single cell value selected, though, so I ended up creating another column. In this column, I had it check for what today’s date was (TODAY()) and compare it against the date in my existing date column. If the date matched today’s date, then it would display a 1.2 value. If it didn’t match, it would leave the cell blank. The full formula for this was:

=IF(TODAY()=D3,1.2, )

This checked if my date column (column D for me; make sure to update with the column letter that matches where your dates live) had today’s date and marked it if so.

It worked! Here’s how it looks – I’ve made the today’s date marker a different color (bright orange) than my other dates of interest (purple):

Example chart with the relevant date line shown and later, a date line (in a different color) distinguishing today's date. This chart will auto-update based on the method described in the full text of the blog post

This orange line will keep shifting to today’s date, so I can quickly glance at this chart and not have to be updating the data selection of the chart as often.

Troubleshooting tips:

I ran into a couple of errors. First, I had used quotes around the 1.2 value in my formula, which entered it as text so it wouldn’t graph the line on my chart. Removing the “” in the formula (correctly written above) changed it back to number formatting so it would graph. Also, I had selected a smaller portion of data for this chart, but then I grabbed the entire today’s date column, so the today’s-date line was incorrectly graphed at the far right of the graph rather than on today’s date. That was because of the size of data mismatch; I had something like A334-C360,G3:G360. Instead, I had to make sure the today’s-date checking column matched the size of the other data selection, meaning A334-C360,G334-360 (notice how the first G number is now updated to match the A starting number). So, if you see your value graphed in an unexpected place, check for that.

Other tricks

PS – I actually am getting my “1” values based on data from another tracking spreadsheet. I use a formula to check for the presence of cell values on another tab where I am simply marking with an ‘x’ or various other simple markers. I use another IF checking formula to see if the cell matching the date in the other tab has a value, and if so, printing that 1 value I illustrated in my source data.

The formula I use for that is:

=IF(OTHER-TAB-NAME!E3=””,,1)

It checks to see if the cell (E3) in the other tab for the same date row has a value. If so, it marks a 1 down and otherwise leaves it blank. That way I can create these rows of values for graphing and additional elements, like the today’s-date row, in another sheet without getting in the way of my actual tracking sheet.

Replacing Embedded Tweets With Images

If you’re like me, you may have been thrilled when (back in the day) it became possible to embed public social media posts such as tweets on websites and blogs. It enabled people who read here to pop over to related Twitter discussions or see images more easily.

However, with how things have been progressing (PS – you can find me @DanaMLewis@med-mastodon.com as well), it’s increasingly possible that a social media account could get suspended/banned/taken down arbitrarily for things that are retrospectively against new policies. It occurred to me that one of the downsides to this is the impact it would have on embedded post content here on my blog, so I started thinking through how I could replace the live embedded links with screenshots of the content.

There’s no automatic way to do this, but the most efficient method that I’ve decided on has been the following:

1 ) Export an XML file of your blog/site content.

If you use WordPress, there’s an “Export” option under “Tools”. You can export all content, it doesn’t matter.

2 ) Run a script (that I wrote with the help of ChatGPT).

I called my script “embedded-links.sh” and it searches the XML file for URLs found between “[ embed ]” and “[\embed]” and generates a CSV file. Opening the CSV with Excel, I can then see the list of every embedded tweet throughout the site.

I originally was going to have the script pair the embedded links (twitter URLs) to the post it was found within to make it easier to go swap them out with images, but realized I didn’t need this.

(See no. 4 for more on why not and the alternative).

3 ) I created screenshots with the URLs in my file.

I went through and pasted each URL (only about 60, thankfully) into https://htmlcsstoimage.com/examples/twitter-tweet-screenshot’s example HTML code and then clicked “re-generate image” in the top right corner under the image tab. Then, I right-clicked the image and chose “Save As” and saved it to a folder. I made sure to rename the image file as I saved it each time descriptively; this is handy for the next step.

I did hit the free demo limit on that tool after about 30 images, and I had 60, so after about 20 minutes I went back and checked and was able to do my second batch of tweets.

(There are several types of these screenshot generators you could use, this one happened to be quick and easy for my use case.)

4 ) I then opened up my blog and grabbed the first link and pasted it into the search box on the Posts page.

It pulled up the list of blog posts that had that URL.

I opened the blog post, scrolled to the embedded tweet, deleted it, and replaced it with the image instead.

(Remember to write alt text for your image during this step!)

Remember to ‘update’/save your post, too, after you input the image.

It took maybe half an hour to do the final step, and maybe 2-3 hours total including all the time I spent working on the script in number 2, so if you have a similar ~60 or so links I would expect this to take ~1-2 focused hours.

Replacing embedded web content with images by Dana M. Lewis

Dealing With And Avoiding Chronic Disease Management Burnout

I’ve been thinking about juggling lately, especially as this year I’ve had to add a series of new habits and behaviors and medications to manage not one but two new chronic diseases. Getting one new chronic disease is hard; getting another is hard; and the challenges aren’t necessarily linear or exponential, and they’re not necessarily obvious up front.

But sometimes the challenges do compound over time.

In January when I started taking pancreatic enzyme replacement therapy (PERT) for exocrine pancreatic insufficiency (EPI or PEI), I had to teach myself to remember to take enzymes at every meal. Not just some time around the meal, but 100% every time before (by only a few minutes) or right at the start of the meal. With PERT, the timing matters for efficacy. I have a fast/short feedback loop – if I mis-time my enzymes or don’t take them, I get varying symptoms within a few hours that then bother me for the rest of the day, overnight, and into the next morning. So I’m very incentivized to take the enzymes and time them effectively when I eat. However, as I started to travel (my first trip out of the country since the pandemic started), I was nervous about trying to adapt to travel and being out of my routine at home where I’ve placed enzymes in visible eye sight of every location where I might consume food. Thankfully, that all went well and I managed not to forget taking enzymes when I ate and all was well. But I know I’m still building the habit of taking enzymes and eating, and that involves both always having enzymes with me and remembering to get them out and take them. It sounds like a trivial amount of things to remember, but this is added on top of everything else I’m doing for managing my health and well-being.

This includes other “simple” things like taking my allergy medications – because I’m allergic to cats (and we have them!), trees, dust, etc. And vitamins (I’m vitamin D deficient when I don’t take vitamin D).

And brushing my teeth and flossing.

You do that too, right? Or maybe you’re one of those people who struggle to remember to floss. It’s normal.

The list of well-being management gets kind of long when you think about all the every day activities and habits you have to help you stay at your best possible health.

Eat healthy! (You do that, right? 😉 )

Hydrate!

Exercise!

Etc.

I’ve also got the background habits of 20 years of living with diabetes: keeping my pump sites on my body; refilling the reservoir and changing the pump site every few days; making sure the insulin doesn’t get too hot or cold; making sure my CGM data isn’t too noisy; changing my CGM sensor when needed; estimating ballpark carbs and entering them and/or temporary targets to indicate exercise into my open source AID; keeping my AID powered; keeping my pump powered; keeping my phone – which has my CGM visibility on it – powered and nearby. Ordering supplies – batteries and pump sites and reservoirs and CGM transmitters and CGM sensors and insulin and glucagon.

Some of these are daily or every few days tasks; others are once or twice a month or every three months.

Those stack up sometimes where I need to refill a reservoir and oops, get another bottle of insulin out of the fridge which reminds me to make a note to check on my shipment of insulin which hasn’t arrived yet. I also need to change my pump site and my CGM sensor is expiring at bedtime so I need to also go ahead and change it so the CGM warmup period will be done by the time I go to sleep. I want to refill my reservoir and change the pump site after dinner since the dinner insulin is more effective on the existing site; I think of this as I pull my enzymes out to swallow as I start eating. I’ll do the CGM insertion when I do my pump site change. But the CGM warmup period is then in the after-dinner timeframe so I then have to keep an eye on things manually because my AID can’t function without CGM data so 2 hours (or more) of warmup means extra manual diabetes attention. While I’m doing that, I also need to remember to take my allergy medication and vitamin D, plus remembering to take my new thyroid medication at bedtime.

Any given day, that set of overlapping scenarios may be totally fine, and I don’t think anything of them.

On other days, where I might be stressed or overwhelmed by something else – even if it’s not health-related – that can make the above scenario feel overwhelmingly difficult.

One of the strategies I discussed in a previous post relative to planning travel or busy periods like holidays is trying to separate tasks in advance (like pre-filling a reservoir), so the action tasks (inserting a pump site and hooking it up to a new reservoir) don’t take as long. That works well, if you know the busy period is coming.

But sometimes you don’t have awareness of a forthcoming busy period and life happens. Or it’s not necessarily busy, per se, but you start to get overwhelmed and stressed and that leaks over into the necessary care and feeding of medical stuff, like managing pump sites and reservoirs and sensors and medication.

You might start negotiating with yourself: “do I really need to change that pump site today? It can wait until tomorrow”. Or you might wait until your reservoir actually hits the ‘0’ level (which isn’t fully 0; there’s a few units plus or minus some bubbles left) to refill it. Or other things like that, whether it’s not entering carbs into your pump or AID or not bolusing. Depending on your system/setup, those things may not be a big deal. And for a day or two, they’re likely not a big deal overall.

But falling into the rut of these becoming the new normal is not optimal – that’s burnout, and I try to avoid getting there.

When I start to have some of those thought patterns and recognize that I have begun negotiating with myself, I try to voice how I’m feeling to myself and my spouse or family or friends. I tell them I’m starting to feel “crispy” (around the edges) – indicating I’m not fully burnt out, but I could get all the way to burnout if I don’t temporarily change some things. (Or permanently, but often for me temporary shifts are effective.)

One of the first things I do is think through what is the bare minimum necessary care I need to take. I go above and beyond and optimize a LOT of things to get above-target outcomes in most areas. While I like to do those things, they’re not necessary. So I think through the list of necessary things, like: keeping a working pump site on my body; keeping insulin in a reservoir attached to my pump; keeping my CGM sensor working; and keeping my AID powered and nearby.

That then leaves a pile of tasks to consider:

  1. Not doing at all for ___ period of time
  2. Not doing myself but asking someone else to do for ____ period of time

And then I either ask or accept the offers of help I get to do some of those things.

When I was in high school and college, I would have weekends where I would ask my parents to help. They would take on the task of carb counting (or estimating) so I didn’t have to. (They also did HEAPS of work for years while I was on their insurance to order and keep supplies in the house and wrangle with insurance so I didn’t have to – that was huge background help that I greatly appreciated.)

Nowadays, there are still things I can and do get other people to help with. Sometimes it’s listening to me vent (with a clear warning that I’m just venting and don’t need suggestions); my parents often still fill that role for me! Since I’m now married and no longer living alone, Scott offers a lot of support especially during those times. Sometimes he fills reservoirs for me, or more often will bring me supplies from the cabinet or fridge to wherever I’m sitting (or even in bed so I don’t have to get up to go change my site). Or he’ll help evaluate and determine that something can wait until a later time to do (e.g. change pump site at another time). Sometimes I get him to open boxes for me and we re-organize how my supplies are to make them easier to grab and go.

Those are diabetes-specific examples, but I’ve also written about how helpful additional help can be sometimes for EPI too, especially with weighing and estimating macronutrient counts so I can figure out my PERT dosing. Or making food once I’ve decided what I want to eat, again so I can separate deciding what to eat and what the counts/dosing is from the action tasks of preparing or cooking the food.

For celiac, one of the biggest changes that has helped was Scott asking family members to load the “Find Me Gluten Free” app on their phone. That way, if we were going out to eat or finding a takeout option, instead of everyone ALWAYS turning to me and saying “what are the gluten free options?”, they could occasionally also skim the app to see what some of the obvious choices were, so I wasn’t always having to drive the family decision making on where to eat.

If you don’t have a chronic illness (or multiple chronic illnesses), these might not sound like a big deal. If you do (even if you have a different set of chronic disease(s)), maybe you recognize some of this.

There are estimates that people with diabetes make hundreds of decisions and actions a day for managing living with diabetes. Multiply that times 20 years. Ditto for celiac, for identifying and preparing and guarding against cross-contamination of said gluten-free food – multiply that work every day times 14 years. And now a year’s worth of *every* time I consider eating anything to estimate (with reading nutrition labels or calculating combinations based on food labels or weighing and googling and estimating compared to other nutrition labels) how much enzymes to take and remembering to swallow the right number of pills at the optimal times. Plus the moral and financial weight of deciding how to balance efficacy with cost of these enzymes. Plus several months now of an additional life-critical medication.

It’s so much work.

It’s easy to get outright burnt out, and common to start to feel a little “crispy” around the edges at times.

If you find yourself in this position, know that it’s normal.

You’re doing a lot, and you’re doing a great job to keep yourself alive.

You can’t do 110% all the time, though, so it is ok to figure out what is the bare minimum and some days throughout the year, just do that, so you can go back to 110%-ing it (or 100%-ing) the other days.

With practice, you will increasingly be able to spot patterns of scenarios or times of the year when you typically get crispy, and maybe you can eventually figure out strategies to adapt in advance (see me over here pre-filling reservoirs ahead of Thanksgiving last week and planning when I’d change my pump site and planning exactly what I would eat for 3 days).

TLDR:

  • Living with chronic disease is hard. And the more diseases you have, the harder it can be.
  • If you live with or love someone with chronic disease(s), ask them if you can help. If they’re venting, ask if they want you to listen (valuable!) or to let you know if at any point they want help brainstorming or for you to provide suggestions (helpful *if* desired and requested).
  • If you’re the one living with chronic disease(s), consider asking for help, even with small things. Don’t let your own judgment (“I should be able to do this!”) get in your way of asking for help. Try it for a day or for a weekend.
Dealing with and avoiding chronic disease burnout by Dana M. Lewis