OpenAPS feature development in 2016

It’s been two years since my first DIY closed loop and almost two years since OpenAPS (the vision and resulting ecosystem to help make artificial pancreas technology, DIY or otherwise, more quickly available to more people living with diabetes) was created.  I’ve spent time here (on DIYPS.org) talking about a variety of things that are applicable to people who are DIY closed looping, but also focusing on things (like how to “soak” a CGM sensorr and how to do “eating soon” mode) that may be (in my opinion) universally applicable.

OpenAPS feature development in 2016

However, I think it’s worth recapping some of the amazing work that’s been done in the OpenAPS ecosystem over the past year, sometimes behind the scenes, because there are some key features and tools that have been added in that seem small, but are really impactful for people living with DIY closed loops.

  1. Advanced meal assist (aka AMA)
    1. This is an “advanced feature” that can be turned on by OpenAPS users, and, with reliable entry of carb information, will help the closed loop assist sooner with a post-meal BG rise where there is mis-timed or insufficient insulin coverage for the meal. It’s easy to use, because the PWD only has to put carbs and a bolus in – then AMA acts based on the observed absorption. This means that if absorption is delayed because you walk home from dinner, have gastroparesis, etc., it backs off and wait until the carbs actually start taking effect (even if it is later than the human would expect).
    2. We also now have the purple line predictions back in Nightscout to visualize some of these predictions. This is a hallmark of the original iob-cob branch in Nightscout that Scott and I originally created, that took my COB calculated by DIYPS and visualized the resulting BG graph. With AMA, there are actually 3 purple lines displayed when there is carb activity. As described here in the OpenAPS docs, the top purple line assumes 10 mg/dL/5m carb (0.6 mmol/L/5m) absorption and is most accurate right after eating before carb absorption ramps up. The line that is usually in the middle is based on current carb absorption trends and is generally the most accurate once carb absorption begins; and the bottom line assumes no carb absorption and reflects insulin only. Having the 3 lines is helpful for when you do something out of the ordinary following a meal (taking a walk; taking a shower; etc.) and helps a human decide if they need to do anything or if the loop will be able to handle the resulting impact of those decisions.
  2. The approach with a “preferences” file
    1. This is the file where people can adjust default safety and other parameters, like maxIOB which defaults to 0 during a standard setup, ultimately creating a low-glucose-suspend-mode closed loop when people are first setting up their closed loops. People have to intentionally change this setting to allow the system to high temp above a netIOB = 0 amount, which is an intended safety-first approach.
    2. One particular feature (“override_high_target_with_low”) makes it easier for secondary caregivers (like school nurses) to do conservative boluses at lunch/snack time, and allow the closed loop to pick up from there. The secondary caregiver can use the bolus wizard, which will correct down to the high end of the target; and setting this value in preferences to “true” allows the closed loop to target the low end of the target. Based on anecdotal reports from those using it, this feature sounds like it’s prevented a lot of (unintentional, diabetes is hard) overreacting by secondary caregivers when the closed loop can more easily deal with BG fluctuations. The same for “carbratio_adjustmentratio”, if parents would prefer for secondary caregivers to bolus with a more conservative carb ratio, this can be set so the closed loop ultimately uses the correct carb amount for any needed additional calculations.
  3. Autosensitivity
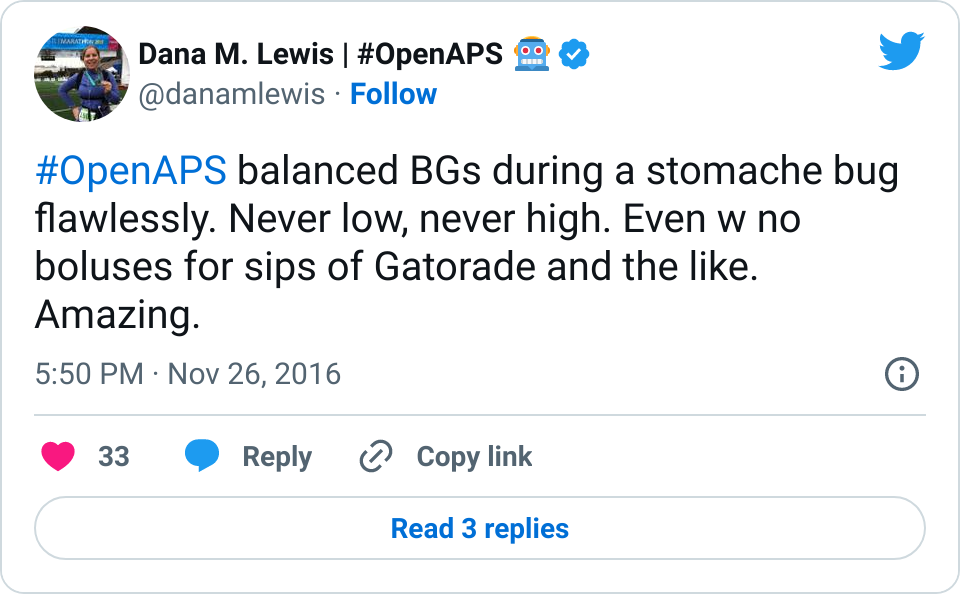
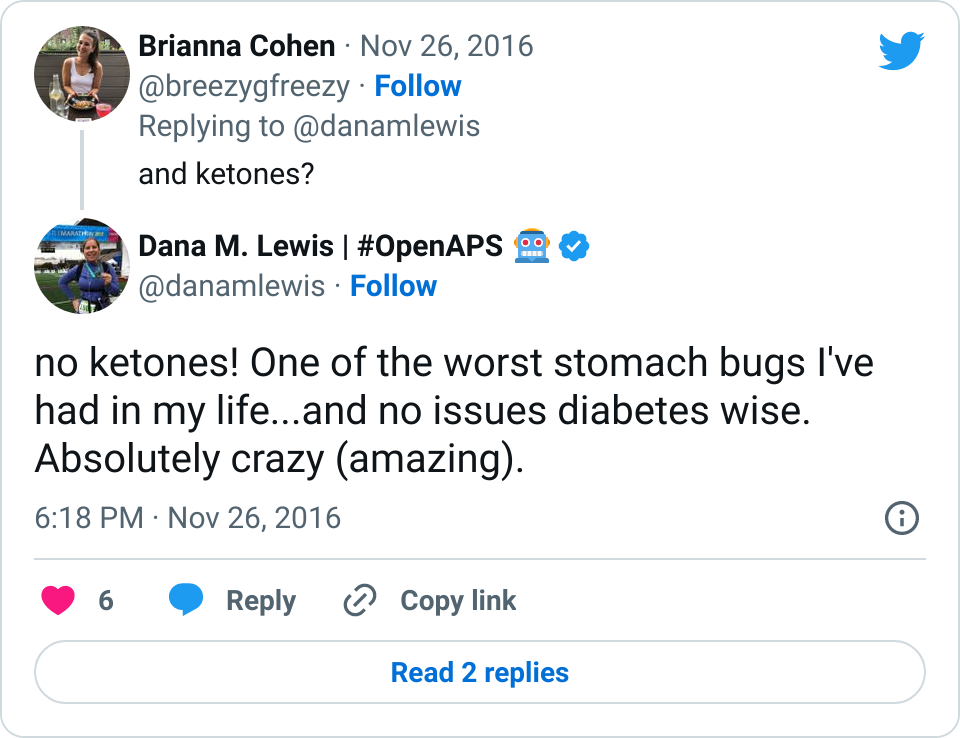
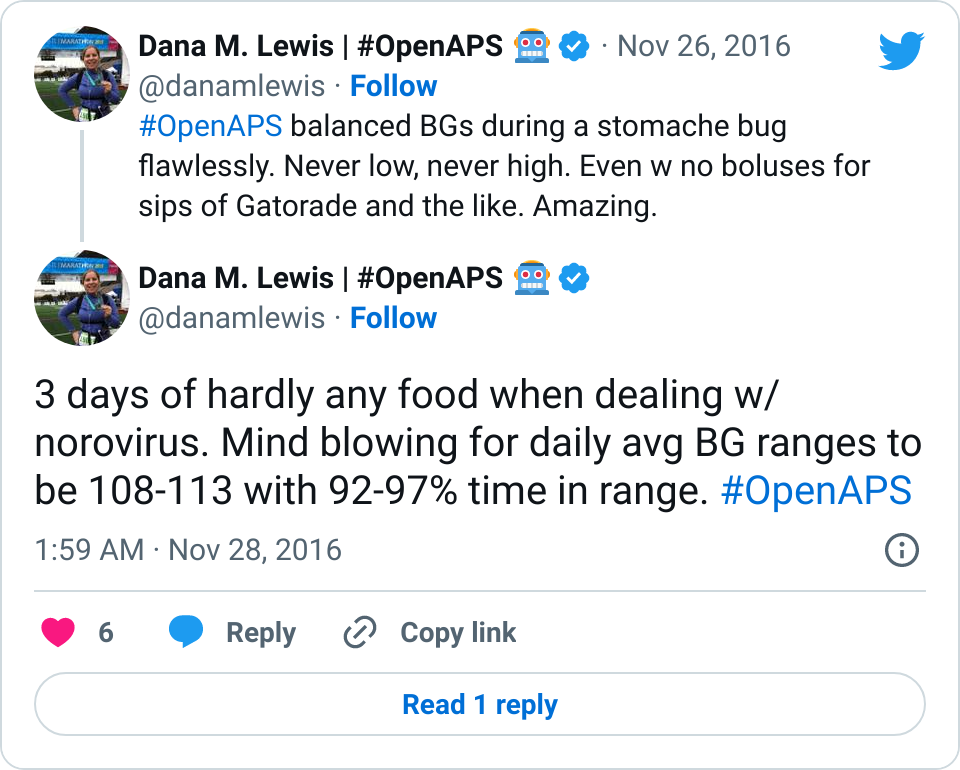
    1. I’ve written about autosensitivity before and how impressive it has been in the face of a norovirus and not eating to have the closed loop detect excessive sensitivity and be able to deal with it – resulting in 0 lows. It’s also helpful during other minor instances of sensitivity after a few active days; or resistance due to hormone cycles and/or an aging pump site.
    2. Autosens is a feature that has to be turned on specifically (like AMA) in order for people to utilize it, because it’s making adjustments to ISF and targets and looping accordingly from those values. It also have safety caps that are set and automatically included to limit the amount of adjustment in either direction that autosens can make to any of the parameters.
  4. Tiny rigs
    1. Thanks to Intel, we were introduced to a board designer who collaborated with the OpenAPS community and inspired the creation of the “Explorer Board”. It’s a multipurpose board that can be used for home automation and all kinds of things, and it’s another tool in the toolbox of off-the-shelf and commercial hardware that can be used in an OpenAPS setup. It’s enabled us, due to the built in radio stick, to be able to drastically reduce the size of an OpenAPS setup to about the size of two Chapsticks.
  5. Setup scripts
    1. As soon as we were working on the Explorer Board, I envisioned that it would be a game changer for increasing access for those who thought a Pi was too big/too burdensome for regular use with a DIY closed loop system. I knew we had a lot of work to do to continue to improve the setup process to cut down on the friction of the setup process – but balancing that with the fact that the DIY part of setting up a closed loop system was and still is incredibly important. We then worked to create the oref0-setup script to streamline the setup process. For anyone building a loop, you still have to set up your hardware and build a system, expressing intention in many places of what you want to do and how…but it’s cut down on a lot of friction and increased the amount of energy people have left, which can instead be focused on reading the code and understanding the underlying algorithm(s) and features that they are considering using.
  6. Streamlined documentation
    1. The OpenAPS “docs” are an incredible labor of love and a testament to dozens and dozens of people who have contributed by sharing their knowledge about hardware, software, and the process it takes to weave all of these tools together. It has gotten to be very long, but given the advent of the Explorer Board hardware and the setup scripts, we were able to drastically streamline the docs and make it a lot easier to go from phase 0 (get and setup hardware, depending on the kind of gear you have); to phase 1 (monitoring and visualizing tools, like Nightscout); to phase 2 (actually setup openaps tools and build your system); to phase 3 (starting with a low glucose suspend only system and how to tune targets and settings safely); to phase 4 (iterating and improving on your system with advanced features, if one so desires). The “old” documentation and manual tool descriptions are still in the docs, but 95% of people don’t need them.
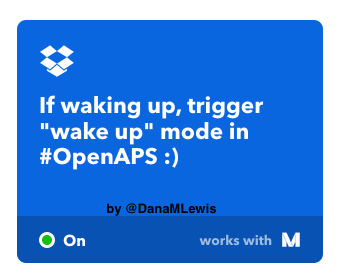
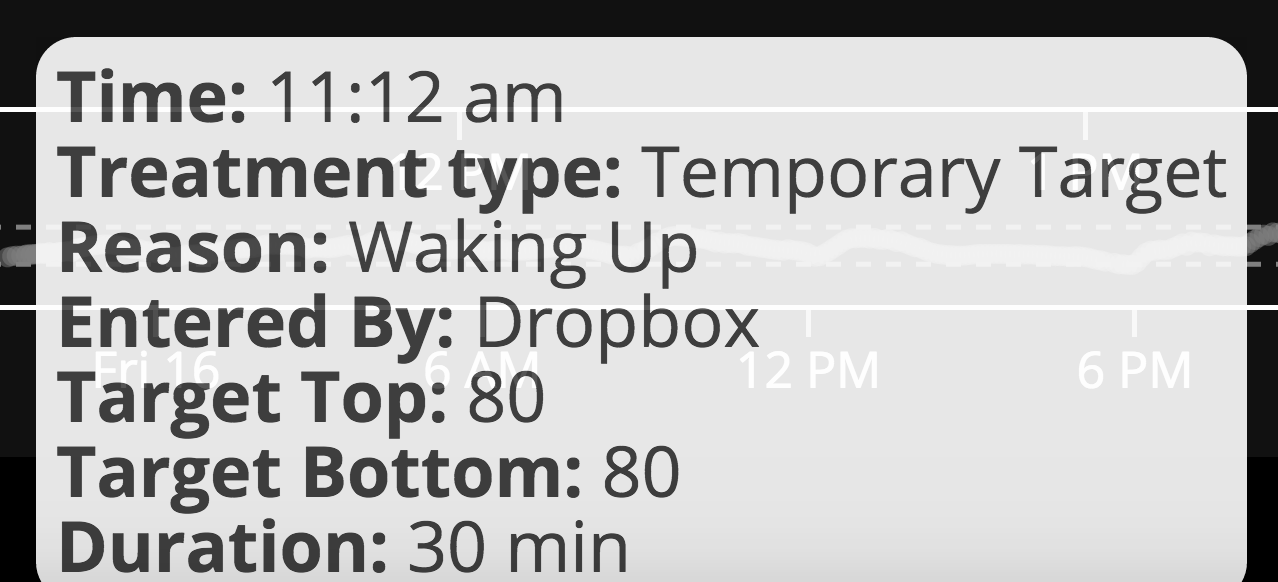
  7. IFTTT and other tool integrations
    1. It’s definitely worth calling out the integration with IFTTT that allows people to use things like Alexa, Siri, Pebble watches, Google Assistant (and just about anything else you can think of), to easily enter carbs or “modes” for OpenAPS to use, or to easily get information about the status of the system. (My personal favorite piece of this is my recent “hack” to automatically have OpenAPS trigger a “waking up” mode to combat hormone-driven BG increases that happen when I start moving around in the morning – but without having to remember to set the mode manually!)

..and that was all just things the community has done in 2016! :) There are some other exciting things that are in development and being tested right now by the community, and I look forward to sharing more as this advanced algorithm development continues.

Happy New Year, everyone!

Automating “wake up” mode with IFTTT and #OpenAPS to blunt morning hormonal rises

tl;dr – automate a trigger to your #OpenAPS rig to start “wake up” mode (or “eating soon”, assuming you eat breakfast) without you having to remember to do it.

Yesterday morning, I woke up and headed to my desk to start working. Because I’m getting some amazing flat line overnights now, thanks to my DIY closed loop (#OpenAPS), I’m more attuned to the fact that after I wake up and start moving around, my hormones kick in to help wake me up (I guess), and I have a small BG rise that’s not otherwise explained by anything else. (It’s not a baseline basal problem, because it happens after I wake up regardless of it being 6am or 8am or even 10:30am if I sleep in on a weekend. It’s also more pronounced when I feel sleep deprived, like my body is working even harder to wake me up.)

Later in the morning, I took a break to jot down my thoughts in response to a question about normal meal rises on #OpenAPS and strategies to optimize mealtimes. It occurred to me later, after being hyper attuned to my lunch results, that my morning wake-up rise up from 1oo perfectly flat to ~140 was higher than the 131 peak I hit after my lunchtime bowl of potato soup.

Hmm, I thought. I wish there was something I could do to help with those morning rises. I often do a temporary target down to 80 mg/dL (a la “eating soon” mode) once I spot the rise, but that’s after it’s already started and very dependent on me paying attention/noticing the rise.

I also have a widely varied schedule (and travel a lot), so I don’t like the idea of scheduling the temp target, or having recurring calendar events that is yet another thing to babysit and change constantly.

What I want is something that is automatically triggered when I wake up, so whether I pop out of the bed or read for 15 minutes first, it kicks in automatically and I (the non-morning person) don’t have to remember to do one more thing. And the best trigger that I could think of is when I end Sleep Cycle, the sleep tracking app I use.

I started looking online to see if there was an easy IFTTT integration with Sleep Cycle. (There’s not. Boo.) So I started looking to see if I could stick my Sleep Cycle data elsewhere that could be used with IFTTT. I stumbled across this blog post describing Sleep Cycle -> iOS Apple HealthKit -> UP -> Google Spreadsheet -> Zapier -> Add to Google Calendar. And then I thought I would add another IFTTT trigger for when the calendar entry was added, to then send “waking up” mode to #OpenAPS. But I don’t need all of the calendar steps. The ideal recipe for me then might be Sleep Cycle ->  iOS Health Kit -> UP -> IFTTT sends “waking up mode” -> Nightscout -> my rig. However, I then learned that UP doesn’t necessarily automatically sync the data from HealthKit, unless the app is open. Hmm. More rabbit holing. Thanks to the tweet-a-friend option, I talked to Ernesto Ramirez (long time QS guru and now at Fitabase), who found the same blog post I did (above) and when I described the constraints, then pointed me to Hipbone to grab Healthkit sleep data and stuff it into Dropbox.

(Why Sleep Cycle? It is my main sleep tracker, but there’s IFTTT integration with Fitbit, Jawbone Up, and a bunch of other stuff, so if you’re interested in this, figure out how to plug your data into IFTTT, otherwise follow the OpenAPS docs for using IFTTT to get data into Nightscout for OpenAPS, and you’ll be all set. I’m trying to avoid having to go back to my Fitbit as the sleep tracker, since I’m wearing my Pebble and I was tired of wearing 2 things. And for some reason my Pebble is inconsistent and slow about showing the sleep data in the morning, so that’s not reliable for this purpose. )

Here’s how I have enabled this “wake up” mode trigger for now:

  1. If you’re using Sleep Cycle, enable it to write sleep analysis data to Apple HealthKit.
  2. Download the Hipbone app for iPhone, connect it with your Dropbox, and allow Hipbone to read sleep data from HealthKit.
  3. Log in or create an account in IFTTT.com and create a recipe using Dropbox as the trigger, and Maker as the action to send a web request to Nightscout. (Again, see the OpenAPS docs for using IFTTT triggers to post to Nightscout, there’s all kinds of great things you can do with your Pebble, Alexa, etc. thanks to IFTTT.) To start, I made “waking up” soon a temporary target to 80 for 30 minutes.

Guess what? This morning, I woke up, ended sleep cycle, and ~10-11 minutes later got notifications that I had new data in Dropbox and checked and found “waking up” mode showing in Nightscout! Woohoo. And it worked well for not having a hormone-driven BG rise after I started moving around.

First "waking up" mode in #OpenAPS automation success

Ideally, this would run immediately, and not take 10-11 minutes, but it went automatically without me having to open Hipbone (or any other app), so this is a great interim solution for me until we find an app that will run more quickly to get the sleep data from HealthKit.

We keep finding great ways to use IFTTT triggers, so if you have any other cool ones you’ve added to your DIY closed loop ecosystem, please let me know!

Autosensitivity (automatically adjusting insulin sensitivity factor for insulin dosing with #OpenAPS)

There’s a secret behind why #OpenAPS was able to deal so well with my BGs during norovirus. Namely, “autosensitivity”.

Autosensitivity (or “autosens”, for short hand) is an advanced feature that can optionally be enabled in OpenAPS.

We know how hard it is for a PWD (person with diabetes) to pay attention to all the numbers and all the things and realize when something is “off”. This could be a bad pump site, a pump site going bad, hormones from growth, hormones from menstrual cycles, sensitivity from exercise the day before, etc. So at the beginning of the year, Scott and I started brainstorming with the community about automatically detecting when the PWD is more or less sensitive to insulin than normal, and adjusting accordingly. Building on the success we’d had in DIYPS with fixed “sensitivity” and “resistance” modes, we built the feature to assess how sensitive or resistant the body is (compared to normal), rather than just a binary mode that sets a predefined response.

How OpenAPS calculates autosensitivity/how it works

It looks at each BG data point for the last 24 hours and calculates the delta (actual observed change) over the last 5 minutes. It then compares it to “BGI” (blood glucose impact, which is how much BG *should* be dropping from insulin alone), and assesses the “deviations” (differences between the delta and BGI).

When sensitivity is normal and basals are well tuned, we expect somewhere between 45-50% of non-meal deviations to be negative, and the remaining 50-55% of deviations should be positive. (To exclude meal-related deviations, we exclude overly large deviations from the sample.) So if you’re outside of that range, you are probably running sensitive or resistant, and we want to adjust accordingly. The output of the detect-sensitivity code is a single ratio number, which is then used to adjust both the baseline basal rate as well as the insulin sensitivity factor (and, optionally, BG targets).

Autosens is designed to detect to food-free downward drift, due to basal rates being too high for the current state of the body, and will adjust basals downward to compensate. The other meal-assist related portion of the algorithms do a pretty good job of dealing with larger than expected post-meal spikes due to resistance: auto-sensitivity mostly comes into play for resistance when you’re sick or otherwise riding high even without food.

Does this calculate basals?

No. Similar to everything else in OpenAPS, this works from your established basals – meaning the baseline basal rates in your pump are what the sensitivity calculations are adjusting from. If you run a marathon and your sensitivity is normally 40, it might adjust your sensitivity to 60 (meaning 1u of insulin would drop your BG an expected 60mg/dl instead of 40 mg/dl) and temporarily adjust your baseline basal rate of 1u to .6u/hour, for example.

This algorithm is simply saying “there’s something going on, let’s adjust proportionately to deal with the lower-than-usual or higher-than-usual sensitivity, regardless of cause”. It easily detects “your basals are too high and/or your ISF is too low” or “your basals are too low and/or your ISF is too high”, but actually differentiating between the effect of basal and ISF is a bit more difficult to do with a simple algorithm like this, so we’re working on a number of new algorithms and tools (see “oref0 issue 99” for our brainstorming on basal tuning and the subsequent issues linked from there) to tackle this in the future.

#OpenAPS’s autosensitivity adjustments during norovirus

After I got over the worst of the norovirus, I started looking at what OpenAPS was calculating for my sensitivity during this time. I was especially curious what would happen during the 2-3 days when I was eating very little.

My normal ISF is 40, but OpenAPS gradually calculated the shift in my sensitivity all the way to 50. That’s really sensitive, and in fact I don’t remember ever seeing a sensitivity adjustment that dramatic – but makes sense given that I usually don’t go so long without eating. (Usually when I notice I’m a little sensitive, I’ll check and see that autosens has been adjusting based on an estimated 43 or so sensitivity.)

And in later days, as expected when sick, I shifted to being more resistant. So autosens continued to assess the data and began adjusting to an estimated sensitivity of 38 as my body continued fighting the virus.

It is so nice to have the tools to automatically make these assessments and adjustments, rather than having to manually deal with them on top of being sick!


Sick days solved with a DIY closed loop #OpenAPS

Ask me about the time I got a norovirus over Thanksgiving.

As expected, it was TERRIBLE. Even though the source of the norovirus was cute, the symptoms aren’t. (You can read about the symptoms from the CDC if you’ve never heard of it before.)

But, unexpectedly, it was only terrible on the norovirus symptoms front. My BGs were astoundingly perfect. So much so that I didn’t think about diabetes for 3 days.

Let me explain.

Since I use an OpenAPS DIY closed loop “artificial pancreas”, I have a small computer rig that automatically reads my CGM and pump and automatically adjusts the insulin dosing on my pump.

OpenAPS temp basal adjustments during day 2 norovirus November 2016
Showing the net basal adjustments made on day 2 of my norovirus – the dotted line is what my basals usually are, so anything higher than that dotted line is a “high” temp and anything lower is a “low” temp of various sorts.
  • When I first started throwing up over the first 8 hours, as is pretty normal for norovirus, I first worried about going low, because obviously my stomach was empty.

Nope. I never went lower than about 85 mg/dl. Even when I didn’t eat at all for > 24 hours and very little over the course of 5 days.

  • After that, I worried about going high as my body was fighting off the virus.

Nope. I never went much higher than a few minutes in the 160s. Even when I sipped Gatorade or gasp, ate two full crackers at the end of day two and didn’t bolus for the carbs.

  • The closed loop (as designed – read the OpenAPS reference design for more details) observed the rising or dropping BGs and adjusted insulin delivery (using temporary basal rates) up or down as needed. I sometimes would slowly rise to 150s and then slowly head back down to the 100s. I only once started dropping slowly toward the 80s, but leveled off and then slowly rose back up to the 110s.

None of this (\/\/\/\/\) crazy spiking and dropping fast that causes me to overreact.

No fear for having to force myself to drink sugar while in the midst of the worst of the norovirus.

No worries, diabetes-wise, at all. In fact, it didn’t even OCCUR to me to test or think about ketones (I’m actually super sensitive and can usually feel them well before they’ll register otherwise on a blood test) until someone asked on Twitter.

Celebrating no lows despite a many-day stomache bug, thanks to OpenAPS managing BGs

Confirming I did not get ketones

Why this matters

I was talking with my father-in-law (an ER doc) and listening to him explain how anti-nausea medications (like Zofran) has reduced ER visits. And I think closed loop technology will similarly dramatically reduce ER visits for people with diabetes when sick with things like norovirus and flu and that sort of thing. Because instead of the first instance of vomiting causing a serious spiral and roller coaster of BGs, the closed loop can respond to the BG fluctuations in a safe way and prevent human overreaction in either direction.

TIR was amazing 92-97% despite the stomach bug

This isn’t what you hear about when you look at various reports and articles (like hey, OpenAPS mentioned in The Lancet this week!) about this type of technology – it’s either general outcome reports or traditional clinical trial results. But we need to show the full power of these systems, which is what I experienced over the past week.

I’m reassured now for the future that norovirus, flu, or anything else I may get will likely be not as hard to deal with as it was for the first 12 years of living with diabetes when getting sick. That’s more peace of mind (in addition to what I get just being able to safely sleep every night) that I never expected to have, and I’m incredibly thankful for it.

(I’m also thankful for the numerous wonderful people who share their stories about how this technology impacts their lives – check out this wonderful video featuring the Mazaheri family to see what a difference this is making in other people’s lives. I’m so happy that the benefits I see from using DIY technology are available to so many other people, too. At latest count, there are (n=1)*174 other people worldwide using DIY closed loop technology, and we collectively have over half a million real-world hours using closed loop technology.)