Edison Foundation honors #OpenAPS community with 2017 Edison Innovation Award

One of my favorite things about open source projects is the amazing humans behind it. OpenAPS came into existence because of numerous open source efforts; and has continued to evolve in both software and hardware improvements because of ongoing contributions in the open source world.

Some of the contributors and their stories are fairly well known (John Costik’s work to pull data from the CGM originally, which allowed Scott/me to create #DIYPS; Ben West’s work to study pump RF communications and create tools to communicate with the pump, in addition to his work on the building blocks that make up the openaps toolkit). Others have worked on areas that have drastically changed the trajectory of our community’s tools, as well. And two of the individuals who we also owe repeated thanks for facilitating our ability to utilize pocket-sized pancreas are Oskar Pearson and Pete Schwamb.

  • Oskar wanted to find a way to replace the Carelink stick, which has dismal range. (How dismal? Back in the day, I used to have a Pi on the bedside table connected to a Carelink stick under the mattress, plus another Carelink hanging over the middle of my bed to try to keep me looping all night in case I rolled over.) He ultimately leveraged some of Ben and Pete’s other work and created “mmeowlink“, which enabled other radio sticks (think TI cc1111 stick & other radios using the cc1110 and cc1111 chipsets) to similarly communicate with our loopable pumps.  He was also (I think) one of the first users of the Intel Edison for OpenAPS. When he shared his pictures showing the potential down sized rigs, jaws dropped across the Internet. This led to a bunch of new hardware options for OpenAPS rigs; Pi/Carelink was no longer the sole go-to. You could pick Pi/TI; Edison/TI; Pi/Slice of Radio; etc. And the range on these radio sticks is such that a single rig and radio stick can read (in most cases) across room(s). It greatly improved the reliability of real-world looping, and especially was a game changer for those on the go!
  • Pete is a wizard in the world of device RF communications. He created the RileyLink (named after his daughter) to bridge communications between a phone and any Sub-1 GHz device (like say, an insulin pump…). But he’s also done some other stellar projects – like subg_rfspy (general purpose firmware for cc111x for sub-GHz RF comms, which is what is leveraged in mmeowlink); and also ccprog (which enables you to flash the cc1110 radio chip on an Explorer board (see below) without having any separate equipment). And, as someone who has been building boards and decoding RF stuff for years..he’s also incredibly generous with sharing his knowledge with other people building open source hardware boards, including with those of us who collaborated on the Explorer Board.

In addition, there have been other people outside the OpenAPS community who have been touched by our stories or by diabetes in their families and have also stepped up to contribute to open source projects. This is how the Explorer Board came into existence. Someone from Intel had stumbled across OpenAPS on Twitter and reached out to meet up with Scott and me when he was in Seattle; he invited a hardware board designer he knew (Morgan Redfield) to stop by the meetup and offered to help initiate development of a smaller board. And amazingly, that’s exactly what happened. Morgan collaborated with us & others like Pete to design, build, and iterate on a small, open source hardware board (the “900 Mhz Explorer Board“) for the Edison that had a built in cc1110 radio, further allowing us to reduce the size of our rigs.

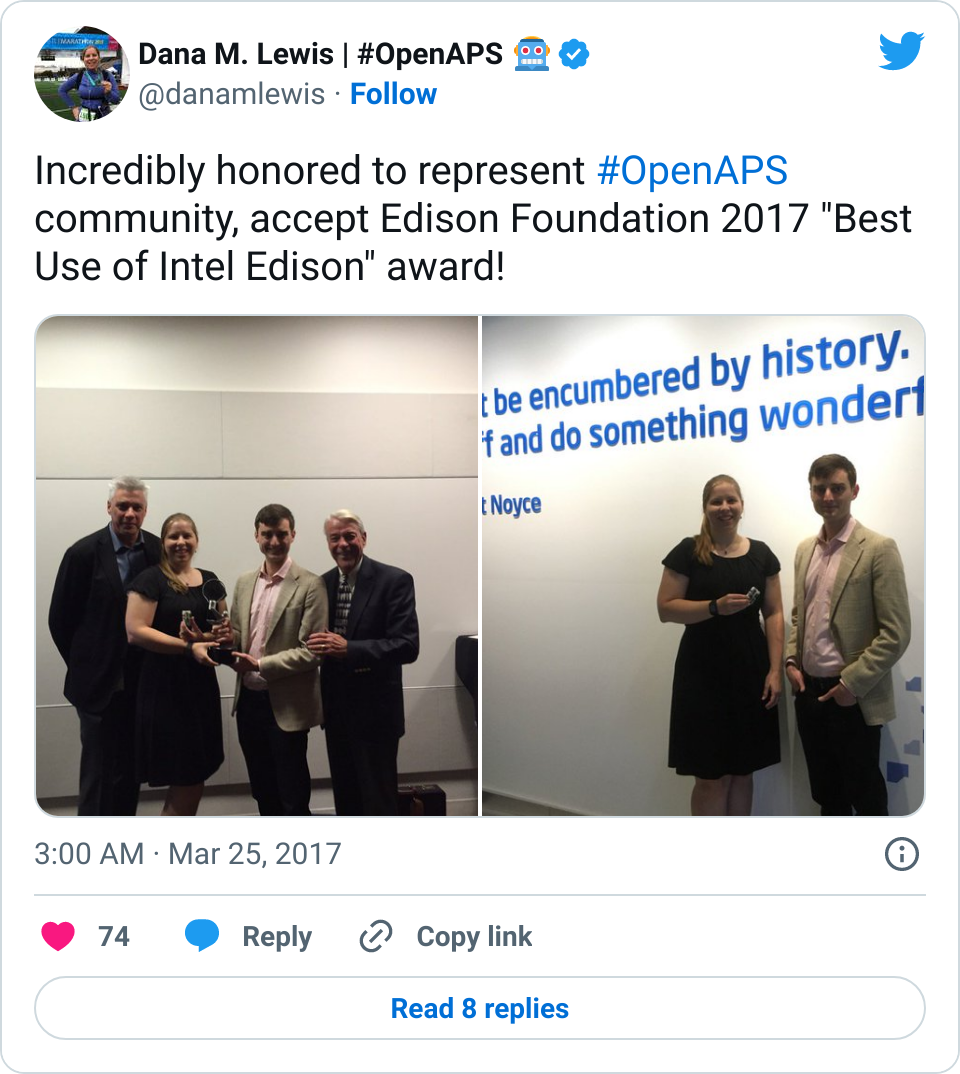
Eventually others at Intel heard about this collaboration, and we (OpenAPS and Morgan) were nominated for the Edison Foundation’s 2017 Edison Innovation Award for “Best Use of the Intel Edison Module”.

I was blown away to find out tonight that we are honored to actually receive the award on behalf of everyone who made these projects possible. I’m incredibly proud of this community and the dozens of people who have contributed in so many ways to a) make DIY artificial pancreases a thing and b) make it more feasible for hundreds of people to be DIYing these themselves with open source software and hardware. (And, this is very much in line with Thomas Edison’s work – the Edison Foundation spoke tonight about how Edison really created the group collaboration and innovation process!)

Representing the OpenAPS community and accepting the "Best Use of Intel Edison" award

Big thanks to Intel and the Edison Foundation for highlighting the community’s efforts…and endless hugs and ongoing appreciation for everyone who has contributed to OpenAPS and other #WeAreNotWaiting projects!

Write It Do It: Tips for Troubleshooting DIY Diabetes Devices (#OpenAPS or otherwise)

When I was in elementary school, I did Science Olympiad. (Are you surprised? Once a geek, always a geek…) One of my favorite “events” was “Write It Do It”, where one person would get a sculpture/something constructed (could be Legos, could be other stuff) and you had to write down instructions for telling someone else how to build it. Your partner got your list of instructions, the equipment, and was tasked with re-building the structure.

Building open source code and tools is very similar, now that I look back on the experiences of having built #DIYPS and then working on #OpenAPS. First step? Build the structure. Second step? Figure out how to tell someone ELSE how to do it. (That’s what the documentation is). But then when someone takes the list of parts and your instructions off elsewhere, depending on how they interpreted the instructions…it can end up looking a little bit different. Sometimes that’s ok, if it still works. But sometimes they skip a step, or you forget to write down something that looks obvious to you (but leaves them wondering how one part got left out) – and it doesn’t work.

Unlike in Science Olympiad, where you were “scored” on the creation and that was that, in DIY diabetes this is where you next turn to asking questions and troubleshooting about what to change/fix/do next.

But, sometimes it’s hard.

If you’re the person building a rig:

  • You know what you’re looking at, what equipment you used to get here, what step you’re on, what you’ve tried that works and what hasn’t worked.
  • You either know “it doesn’t work” or “I don’t know what to do next.”

If you’re the troubleshooter:

  • You only know generally how it can/should work and what the documentation says to do; but you only know as much about the specific problem is shared with you in context of a question.

As someone who spends a lot of time in the troubleshooter role these days, trying to answer questions or assist people in getting past where they’re stuck, here are my tips to help you if you’re building something DIY and are stuck.

Tips_online_troubleshooting_DIY_diabetes_DanaMLewis

DO:

  1. Start by explaining your setup. Example: “I’m building an Edison/Explorer Board rig, and am using a Mac computer to flash my Edison.”
  2. Explain the problem as specifically as you can. Example: “I am unable to get my Edison flashed with jubilinux.”
  3. Explain what step you’re stuck on, and in which page/version of the docs. Example: “I am following the Mac Edison flashing instructions, and I’m stuck on step 1-4.” Paste a URL to the exact page in the docs you’re looking at.  Clarify whether your problem is “it doesn’t work” or “I don’t know what to do next.”
  4. Explain what it’s telling you and what you see. Pro tip: Copy/paste the output that the computer is telling you rather than trying to summarize the error message. Example: “I can’t get the login prompt, it says “can’t find a PTY”.”
    (This is ESPECIALLY important for OpenAPS’ers who want help troubleshooting logs when they’ve finished the setup script – the status messages in there are very specific and helpful to other people who may be helping you troubleshoot.)
  5. Be patient! You may have tagged someone with an @mention; and they may be off doing something else. But don’t feel like you must tag someone with an @mention – if you’re posting in a specific troubleshooting channel, chances are there are numerous people who can (and will) help you when they are in channel and see your message.
  6. Be aware of what channel you’re in and pros/cons for what type of troubleshooting happens where.
    My suggestions:

    1. Facebook – best for questions that don’t need an immediate fix, or are more experience related questions. Remember you’re also at the mercy of Facebook’s algorithm for showing a post to a particular group of people, even if someone’s a member of the same group. And, it’s really hard to do back-and-forth troubleshooting because of the way Facebook threads posts. However, it IS a lot easier to post a picture in Facebook.
    2. Gitter – best for detailed, and hard, troubleshooting scenarios and live back-and-forth conversations. It’s hard to do photos on the go from your mobile device, but it’s usually better to paste logs and error output messages as text anyway (and there are some formatting tricks you can learn to help make your pasted text more readable, too). Those who are willing to help troubleshoot will generally skim and catch up on the channel when they get back, so you might have a few hours delay and get an answer later, if you still haven’t resolved or gotten an answer to your question from the people in channel when you first post.
    3. Email groups – best for if no one in the other channels knows the questions, or you have a general discussion starter that isn’t time-constrained
  7. Start with the basic setup, and come back and customize later. The documentation is usually written to support several kinds of configurations, but the general rule of thumb is get something basic working first, and then you can come back later and add features and tweaks. If you try to skip steps or customize too early, it makes it a lot harder to help troubleshoot what you’re doing if you’re not exactly following the documentation that’s worked for dozens of other people.
  8. Pay it forward. You may not have a certain skill, but you certainly have other skills that can likely help. Don’t be afraid to jump in and help answer questions of things you do know, or steps you successfully got through, even if you’re not “done” with your setup yet. Paying it forward as you go is an awesome strategy J and helps a lot!

SOME THINGS TO TRY TO AVOID:

  1. Avoid vague descriptions of what’s going on, and using the word “it”. Troubleshooter helpers have no idea which “it” or what “thing” you’re referring to, unless you tell them. Nouns are good :) . Saying “I am doing a thing, and it stopped working/doesn’t work” requires someone to play the game of 20 questions to draw out the above level of detail, before they can even start to answer your question of what to do next.
  2. Don’t get upset at people/blame people. Remember, most of the DIY diabetes projects are created by people who donated their work so others could use it, and many continue to donate their time to help other people. That’s time away from their families and lives. So even if you get frustrated, try to be polite. If you get upset, you’re likely to alienate potential helpers and revert into vagueness (“but it doesn’t work!”) which further hinders troubleshooting. And, remember, although these tools are awesome and make a big difference in your life – a few minutes, or a few hours, or a few days without them will be ok. We’d all prefer not to go without, which is why we try to help each other, but it’s ok if there’s a gap in use time. You have good baseline diabetes skills to fall back on during this time. If you’re feeling overwhelmed, turn off the DIY technology, go back to doing things the way you’re comfortable, and come back and troubleshoot further when you’re no longer feeling overwhelmed.
  3. Don’t go radio silent: report back what you tried and if it worked. One of the benefits of these channels is many people are watching and learning alongside you; and the troubleshooters are also learning, too. Everything from “describing the steps ABC way causes confusion, but saying XYZ seems to be more clear” and even “oh wow, we found a bug, 123 no longer is ideal and we should really do 456.” Reporting back what you tried and if it resolved your issue or not is a very simple way to pay it forward and keep the community’s knowledge base growing!
  4. Try not to get annoyed if someone helping out asks you to switch channels to continue troubleshooting. Per the above, sometimes one channel has benefits over the other. It may not be your favorite, but it shouldn’t hurt you to switch channels for a few minutes to resolve your issue.
  5. Don’t wait until you’re “done” to pay it forward. You definitely have things to contribute as you go, too! Don’t wait until you’re done to make edits (PRs) to the documentation. Make edits while they’re fresh in your mind (and it’s a good thing to do while you’re waiting for things to install/compile ;)).

These are the tips that come to mind as I think about how to help people seek help more successfully online in DIY diabetes projects. What tips would you add?

Traveling through airport security with diabetes devices (with or without #OpenAPS)

tl;dr: Put your #OpenAPS or other artificial pancreas rigs through the x-ray machine; it’s a small computer and a battery.

Traveling through airport security with your diabetes devices and artificial pancreas rigs (#OpenAPS)

I travel quite a bit these days, so it’s pretty routine for me to pack up my diabetes gear and backup supplies and whisk away to the airport and the next adventure. In fact, in 2016 I think I went through airport security 44+ times, in several countries. I have never had any issues with my #OpenAPS (DIY hybrid closed loop artificial pancreas) rigs – even when I carry multiples. Here are some tips on what gear should be put where, who should be told what during the security process, and how to further simplify (as much as is possible with diabetes!) the airport security experience when traveling with diabetes.

Showing my OpenAPS rig on my hip at the airport

A list of diabetes gear you’re probably packing for your trip:

  • BG meter
  • Test strips
  • Lancet(s)
  • Pump sites
  • Reservoirs
  • CGM sensors
  • CGM receiver
  • Tape for sites/sensors
  • Syringes as back up
  • Anti-nausea meds
  • Depending on the length of your trip, backup pump/transmitter/meter/receiver/etc.
  • Snacks
  • Extra batteries to power your phone for uploading BGs
  • (Uploader phone if you’re still using an uploader to Nightscout)
  • Artificial pancreas rig (i.e. #OpenAPS rig, whether that’s a Raspberry Pi or Explorer Board setup, or a Rileylink)
  • Insulin
  • Extra insulin
  • Juice for lows

Out of that list? Here are the only things I would pull out of your bag.

  • Insulin/extra insulin*
  • Juice for lows**

Everything else (yes, including your CGM receiver; yes, including your pancreas rigs) can stay in your bag and go through the x-ray.

*If you have a single bottle of insulin, it’s under the liquid (3oz) limits, so you don’t technically need to pull it out. But if you are carrying numerous bottles/pens/etc., if you have them separately bagged and can pull out separately, I would do so in order to reduce the risk of them flagging your bag for needing additional screening.

** Yes, you have a medical need for liquid and can take juice through security. HOWEVER, I *highly* recommend having this in a baggie and pulled out of your bag so it is separate. They’ll often pick that up, examine it, and if you say “medical liquid for diabetes”, it’s fine. Sometimes you’ll get pulled for a pat down, but not always. And, this usually prevents them from having to dig through your bags to find the juice and go through all your things. (Which is annoying, not to mention time consuming).

My second “HOWEVER” related to juice: I’ve stopped carrying juice for lows when I air travel. Yes, it only takes an extra couple of minutes or whatever for them to check things out, but I’d rather not have any hassle if I can avoid it. I instead have switched to Starbursts, Skittles, and similar. (They’re super fast acting for me, and actually make it easier to do a small 4g correction vs having to bust open an entire 15g juice box that can’t really be saved for later.) I have those in my pocket or easily accessible in an outer pocket of the bag that will go under my seat on the plane. You can of course still carry juice, but think about if that’s really worth the hassle/effort and if there’s an alternative (glucose tabs, small wrapped candies, etc.) that might be easier for treating lows when traveling. YDMV, of course.

(My favorite carrying-juice-through-security story is this: I was traveling to somewhere in Europe while in college (well before my DIY closed loop days), and I had a large baggie jam-packed with 8 or 9 juice boxes and a bottle of insulin. Despite telling them that I had diabetes and was traveling internationally and this was medically necessary in case of low BGs, the TSA agent said “how many juice boxes could you possibly need in an 11 hour flight? You wouldn’t use more than one, right?” It was *really* hard not to laugh.)

What about insulin pumps? Do you take it off?

  • I currently am wearing an insulin pump that does not alarm in 99% of metal detectors because it’s not made with lots of metal. I also have TSA Pre-Check, which means 95% of the time when traveling in the U.S. I am only asked to go through a metal detector. So right before I walk up to security, I take my pump that’s usually clipped to an outer pants pocket and clip it inside my waist band and underneath my shirt. If it doesn’t alarm, then I proceed like a usual traveler to get my bags and be on my way.
  • If I am randomly selected by the metal detector to instead go through the body scanner:
    • YDMV/YMMV, but there are no guarantees that the body scanners will not break your pump. And if you have a super special limited edition rare pump that does a special thing (like those that enable you to DIY closed loop), as I do, it may make you decide that a pat down is better than risking your pump, since if it DOES break due to scanner interference, TSA sure isn’t going to pay to fix it/get you a new one, and a new one wouldn’t allow you to DIY closed loop anyway.
    • So, if I get randomly selected, I stop right there and say “opt out”. Say it to whoever is pointing you over to the body scanner, they’ll posssibly read you a script to confirm you want to opt out, and just keep saying “yes, I opt out” and “that’s fine” to the “but then you have to have a pat down!”. They’ll order up a same-gender TSA agent who will come get you, escort you around the body scanners, and you’ll get your pat down. The usual applies – if you want, you can ask for a private area for your pat down. I usually don’t care, but if you do, make sure you keep an eye on your bags and ask for those to come with you so they’re not left out in the open for anyone to accidentally take. (They’re usually pretty good about that, though.)
    • For the pat down, they’ll ask you about sensitive areas/medical devices. This is the time to point out your pump; tell them (pat the area) where it’s connected, and ditto for patting/pointing out your CGM sensor if you have one. They’ll be extra careful then to not accidentally catch their hands on those areas.
    • At the end, they’ll go swab their gloves, then come back and ask you to pat/touch your pump and then let them swab your hands.
  • If you don’t have Pre-Check, the above will likely happen every time. So if you’re an opt-out-of-body-scanner-type and travel more than 2 times a year…IMO Pre-Check is worth the money. (And think about getting Global Entry, which comes with Pre-Check included, and also gets you expedited return to the country after traveling abroad).
  • If you have a metal-cased pump (or any other pump, and just want this instead of the metal detector or the body scanner), you can ask for a hand inspection of your pump. Different manufacturers say different things about whether x-ray and body scanners are ok/not ok, so check with them and also go with your gut about what you’d like to do with your pump.  Keep in mind that the radiation your carry-on luggage gets from the hand-luggage x-ray is about 100 times what your body gets from a backscatter x-ray, so if you’re concerned about x-ray radiation damaging your pump, it should not be sent through the scanner with your carry-on luggage.

What about a doctor’s note?

I have never carried a doctor’s note, and have not had an issue in the 14+ years I’ve been flying with diabetes – including in dozen of international airports. YDMV, and if you’d feel more comfortable with one, you can get one from your doctor. But for what it’s worth, I don’t travel with one.

What about international airports?

The only thing to know about international airports is they have similar guidelines about liquids, so plan to also pull out your juice and toiletries from your bag. Same rules apply for keeping rigs, supplies, etc. in your bag otherwise. I’ve never had an issue based on pancreas rigs internationally, either. They’re small computers and batteries, so both TSA and international security are used to seeing those in the x-ray.

OpenAPS rigs are mini computers and can go through xray and airport security

(Let me know what other travel-related questions you have, and I’ll keep adding to this post if it’s helpful. Happy traveling!)

Scuba diving, snorkeling, and swimming with diabetes (and #OpenAPS)

tl;dr – yes, you can scuba dive with diabetes, snorkel with diabetes, and swim with diabetes! Here’s what you need to know.

I meant to write this post before I left for a two-week Hawaii trip, and since I answered about a question a day on various platforms as I posted pictures from the trip, I really wish I had done it ahead of time. Oh well. :) I especially wish someone had written this post for me 2 years ago, before my first scuba dive, because I couldn’t find a lot of good information on the practicalities of good approaches for dealing with all the details of scuba diving with diabetes and an insulin pump and CGM and now closed loops. Scuba diving, snorkeling, and swimming with diabetes are actually pretty common, so here are a few things to keep in mind/tips from me, before diving (pun intended) into some explanations of what I think about for each activity diabetes-wise.

scuba_diving_with_diabetes_tips_water_activities_by_Dana_M_Lewis

General tips for water activities when living with diabetes:

  1. Most important: be aware of your netIOB going into the activity. Positive netIOB plus activity of any kind = expedited low BG. This is the biggest thing I do to avoid lows while scuba diving or snorkeling – trying to time breakfast or the previous meal to be a few hours prior so I don’t have insulin peaking and accelerated by the activity when I’m out in the water and untethered from my usual devices.
  2. Second most important: CGM sensor and transmitter on your body can get wet (shower, pools, hot tubs, oceans, etc.), but keep in mind it can’t read underwater. And sometimes it gets waterlogged from short or long exposure to the water, so it may take a while to read even after you get it above water or dry off. And, historically I’ve had sensors come back and the CGM will sometimes read falsely high (100-200 points higher than actual BG), so exercise extreme caution and I highly recommend fingerstick testing before dosing insulin after prolonged water exposure.
  3. Know which of your devices are waterproof, watertight, etc. Tip: most pumps are not waterproof. Some are watertight*. The * is because with usual wear and tear and banging into things, small surface cracks start showing up and make your pump no longer even watertight, so even a light splash can kill it. Be aware of the state of your pump and protect it accordingly, especially if you have a limited edition super special super rare DIY-loopable pump. I generally take a baggie full of different sized baggies to put pump/CGM/OpenAPS rig into, and I also have a supposedly waterproof bag that seals that I sometimes put my bagged devices into. (More on that below).
    1. And in general, it’s always wise to have a backup pump (even if it’s non-loopable) on long/tropical/far away trips, and many of the pump companies have a loaner program for overseas/cruise/tropical travel.
  4. Apply sunscreen around your sites/sensors because sunburn and applying or removing them hurts. However, as I learned on this trip, don’t do TOO much/any sunscreen directly on top of the adhesive, as it may loosen the adhesive (just surrounding the edges is fine). I usually use a rub sunscreen around the edges of my pump site and CGM sensor, and do the rest of my body with a spray sunscreen. And pack extra sites and sensors on top of your extras.

Why extras on top of your extras? Because you don’t want to have a vacation like I did where I managed to go through 5 pump site catastrophes in 72 hours and run out of pump sites and worry about that instead of enjoying your vacation. Here’s what happened on my last vacation pump-site wise:

  • Planned to change my site the next morning instead of at night, because then I would properly use up all the insulin in my reservoir. So I woke up, put in a new pump site (B) on my back hip, and promptly went off to walk to brunch with Scott.
  • Sitting down and waiting for food, I noticed my BG was rocketing high. I first guessed that I forgot to exit the prime screen on the pump, which means it wasn’t delivering any insulin (even basal). Wrong. As I pulled my pump off my waist band, I could finally hear the “loud siren escalating alarm” that is “supposed” to be really audible to anyone…but wasn’t audible to me outside on a busy street. Scott didn’t hear it, either. That nice “siren” alarm was “no delivery”, which meant there was something wrong with the pump site and I hadn’t been getting any insulin for the last hour and a half. Luckily, I have gotten into the habit of keeping the “old” pump site (A) on in case of problems like this, so I swapped the tubing to connect to the “old” site A and an hour or so later as insulin started peaking, felt better. I pulled site B out, and it was bent (that’s why it was no delivery-ing). I waited until that afternoon to put in the next pump site (C) into my leg. It was working well into dinner, so I removed site A.
  • However, that night when I changed clothes after dinner, site C ripped out. ARGHHHH. And I had removed site A, so I  had to put on another site (D). Bah, humbug. Throw in someone bumping a mostly-full insulin vial off the counter and it shattering, and I was in one of my least-pleased-because-of-diabetes moods, ever. It was a good reminder of how much a closed loop is not a cure, because we still have to deal with bonked sites and sites in general and all this hoopla.
  • Site D lasted the next day, while we went hiking at Haleakala (a 12.2 mile hike, which was amazing that neither my site or my sensor acted up!). However, on the third day in this adventure, I put on sunscreen to go to the beach with the whole family. When we came back from the beach, I went to remove my cover up to shower off sand before getting into the pool. As my shirt came over my head, I saw something white fly by – which turned out to be 4th pump site, flying around on the end of the pump tube, rather than being connected to my body. There went Site D. In went my fifth site (E), which I tackled down onto my body with extra flexifix tape that I usually use for CGM sensors because I. Was. Fed. Up. With. Pump. Sites!
  • Thankfully, site E lasted a normal life and lasted til I got home and did my next normal site change, and all is back to normal.

Lessons learned about pump sites: I repeat, don’t sunscreen too much on the adhesive, just sunscreen AROUND the adhesive. And pack extras, because I went through ~2 weeks of pump sites in 3 days, which I did not expect – luckily I had plenty of extra and extras behind those!

Now on to the fun stuff.

Scuba Diving with diabetes:

  • 2 years ago was my “Discovery” dive, where you aren’t certified but they teach you the basics and do all the equipment for you so you just do some safety tutorials and go down with a guide who keeps you safe. For that dive, I couldn’t find a lot of good info about scuba diving with diabetes, other than logical advice about the CGM sensor not transmitting under water, the receiver not being waterproof, and the pump not being waterproof. I decided to try to target my BG in advance to be around 180 mg/dl to avoid lows during the dive, and for extra safety eat some skittles before I went down – plus I suspended and removed my pump. Heh. That worked too well, and I was high in the mid-200s in between my two dives, so I found myself struggling to peel my wetsuit off in between dives to connect my pump and give a small bolus. The resulting high feeling after the second dive when my BG hadn’t re-normalized yet plus the really choppy waves made me sea-sick. Not fun. But actually diving was awesome and I didn’t have any lows.
    • Pro tip #1 for scuba diving with diabetes: If you can, have your pump site on your abdomen, arm, or other as-easy-as-possible location to reconnect your pump for between-dive boluses so you don’t have to try to get your arm down the leg of your wetsuit to re- and disconnect.
  • I decided I wanted to get PADI certified to scuba dive. I decided to do the lessons (video watching and test taking) and pool certification and 2/4 of my open water dives while on a cruise trip last February. Before getting in the pool, I didn’t do anything special other than avoid having too much (for me that’s >.5u) of netIOB. For the open water dives at cruise ports, I did the same thing. However, due to the excitement/exertion of the first long dive, along with having to do some open water safety training after the first dive but before getting out (and doing my swim test in choppy open water), I got out of the water after that to find that I was low. I had to take a little bit longer (although maybe only 10 extra minutes) than the instructor wanted to finish waiting for my BG to come up before we headed out to the second dive. I was fine during and after the second dive, other than being exhausted.
    • Pro tip #2 for scuba diving with diabetes: Some instructors or guides get freaked out about the idea of having someone diving with diabetes. Get your medical questionnaire signed by a doctor in advance, and photocopy a bunch so you can take one on every trip to hand to people so they can cover themselves legally. Mostly, it helps for you to be confident and explain the safety precautions you have in place to take care of yourself. It also helps if you are diving with a buddy/loved one who understands diabetes and is square on your safety plan (what do you do if you feel low? how will you signal that? how will they help you if you need help in the water vs. on the boat, etc.?). For my training dives, because Scott was not with me, I made sure my instructor knew what my plan was (I would point to my arm where my sensor was if I felt low and wanted to pause/stop/head to the surface, compared to the other usual safety signals).
  • This past trip in Hawaii I was finishing off a cold at the beginning, so at the end of the trip I started with a shore dive so I could go slow and make sure it was safe for me to descend. I was worried about going low on this one, since we had to lug our gear a hundred feet or so down to the beach and then into the water (and I’ve never done a shore dive prior to this). I did my usual prep: temp basal to 0 on my pump for a few hours (so it can track IOB properly) and suspend; place it and CGM and OpenAPS rigs in baggies in my backpack; and confirming that my BG was flat at a good place without IOB, I didn’t eat anything extra. We went out slowly, had a great dive (yay, turtles), and I was actually a little high coming back up after the dive rather than low. My CGM didn’t come back right away, so I tested with a fingerstick and hooked my pump back up right away and gave a bolus to make up for the missed insulin during the dive. I did that before we headed off the beach and up to clean off our gear.
    • Pro tip #3 for scuba diving with diabetes: Don’t forget that insulin takes 60-90 minutes to peak, so if you’ve been off your pump and diving for a while, even if you are low or fine in that moment, that missing basal will impact you later on. Often if I am doing two dives, even with normal BG levels I will do a small bolus in between to be active by the time I am done with my second dive, rather than going 3+ hours with absolutely no insulin. You need some baseline insulin even if you are very active.
  • While in Hawaii, we also got up before the crack of dawn to head out and do a boat dive at Molokini. It was almost worth the 5am wakeup (I’m not a morning person :)). As soon as I woke up at 5am, I did an “eating soon” and bolused fully for my breakfast, knowing that we’d be getting on the boat at 6:30amish (peak insulin time), but it’d take a while to get out to the dive site (closer to 7:30am), so it was better to get the breakfast bolus in and let it finish counteracting the carbs. I did, but still ran a little higher than I would have liked while heading out, so I did another small correction bolus about half an hour before I temped to zero, suspended, and disconnected and baggied/bagged/placed the bag up in the no-water-shelf on the boat. I then did the first dive, which was neat because Molokini is a cool location, and it was also my first “deep” dive where we went down to about ~75 feet. (My previous dives have all been no deeper than about ~45 feet.) Coming back onto the boat, I did my usual of getting the gear off, then finding a towel to dry my hands and do a fingerstick BG test to see what I was. In this case, 133 mg/dl. Perfect! It would take us almost an hour for everyone to get back on the boat and then move to dive spot #2, so I peeled down my wetsuit and reconnected my pump to get normal basal during this time and also do a small bolus for the bites of pineapple I was eating. (Given the uncertainties of accuracy of CGM coming out of prolonged water exposure, since they sometimes run 100+ points high for me, I chose not to have the loop running during this dive and just manually adjust as needed). We got to spot #2 and went down for the dive, where we saw sharks, eels, and some neat purple-tailed fish. By the end of the dive, I started to feel tired, and also felt hungry. Those are the two signs I feel underwater that probably translate to being low, so I was the first from our group to come up when we got back from the boat. I got on the boat, removed gear, dried hands, tested, and…yep. 73 mg/dl. Not a bad low, but I’m glad I stopped when I did, because it’s always better to be sure and safe than not know. I had a few skittles while reconnecting my pump, and otherwise was fine and enjoyed the rest of the experience including some epic dolphin and whale watching on the return boat ride back to the harbor!
    • Pro tip #4 for scuba diving with diabetes: You may or may not be able to feel lows underwater; but listening to your body and using your brain to pay attention to changes, about low or not, is always a really good idea when scuba diving. I haven’t dived enough  (7 dives total now?) or had enough lows while diving to know for sure what my underwater low symptoms are, but fatigue + hunger are very obvious to me underwater. Again, you may want to dive with a buddy and have a signal (like pointing to the part of your body that has the CGM) if you want to go up and check things out. Some things I read years ago talked about consuming glucose under water, but that seems above my skill level so I don’t think I’ll be the type of diver who does that – I’d rather come to the surface and have someone hand me from the boat something to eat, or shorten the dive and get back on the boat/on shore to take care of things.

All things considered, scuba diving with diabetes is just like anything else with diabetes – it mostly just takes planning ahead, extra snacks (and extra baggies) to have on hand, and you can do it just like anyone else. (The real pain and suffering of scuba diving in my opinion comes not from high or low BGs; but rather pulling hair out of your mask when you take it off after a dive! Every time = ouch.)

Snorkeling with diabetes:

  • Most of my snorkeling experiences/tips sound very similar to the scuba diving ones, so read the above if you haven’t. Remember:
    • Don’t go into a snorkel with tons of positive IOB.
    • Have easy-access glucose supplies in the outer pockets of your bag – you don’t want to have to be digging into the bottom of your beach bag to get skittles out when you’re low!
    • Sunscreen your back well 😉 but don’t over-sunscreen the adhesive on sites and sensors!
    • Make sure your pump doesn’t get too hot while you’re out snorkeling if you leave it on the beach (cover it with something).
    • You could possibly do baggies inside a waterproof bag and take your pump/cgm/phone out into the water with you. I did that two years ago when I didn’t trust leaving my pump/receiver/phone on shore, but even with a certified waterproof bag I spent more time worrying about that than I did enjoying the snorkel. Stash your pump/gear in a backpack and cover it with a towel, or stick it in the trunk/glove compartment of your car, etc.
    • Remember CGMs may not read right away, or may read falsely high, so fingerstick before correcting for any highs or otherwise dosing if needed.

Swimming with diabetes:

  • Same deal as the above described activities, but with less equipment/worries. Biggest things to think about are keeping your gear protected from splashes which seem more common poolside than oceanside…and remember to take your pump off, phone or receiver out of your pocket, etc. before getting in the water!

Wait, all of this has been about pump/CGM. What about closed looping? Can you #OpenAPS in the water?

    • If you don’t have your pump on (in the water), and you don’t have CGM data (in the water, because it can’t transmit there), you can’t loop. So for the most part, you don’t closed loop DURING these activities, but it can be incredibly helpful (especially afterward to make up for the missing basal insulin) to have once you get your pump back on.

However, if your CGM is reading falsely high because it’s waterlogged, you may want to set a high temporary target or turn your rig off during that time until it normalizes. And follow all the same precautions about baggies/waterproofing your rig, because unlike the pump, it’s not designed for even getting the lightest of splashes on it, so treat it like you treat your laptop. For my Hawaii trip, I often had my #OpenAPS rig in a baggie inside of my bag, so that when my pump was on and un-suspended and I had CGM data, it would loop – however, I kept a closer eye on my BGs in general, including how the loop was behaving, in the hour following water activities since I know CGM is questionable during this time.

I’m really glad I didn’t let diabetes stop me from trying scuba diving, and I hope blog posts like this help you figure out how you need to plan ahead for trying new water activites. I’m thankful for technology of pumps and CGMs and tools like #OpenAPS that make it even easier for us to go climb mountains and scuba dive while living with diabetes (although not in the same day ;)).

UPDATE in 2023: I went scuba diving recently using a Dexcom G6, and it did not have any issues once out of the water with falsely high readings! It reconnected instantly (no delay) to my phone once I was back in range and backfilled correctly and had a correct value for the most recent value. So, this is a huge improvement beyond what I described above with earlier generation (e.g., G4 and G5) sensors, but it still has the downside that it can’t transmit data underwater. You can also read here about how I use Libre for underwater reading when I’m doing several water activities and find it worth my while to invest in a single Libre sensor for having CGM data underwater.