Tips and tricks for real life and living with an ankle fracture

As I wrote in a previous post with much more detail (see here), I fell off a mountain and broke my ankle in three places, then managed to break a bone in my 5th toe on the other foot. This meant that my right ankle was in a hard cast for 6 weeks and I was 100% non-weight bearing…but this was challenging because the foot meant to be my stable base for crutching or knee scootering was often pretty wobbly and in a lot of pain.

This post is a follow up with more detailed tips and lessons learned of things that were helpful in living with a leg cast, as well as what the return to weight bearing was really like. I couldn’t find a lot of good information about the transition to weight bearing was really like, so this is my take on information I was looking for and would have appreciated before and during the weight bearing progression process. (And if you’re looking for diabetes-specific stuff, it’s in the last section!)
Tips_weight_bearing_DanaMLewis
Dealing with lack of energy and fatigue

First, it’s worth noting something major about a fractured bone, and *especially* true if it’s a big bone fracture like some of mine were: it takes a lot of healing, which means a lot of energy going to the healing and not much energy left for every day living. I was constantly exhausted – and surprised by this fatigue – pretty much throughout this process. It made sense in the early days (say weeks 1-2 after fracture), but was frustrating to me how little I had energy to do even in the 4-6 weeks after my fracture.

But, then it got worse. Returning to weight bearing took *even more* energy. For example, on the first day of partial weight bearing, I was tasked with putting 25 lbs of weight on my foot in the walking boot. First by placing my foot on the scale and getting reliable with being able to put the right amount of weight on the boot; then by standing and repeating with the scale; then taking a few steps (with the crutches taking the rest of my weight) and re-calibrating with the scale until I was confident in that weight. With weight bearing progression, you’re supposed to spend up to an hour a day working on this.

I took to heart what my ortho said about not progressing fast if you only do 5-10 minute chunks, so after the first day, I tried to always do 10-15 minute chunks at a minimum, with a longer chunk wherever possible as permitted by pain and my energy levels.

But the first few days were really, really tough. It was hard to switch to a new weight every two days – because this meant readjusting how I was stepping/walking, and how much weight and where I placed my crutches. I started with a blister on my right palm, which turned into a squished nerve that made my right hand go numb, and ultimately damaged some tendons in my right wrist, too. This made it painful to use the crutches or even drive my knee scooter when I wasn’t focusing on weight bearing. So I had a lot of pain and suffering in the WB progression process that probably contributed to how fatigued I was overall.

So one of my biggest pieces of advice for anyone with broken bones is to expect your energy to take a(nother) dip for the first few weeks after you start returning to weight-bearing (or return to normal activity outside your cast). It’s a *lot* of work to regain strength in atrophied muscles while still also doing the internal healing on the broken bones!

Tips to deal with so much fatigue as you return to weight bearing:

Some of the tips and things I figured out for being non-weight bearing and sitting around with a hard cast came in handy for the weight-bearing progression fatigue, too.

  • I got a shower bench (this is the one I got) so that it was easy to sit down on and swing my legs over into the shower/bathtub. Once I was out of my hard cast, I still can’t weight bear without the boot, so I still need a sitting shower/bath solution while I return to weight bearing. I also removed the back after a while, so it was easier to sit in either direction depending on preference (washing hair/not) without having to ask Scott to remove the back and re-attach it on the other side.
  • Speaking of showers, I put a toothbrush and toothpaste in the shower so I can also brush my teeth there while seated.
  • I still keep most of my toiletries in the bedside table (or you could have a caddy by the bedside) so I can brush my hair, take my contacts out or put them in, wipe my face (facewipes instead of having to stand at the sink to wash my face), etc. from the bed.
  • I am taking ibuprofen 4x a day, and I get tired of opening the bottle. So I dumped a pile of ibuprofen on my bedside table to make it easy to reach and remember to take first thing in the morning or at night. (There are no kids or pets in my household; keep safety in mind if you have kids etc in your household – this solution may not work for you).
  • The one time I tended to forget to proactively take my medication was mid-day, so I added a recurring calendar event to my calendar saying “take ibuprofen if you haven’t 2x a day” around 2pm, which would be the latest I would take my second round, even if I woke up later in the day and my first dose was later in the morning. This has helped me remember multiple times, especially on weekends or times when I’m away from my desk or bed where I would have the meds visible as a reminder.
  • Pre-mix protein powder (this is what I chose) into the beverage of choice in advance, and keep it in individual containers so it’s easy to get and take (and if I’m really tired, round tupperware containers that have measurement lines make it easy to measure liquid into, put the lid on to shake it up, and drink out of without having to find another cup). I had Scott do this several days in advance when he went on a trip, and we kept doing it in advance even after he got home.
  • I kept using my portable desk for working, taking video calls propped up in the bed with pillows behind me, and also laying the surface flat to eat meals from when I was too tired to get out of the bed.

Other advice for the return to weight-bearing:

If you’re like me, you’ll switch back to weight-bearing accompanied by getting out of your hard cast and getting a walking boot of some sort. If you can, ask your ortho/doc in advance what kind of boot they’ll put you in. It’s often cheaper to get the boot yourself. Perfect example: my ortho didn’t tell me what kind of boot I would need, and I looked at various boots online and saw they ranged $50-100 on Amazon. At my appointment he asked if I brought a boot and since I didn’t, they’d provide one..and the paperwork I signed stated the price would be $427 (::choking::) if the insurance didn’t cover it. Insurance negotiated down to $152 for me to pay out of pocket for since I haven’t hit my deductible…which is still 2-3x more than retail cost. UGH. So, if you can, buy your walking boot via retail. (Same goes for purchasing a knee scooter (here’s the one I got) – it may be cheaper to buy it new through Amazon/elsewhere than getting a medical purchase that goes through insurance and/or trying to do a rental.)

  • You’ll also probably end up with a boot with lots of velcro straps. When you undo your boot, fold back the strap on itself so it doesn’t stick to the boot, another strap, your clothes, etc.
Other equipment that has come in handy:
  • Get multiple ankle braces. I had a slightly structured ankle brace with hard sides that made me feel safer the first few nights sleeping out of the cast, and it was often easier to go from the bed to the bathroom on my knee scooter or crutches with the ankle brace(s) instead of re-putting on my walking boot and taking it off again for a shower. (I transitioned to sleeping in a lighter ankle brace after a week or so, but still used the structured brace inside the waterproof cast bag for swimming laps to help protect my ankle.)
  • An ice pack with a strap to put around your ankle/broken joint. I had gotten this ice pack for my knee last fall, and strap it and another ice pack to my ankle to get full joint coverage.
  • Wide leg athletic pants…ideally ones that you can put on/off without having to take your boot off. (Women should note I found better athletic pants for this purpose in the men’s athletic section at Target..but be aware a lot of the modern men’s style have tapered legs so make sure to watch out for those and have enough width to get over your boot). Taking off the boot is exhausting with so many velcro straps, so any time I can get dressed or undressed without having to remove the boot if I am not otherwise removing the boot is a win.
  • Look online for your state’s rules for a temporary handicap parking pass, and take the paperwork to your first ortho appointment to get filled out. Also, make sure to note where the places are that you can drop off the paperwork in person (in Seattle it was not the same as the DMV offices!), or otherwise be aware of the time frame for mailing those in and receiving the pass. The handicap parking placard has been helpful for encouraging me to get out of the house more to go to the store or go to a restaurant when otherwise I’m too exhausted to do anything.
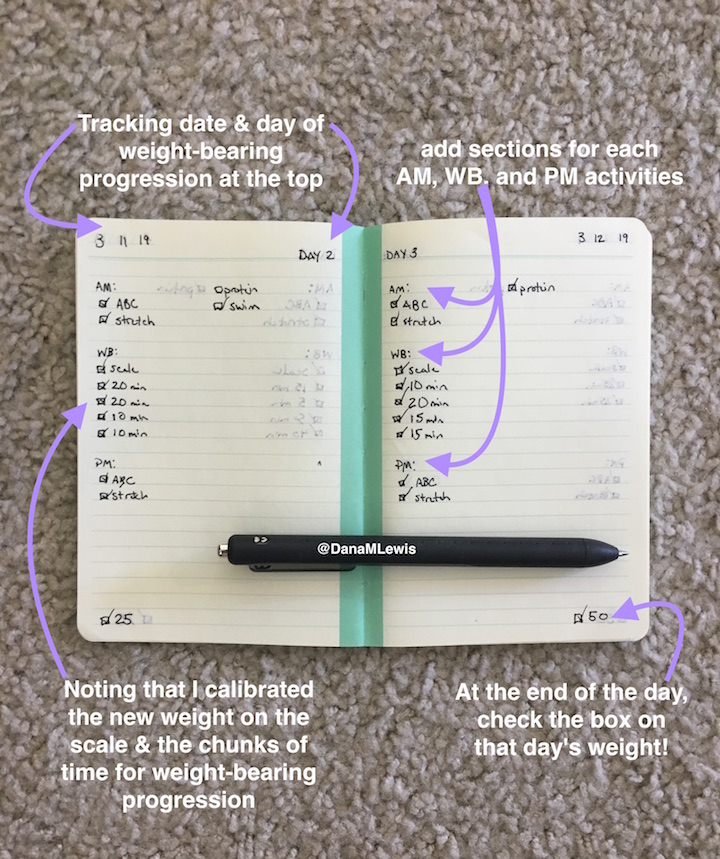
  • A new shiny notebook for writing down your daily activities and what you did. If you’re not a notebook type person, use an app or note on your phone. But despite being mostly digital, I liked having a small notebook by the bed to list my daily activities and check the box on them to emphasize the activities I was doing and the progress I was making. At the beginning, it was helpful for keeping track of all the new things I needed to do; in the middle, it was useful for emphasizing the progress I was making; and at the end it felt really good to see the light of the end of the tunnel of a few pages/days left toward being fully weight bearing.
Weightbearing_notebook_DanaMLewis

Other tips for getting used to a walking boot and transitioning to weight bearing:

  • Don’t be surprised if you have pain in new areas when you move from a hard cast to a walking boot. (Remember you’ll be moving your leg or limbs in different ways than they’ve been accustomed to).
  • My ortho told me the goal of weight bearing progression is to understand the difference between discomfort (lasts a few minutes) and pain (lasts a few hours). You’re likely going to be in discomfort when doing weight bearing progression – that’s normal. Pain (i.e. sharp pain) is not normal, and you should take a break or back down to a previous weight (follow your protocol) if you have it. I was lucky – the only few times I had pain was from trying to press down forcefully on the scale when seated, rather than standing on the scale and naturally letting my weight on my leg. I didn’t end up plateauing at any weight, and was able to follow my protocol of 25lb weight bearing added every 2 days and get to full weight bearing with no delays.
  • If you have a watch with a stopwatch feature, use it. It’s hard to keep track of actual time spent walking (especially at first when 90 seconds feels like 6 minutes) with just a normal watch/clock. You could also use your smartphone’s timer feature. But tracking the time and pausing when you pause or take a break helps make sure you’re accurately tracking toward your hour of walking.
  • The process wasn’t without discomfort – physical and emotional. Putting weight on my leg was scary, and every new weight day was hard as I dealt with the fear and processing of the discomfort, as well as learning how to step and walk and do my crutches in a new way yet again.
  • But what I learned is that the first 5 minutes of every new weight day ALWAYS sucked. Once I recognized this, I set the goal to always tough out a 15 minute session after I calibrated on the scale by walking slowly around my apartment. (I put my headphones in to listen to music while I did it). As long as there was only discomfort and not pain, I didn’t stop until after 15 minutes of slow walking with that weight and also re-calibrated on the scale during and after to make sure I was in the right ballpark.
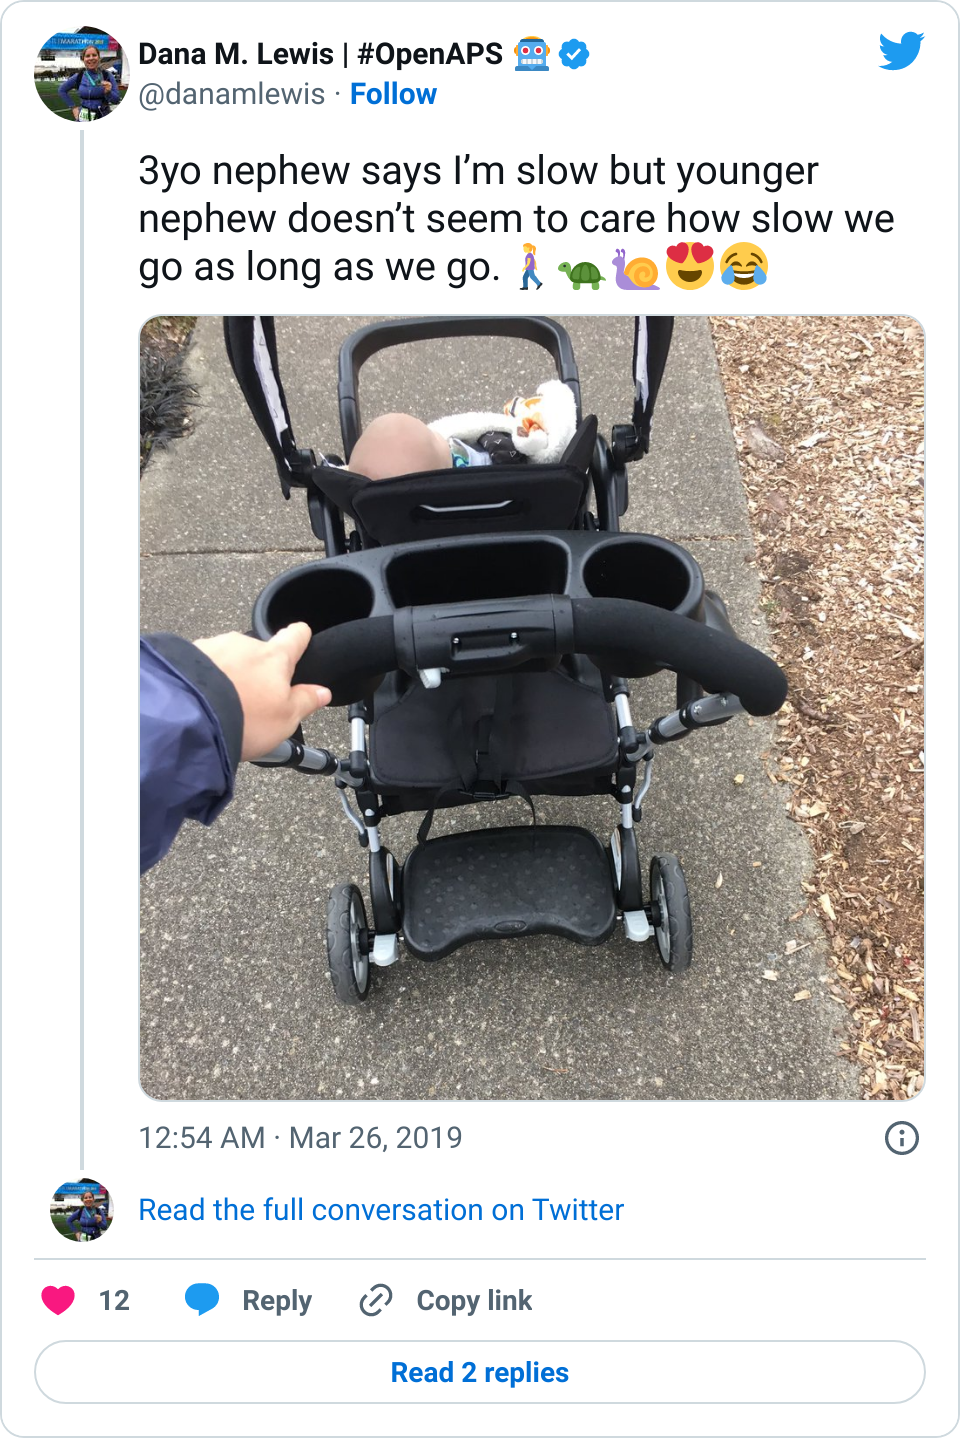
  • I had to spend the first half hour or so working on my weight bearing by myself. I couldn’t talk on the phone or talk with Scott while I did it; it required a lot of concentration. (The only thing I could do is listen to music, because I’m used to running with music). So distractions did not help when I got started, but toward the end of the hour I could handle and appreciate distractions. Same for day 2 of a weight – having distractions or a task to do (e.g. walk from A to B, or walking while my nephew was on his scooter) helped pass the time and get me to complete my hour or more of weight-bearing work.
  • Be careful with your hands and wrists. Blisters are common, and I managed to both squish a nerve (which caused me to have a numb side of my hand and be unable to type for several days) and also pull or damage tendons on both sides of my wrists. I was torn between choosing to delay my weight bearing progression work, but also recognizing that the sooner I got to full weight bearing the sooner I could completely ditch my crutches and be done hurting my hands. So I chose to continue, but in some cases shortened my chunks of WB walking down to 15 minutes wherever possible to reduce the pain and pressure on my hands.
You’ll likely also be doing range of motion exercises. At first, it’s scary how jerky your motions may be and how little your muscles and tendons respond to your brain’s commands. One thing I did was take a video on day 1 showing me pointing and stretching my ankle, and doing my ABC’s with my foot. Then every week or so when I was feeling down and frustrated about how my ankle wasn’t fully mobile yet, I’d take another video and watch the old one to compare. I was able to see progress every few days in terms of being able to point my foot more, and wider motions for doing the ABC’s with my foot.
Also remember, once you’re weight bearing and working toward getting rid of your crutches, you can use things like strollers or grocery carts to help you balance (and also kill some of your weight bearing time!) without crutches. The practice will make it easier for re-learning your posture and gaining confidence in walking without crutches.

Using my nephew's stroller to support me walking in a boot after my ankle fracture as I returned to weight bearing

Don’t you usually talk about diabetes stuff on this blog? 😉

(If anyone finds this post in the future mainly for ankle fracture and weight bearing transition/progression tips, you can ignore this part!)

Diabetes-wise, I’ve had a pretty consistent experience as to what I articulated in the last post about actually breaking bones.

  • It was common for my first few days of progressive weight bearing to have a small pain/stress rise in my BGs. It wasn’t much, but 20-30 points was an obvious stress response as I did the first few 15 minutes of weight bearing practice. The following days didn’t see this, so my body was obviously getting used to the stress of weight bearing again.
  • However, on the flip side, the first week of weight bearing progression also caused several lows. The hour of walking was the equivalent of any new activity where I usually have several hours later delayed sensitivity to insulin out of nowhere, and my blood sugars “go whoosh” – dropping far more than they normally would. I had two nights in a row in the first week where I woke up 2-3 hours after I went to sleep and needed to eat some carbs. This normally happens maybe once every few months (if that) now as an OpenAPS user, so it was obviously associated with this new surge of physical activity and hard work that I was doing for the weight bearing.
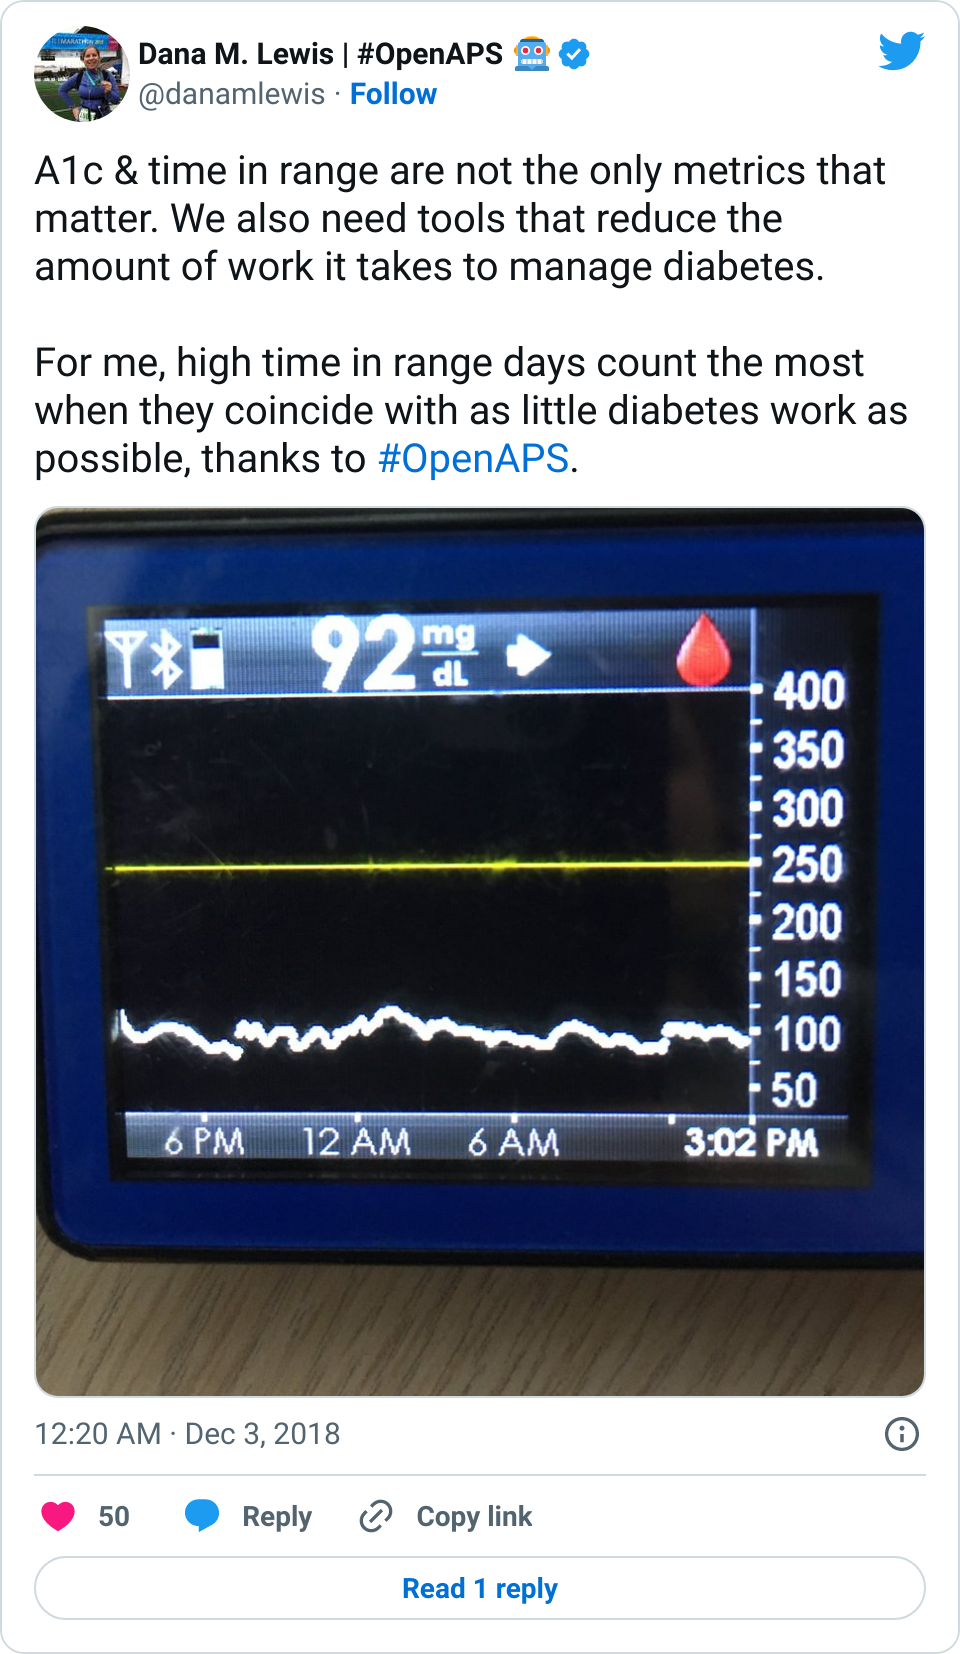
  • Overall, while I was 100% non-weight bearing, I was eating slightly (but not much) lower carb and slightly less processed food than I usually do. But not always. One day I ended up having 205+ grams of carbs for me (quite a bit more than my average). However, thanks to #OpenAPS, I still managed to have a 100% in range day (80-150 mg/dL). Similarly on a travel day soon after, I ate a lot less (<50g carb) and also had a great day where OpenAPS took care of any surges and dips automatically – and more importantly, without any extra work and energy on my part. Having OpenAPS during the broken bone recovery has been a HUGE benefit, not only for keeping my BGs in range so much of the time for optimal healing, but also for significantly reducing the amount of work and cognitive burden it takes to stay alive with type 1 diabetes in general. I barely had energy to eat and do my hour of weight bearing each day, let alone anything else. Thankfully good BGs didn’t fall by the wayside, but without this tech it certainly would have.

And finally the pep talk I gave myself every day during weight bearing progression work:

This is short-term and necessary discomfort and suffering on the way to weight bearing. It sucks, but you can and will do it. You have to do it. If you need to take a break, take a break. If you need to do something else to get yourself pumped up and motivated to do your weight bearing, it’s ok to do that. But you’ll get there. Slowly, but surely. You’ve got this!

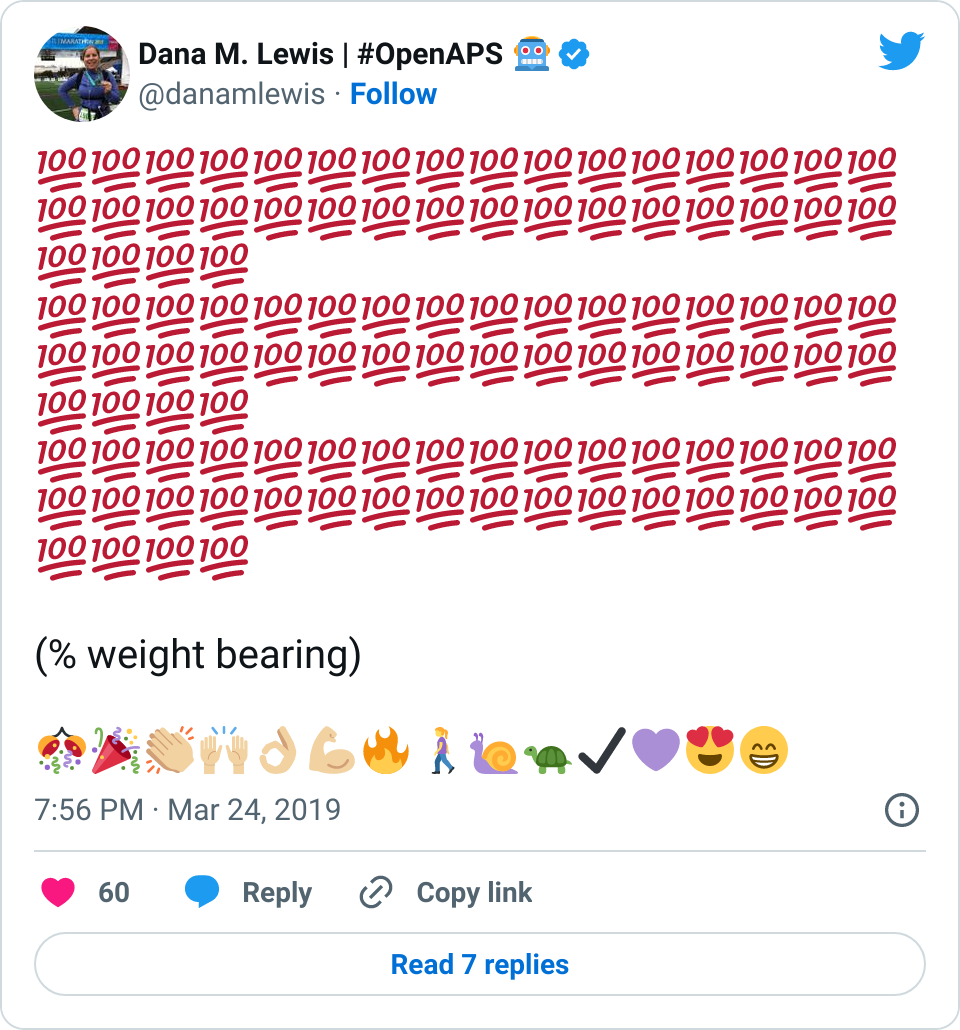
Proof that I did get there:

Lots of 100 emojis celebrating 100% weight bearing after my broken ankle

Best of luck and lots of support and encouragement to anyone who’s working their way to weight bearing after an injury, and many thanks to everyone who’s supported me and cheered me on virtually along the way!

2021 update – see this post about (finally) running the marathon that I had signed up for before I broke my ankle!

4 years DIY closed looping with #OpenAPS – what changed and what hasn’t

It’s hard to express the magnitude of how much closed looping can improve a person with diabetes’ life, especially to someone who doesn’t have diabetes or live closely with someone that does. There are so many benefits – and so many way beyond the typically studied “A1c improvement” and “increased time in range”. Sure, those happen (and in case you haven’t seen it, see some of the outcomes from various international studies looking at DIY closed loop outcomes). But everything else…it’s hard to explain all of the magic that happens in real life, that’s made so much richer by having technology that for the most part keeps diabetes out of the way, and more importantly: off the top of your mind.

Personally, my first and most obvious benefit, and the whole reason I started DIYing in the first place, was to have the peace of mind to sleep safely at night. Objective achieved, immediately. Then over time, I got the improvements in A1c and time in range, plus reduction in time spent doing diabetes ‘stuff’ and time spent thinking about my own diabetes. The artificial pancreas ‘rigs’ got smaller. We improved the algorithm, to the point where it can handle the chaos that is everything from menstrual cycle to having the flu or norovirus.

More recently, in the past ~17 months, I’ve achieved an ultimate level of not doing much diabetes work that I never thought was possible: with the help of faster insulin and things like SMB’s (improved algorithm enhancements in OpenAPS), I’ve been able do a simple meal announcement by pressing a button on my watch or phone..and not having to bolus. Not worrying about precise carb counts. Not worrying about specific timing of insulin activity. Not worrying about post-meal lows. Not worrying about lots of exercise. And the results are pretty incredible to me:

We should be measuring and reducing user burden with AID in addition to improving TIR and A1c

But I remember early on when we had announced that we had figured out how to close the loop. We got a lot of push back saying, well, that’s good for you – but will it work for anyone else? And I remember thinking about how if it helped one other person sleep safely at night..it would be worth the amount of work it would take to open source it. Even if we didn’t know how well it would work for other people, we had a feeling it might work for some people. And that for even a few people who it might work for, it was worth doing. Would DIY end up working for everyone, or being something that everyone would want to do? Maybe not, and definitely not. We wouldn’t necessarily change the world for everyone by open sourcing an APS, but that could help change the world for someone else, and we thought that was (and still is) worth doing. After all, the ripple effect may help ultimately change the world for everyone else in ways we couldn’t predict or expect.

Ripple_effect_DanaMLewisThis has become true in more ways than one.

That ‘one other person’ turned into a few..then dozen..hundreds..and now probably thousand(s) around the world using various DIY closed loop systems.

And in addition to more people being able to choose to access different DIY systems with more pumps of choice, CGMs of choice, and algorithm of choice, we’ve also seen the ripple effect in the way the world works, too. There is now, thankfully, at least one company who is evaluating open source code; running simulations with it; and where it is out-performing their original algorithm or code components, utilizing that knowledge to improve their system. They’re also giving back to the open source diabetes community, too. Hopefully more companies will take this approach & bring better products more quickly to the market. When they are ready to submit said products, we know at least U.S. regulators at the FDA are ready to quickly review and work with companies to get better tools on the market. That’s a huge change from years ago, when there was a lot of finger pointing and what felt like a lot of delay preventing newer technology from reaching the market. The other change I’m seeing is in diabetes research, where researchers are increasingly working directly with patients from the start and designing better studies around the things that actually matter to people with diabetes, including analyzing the impact and outcomes of open source technology.

After five years of open source diabetes work, and specifically four years of DIY closed looping, it finally feels like the ripples are ultimately helping achieve the vision we had at the start of OpenAPS, articulated in the conclusion of the OpenAPS Reference Design:

OpenAPS_Reference_Design_conclusionIs there still more work to do? Absolutely.

Even as more commercial APS roll out, it takes too long for these to reach many countries. And in most parts of the world, it’s still insanely hard and/or expensive to get insulin (which is one of the reasons Scott and I support Life For A Child to help get insulin, supplies, and education to as many children as possible in countries where otherwise they wouldn’t be able to access it – more on that here.). And even when APS are “approved” commercially, that doesn’t mean they’ll be affordable or accessible, even with health insurance. So I expect our work to continue, not only to support ongoing improvements with DIY systems directly; but also with encouraging and running studies to generalize knowledge from DIY systems; hopefully seeing DIY systems approved to work with existing interoperable devices; helping any company that will listen to improve their systems, both in terms of algorithms but also in terms of usability; helping regulators to see both what’s possible as well as what’s needed to successfully using these types of system in the real world. I don’t see this work ending for years to come – not until the day where every person with diabetes in every country has access to basic diabetes supplies, and the ability to choose to use – or not – the best technology that we know is possible.

But even so, after four years of DIY closed looping, I’m incredibly thankful for the quality of life that has been made possible by OpenAPS and the community around it. And I’m thankful for the community for sharing their stories of what they’ve accomplished or done while using DIY closed loop systems. It’s incredible to see people sharing stories of how they are achieving their best outcomes after 45 years of diabetes; or people posting from Antartica; or after running marathons; or after a successful and healthy pregnancy where they used their DIY closed loop throughout; or after they’ve seen the swelling in their eyes go done; etc.

The stories of the real-life impacts of this type of technology are some of the best ripple effects that I never want to forget.

Traveling through airport security with diabetes devices (with or without #OpenAPS)

tl;dr: Put your #OpenAPS or other artificial pancreas rigs through the x-ray machine; it’s a small computer and a battery.

Traveling through airport security with your diabetes devices and artificial pancreas rigs (#OpenAPS)

I travel quite a bit these days, so it’s pretty routine for me to pack up my diabetes gear and backup supplies and whisk away to the airport and the next adventure. In fact, in 2016 I think I went through airport security 44+ times, in several countries. I have never had any issues with my #OpenAPS (DIY hybrid closed loop artificial pancreas) rigs – even when I carry multiples. Here are some tips on what gear should be put where, who should be told what during the security process, and how to further simplify (as much as is possible with diabetes!) the airport security experience when traveling with diabetes.

Showing my OpenAPS rig on my hip at the airport

A list of diabetes gear you’re probably packing for your trip:

  • BG meter
  • Test strips
  • Lancet(s)
  • Pump sites
  • Reservoirs
  • CGM sensors
  • CGM receiver
  • Tape for sites/sensors
  • Syringes as back up
  • Anti-nausea meds
  • Depending on the length of your trip, backup pump/transmitter/meter/receiver/etc.
  • Snacks
  • Extra batteries to power your phone for uploading BGs
  • (Uploader phone if you’re still using an uploader to Nightscout)
  • Artificial pancreas rig (i.e. #OpenAPS rig, whether that’s a Raspberry Pi or Explorer Board setup, or a Rileylink)
  • Insulin
  • Extra insulin
  • Juice for lows

Out of that list? Here are the only things I would pull out of your bag.

  • Insulin/extra insulin*
  • Juice for lows**

Everything else (yes, including your CGM receiver; yes, including your pancreas rigs) can stay in your bag and go through the x-ray.

*If you have a single bottle of insulin, it’s under the liquid (3oz) limits, so you don’t technically need to pull it out. But if you are carrying numerous bottles/pens/etc., if you have them separately bagged and can pull out separately, I would do so in order to reduce the risk of them flagging your bag for needing additional screening.

** Yes, you have a medical need for liquid and can take juice through security. HOWEVER, I *highly* recommend having this in a baggie and pulled out of your bag so it is separate. They’ll often pick that up, examine it, and if you say “medical liquid for diabetes”, it’s fine. Sometimes you’ll get pulled for a pat down, but not always. And, this usually prevents them from having to dig through your bags to find the juice and go through all your things. (Which is annoying, not to mention time consuming).

My second “HOWEVER” related to juice: I’ve stopped carrying juice for lows when I air travel. Yes, it only takes an extra couple of minutes or whatever for them to check things out, but I’d rather not have any hassle if I can avoid it. I instead have switched to Starbursts, Skittles, and similar. (They’re super fast acting for me, and actually make it easier to do a small 4g correction vs having to bust open an entire 15g juice box that can’t really be saved for later.) I have those in my pocket or easily accessible in an outer pocket of the bag that will go under my seat on the plane. You can of course still carry juice, but think about if that’s really worth the hassle/effort and if there’s an alternative (glucose tabs, small wrapped candies, etc.) that might be easier for treating lows when traveling. YDMV, of course.

(My favorite carrying-juice-through-security story is this: I was traveling to somewhere in Europe while in college (well before my DIY closed loop days), and I had a large baggie jam-packed with 8 or 9 juice boxes and a bottle of insulin. Despite telling them that I had diabetes and was traveling internationally and this was medically necessary in case of low BGs, the TSA agent said “how many juice boxes could you possibly need in an 11 hour flight? You wouldn’t use more than one, right?” It was *really* hard not to laugh.)

What about insulin pumps? Do you take it off?

  • I currently am wearing an insulin pump that does not alarm in 99% of metal detectors because it’s not made with lots of metal. I also have TSA Pre-Check, which means 95% of the time when traveling in the U.S. I am only asked to go through a metal detector. So right before I walk up to security, I take my pump that’s usually clipped to an outer pants pocket and clip it inside my waist band and underneath my shirt. If it doesn’t alarm, then I proceed like a usual traveler to get my bags and be on my way.
  • If I am randomly selected by the metal detector to instead go through the body scanner:
    • YDMV/YMMV, but there are no guarantees that the body scanners will not break your pump. And if you have a super special limited edition rare pump that does a special thing (like those that enable you to DIY closed loop), as I do, it may make you decide that a pat down is better than risking your pump, since if it DOES break due to scanner interference, TSA sure isn’t going to pay to fix it/get you a new one, and a new one wouldn’t allow you to DIY closed loop anyway.
    • So, if I get randomly selected, I stop right there and say “opt out”. Say it to whoever is pointing you over to the body scanner, they’ll posssibly read you a script to confirm you want to opt out, and just keep saying “yes, I opt out” and “that’s fine” to the “but then you have to have a pat down!”. They’ll order up a same-gender TSA agent who will come get you, escort you around the body scanners, and you’ll get your pat down. The usual applies – if you want, you can ask for a private area for your pat down. I usually don’t care, but if you do, make sure you keep an eye on your bags and ask for those to come with you so they’re not left out in the open for anyone to accidentally take. (They’re usually pretty good about that, though.)
    • For the pat down, they’ll ask you about sensitive areas/medical devices. This is the time to point out your pump; tell them (pat the area) where it’s connected, and ditto for patting/pointing out your CGM sensor if you have one. They’ll be extra careful then to not accidentally catch their hands on those areas.
    • At the end, they’ll go swab their gloves, then come back and ask you to pat/touch your pump and then let them swab your hands.
  • If you don’t have Pre-Check, the above will likely happen every time. So if you’re an opt-out-of-body-scanner-type and travel more than 2 times a year…IMO Pre-Check is worth the money. (And think about getting Global Entry, which comes with Pre-Check included, and also gets you expedited return to the country after traveling abroad).
  • If you have a metal-cased pump (or any other pump, and just want this instead of the metal detector or the body scanner), you can ask for a hand inspection of your pump. Different manufacturers say different things about whether x-ray and body scanners are ok/not ok, so check with them and also go with your gut about what you’d like to do with your pump.  Keep in mind that the radiation your carry-on luggage gets from the hand-luggage x-ray is about 100 times what your body gets from a backscatter x-ray, so if you’re concerned about x-ray radiation damaging your pump, it should not be sent through the scanner with your carry-on luggage.

What about a doctor’s note?

I have never carried a doctor’s note, and have not had an issue in the 14+ years I’ve been flying with diabetes – including in dozen of international airports. YDMV, and if you’d feel more comfortable with one, you can get one from your doctor. But for what it’s worth, I don’t travel with one.

What about international airports?

The only thing to know about international airports is they have similar guidelines about liquids, so plan to also pull out your juice and toiletries from your bag. Same rules apply for keeping rigs, supplies, etc. in your bag otherwise. I’ve never had an issue based on pancreas rigs internationally, either. They’re small computers and batteries, so both TSA and international security are used to seeing those in the x-ray.

OpenAPS rigs are mini computers and can go through xray and airport security

(Let me know what other travel-related questions you have, and I’ll keep adding to this post if it’s helpful. Happy traveling!)