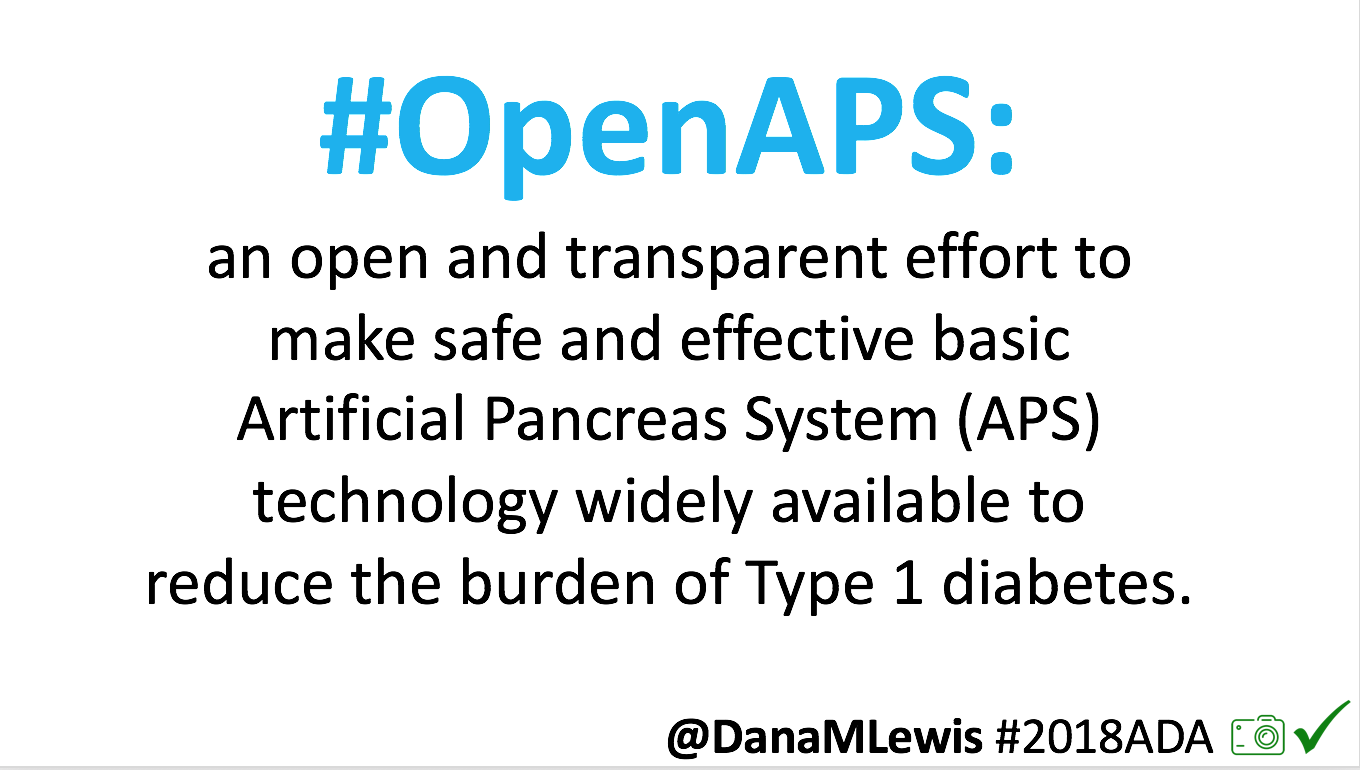
Like I did last year, I want to share the work being presented at #ADA2019 with those who are not physically there! (And if you’re presenting at #ADA2019 or another conference and would like suggestions on how to share your content in addition to your poster or presentation, check out these tips.) This year, I’m co-author on three posters and an oral presentation.
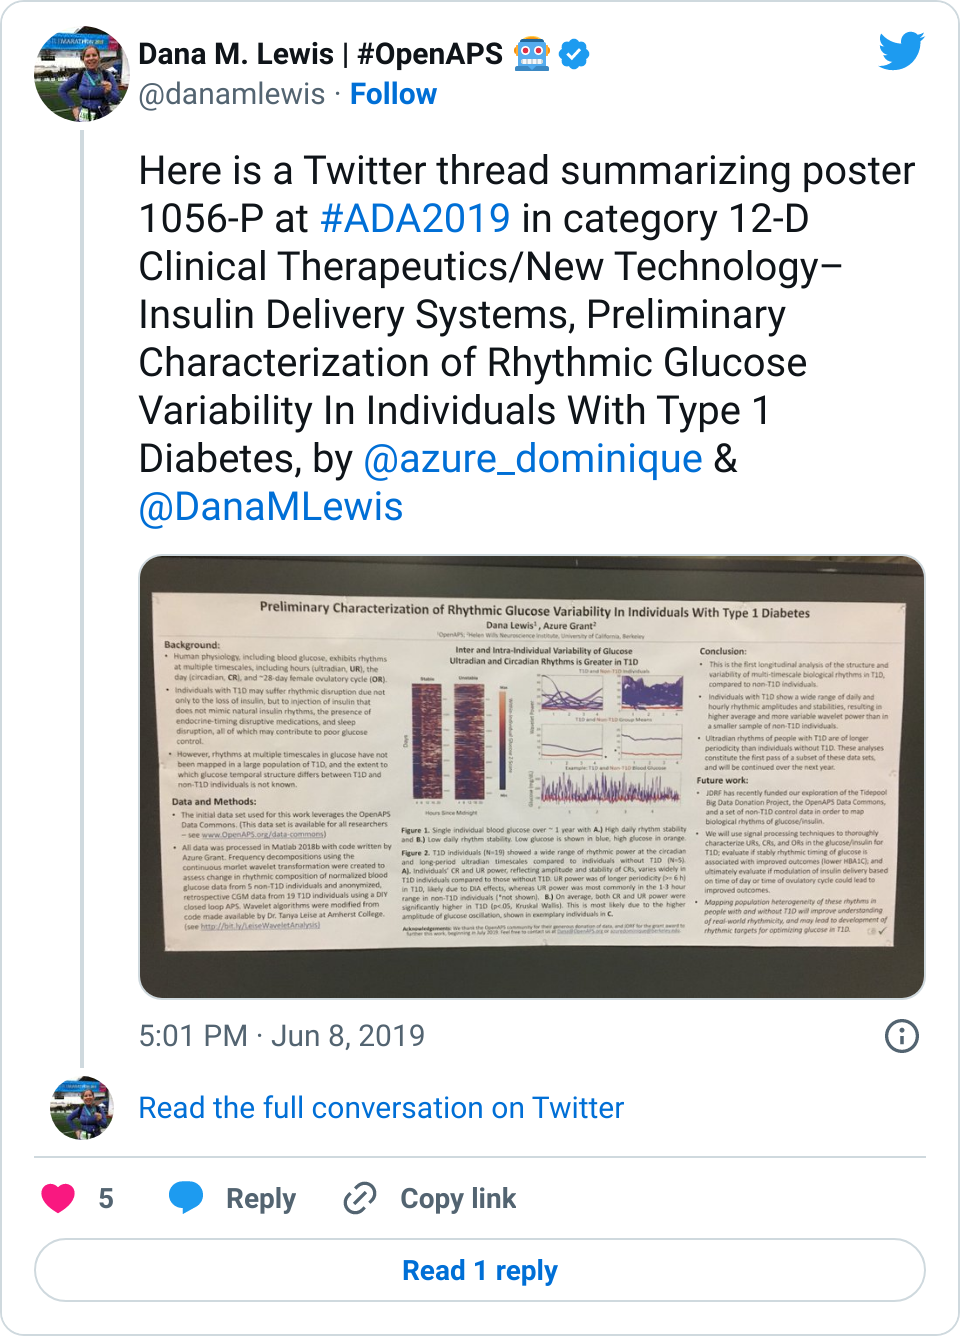
- 1056-P in category 12-D Clinical Therapeutics/New Technology–Insulin Delivery Systems, Preliminary Characterization of Rhythmic Glucose Variability In Individuals With Type 1 Diabetes, co-authored by Dana Lewis and Azure Grant.
- Come see us at the poster session, 12-1pm on Sunday! Dana & Azure will be presenting this poster.
- 76-OR, In-Depth Review of Glycemic Control and Glycemic Variability in People with Type 1 Diabetes Using Open Source Artificial Pancreas Systems, co-authored by Andreas Melmer, Thomas Züger, Dana Lewis, Scott Leibrand, Christoph Stettler, and Markus Laimer.
- Come hear our presentation in room S-157 (South, Upper Mezzanine Level), 2:15-2:30 pm on Saturday!
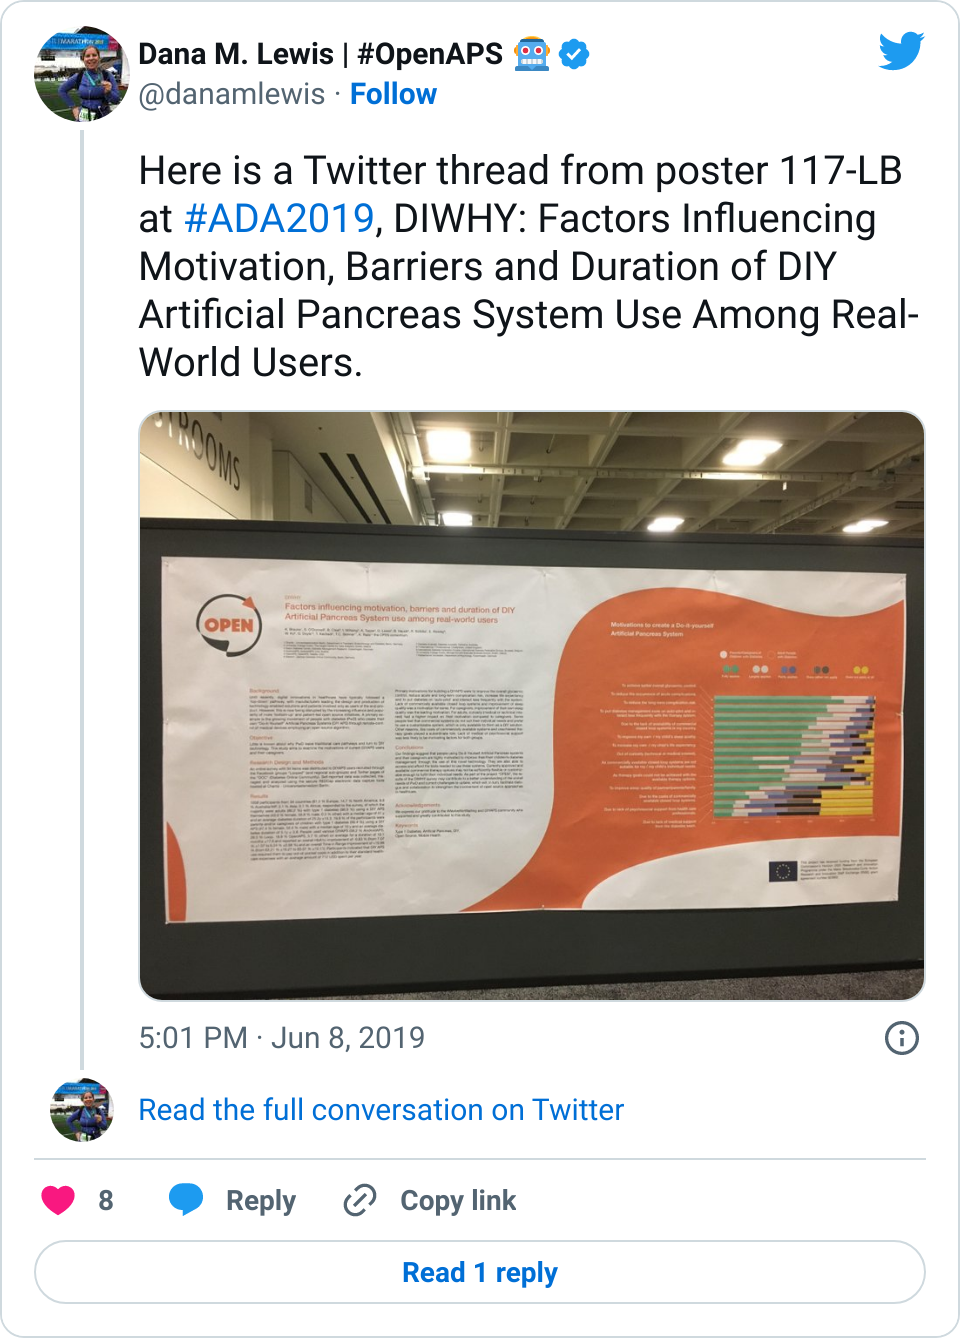
- 117-LB, DIWHY: Factors Influencing Motivation, Barriers and Duration of DIY Artificial Pancreas System Use Among Real-World Users, co-authored by Katarina Braune, Shane O’Donnell, Bryan Cleal, Ingrid Willaing, Adrian Tappe, Dana Lewis, Bastian Hauck, Renza Scibilia, Elizabeth Rowley, Winne Ko, Geraldine Doyle, Tahar Kechadi, Timothy C. Skinner, Klemens Raille, and the OPEN consortium.
- Come see us at the poster session, 12-1pm on Sunday! Scott will be presenting this poster.
- 78-LB, Detailing the Lived Experiences of People with Diabetes Using Do-it-Yourself Artificial Pancreas Systems – Qualitative Analysis of Responses to Open-Ended Items in an International Survey, co-authored by Bryan Cleal, Shane O’Donnell, Katarina Braune, Dana Lewis, Timothy C. Skinner, Bastian Hauck, Klemens Raille, and the OPEN consortium.
- Come see us at the poster session, 12-1pm on Sunday! Bryan Cleal will be presenting this poster.
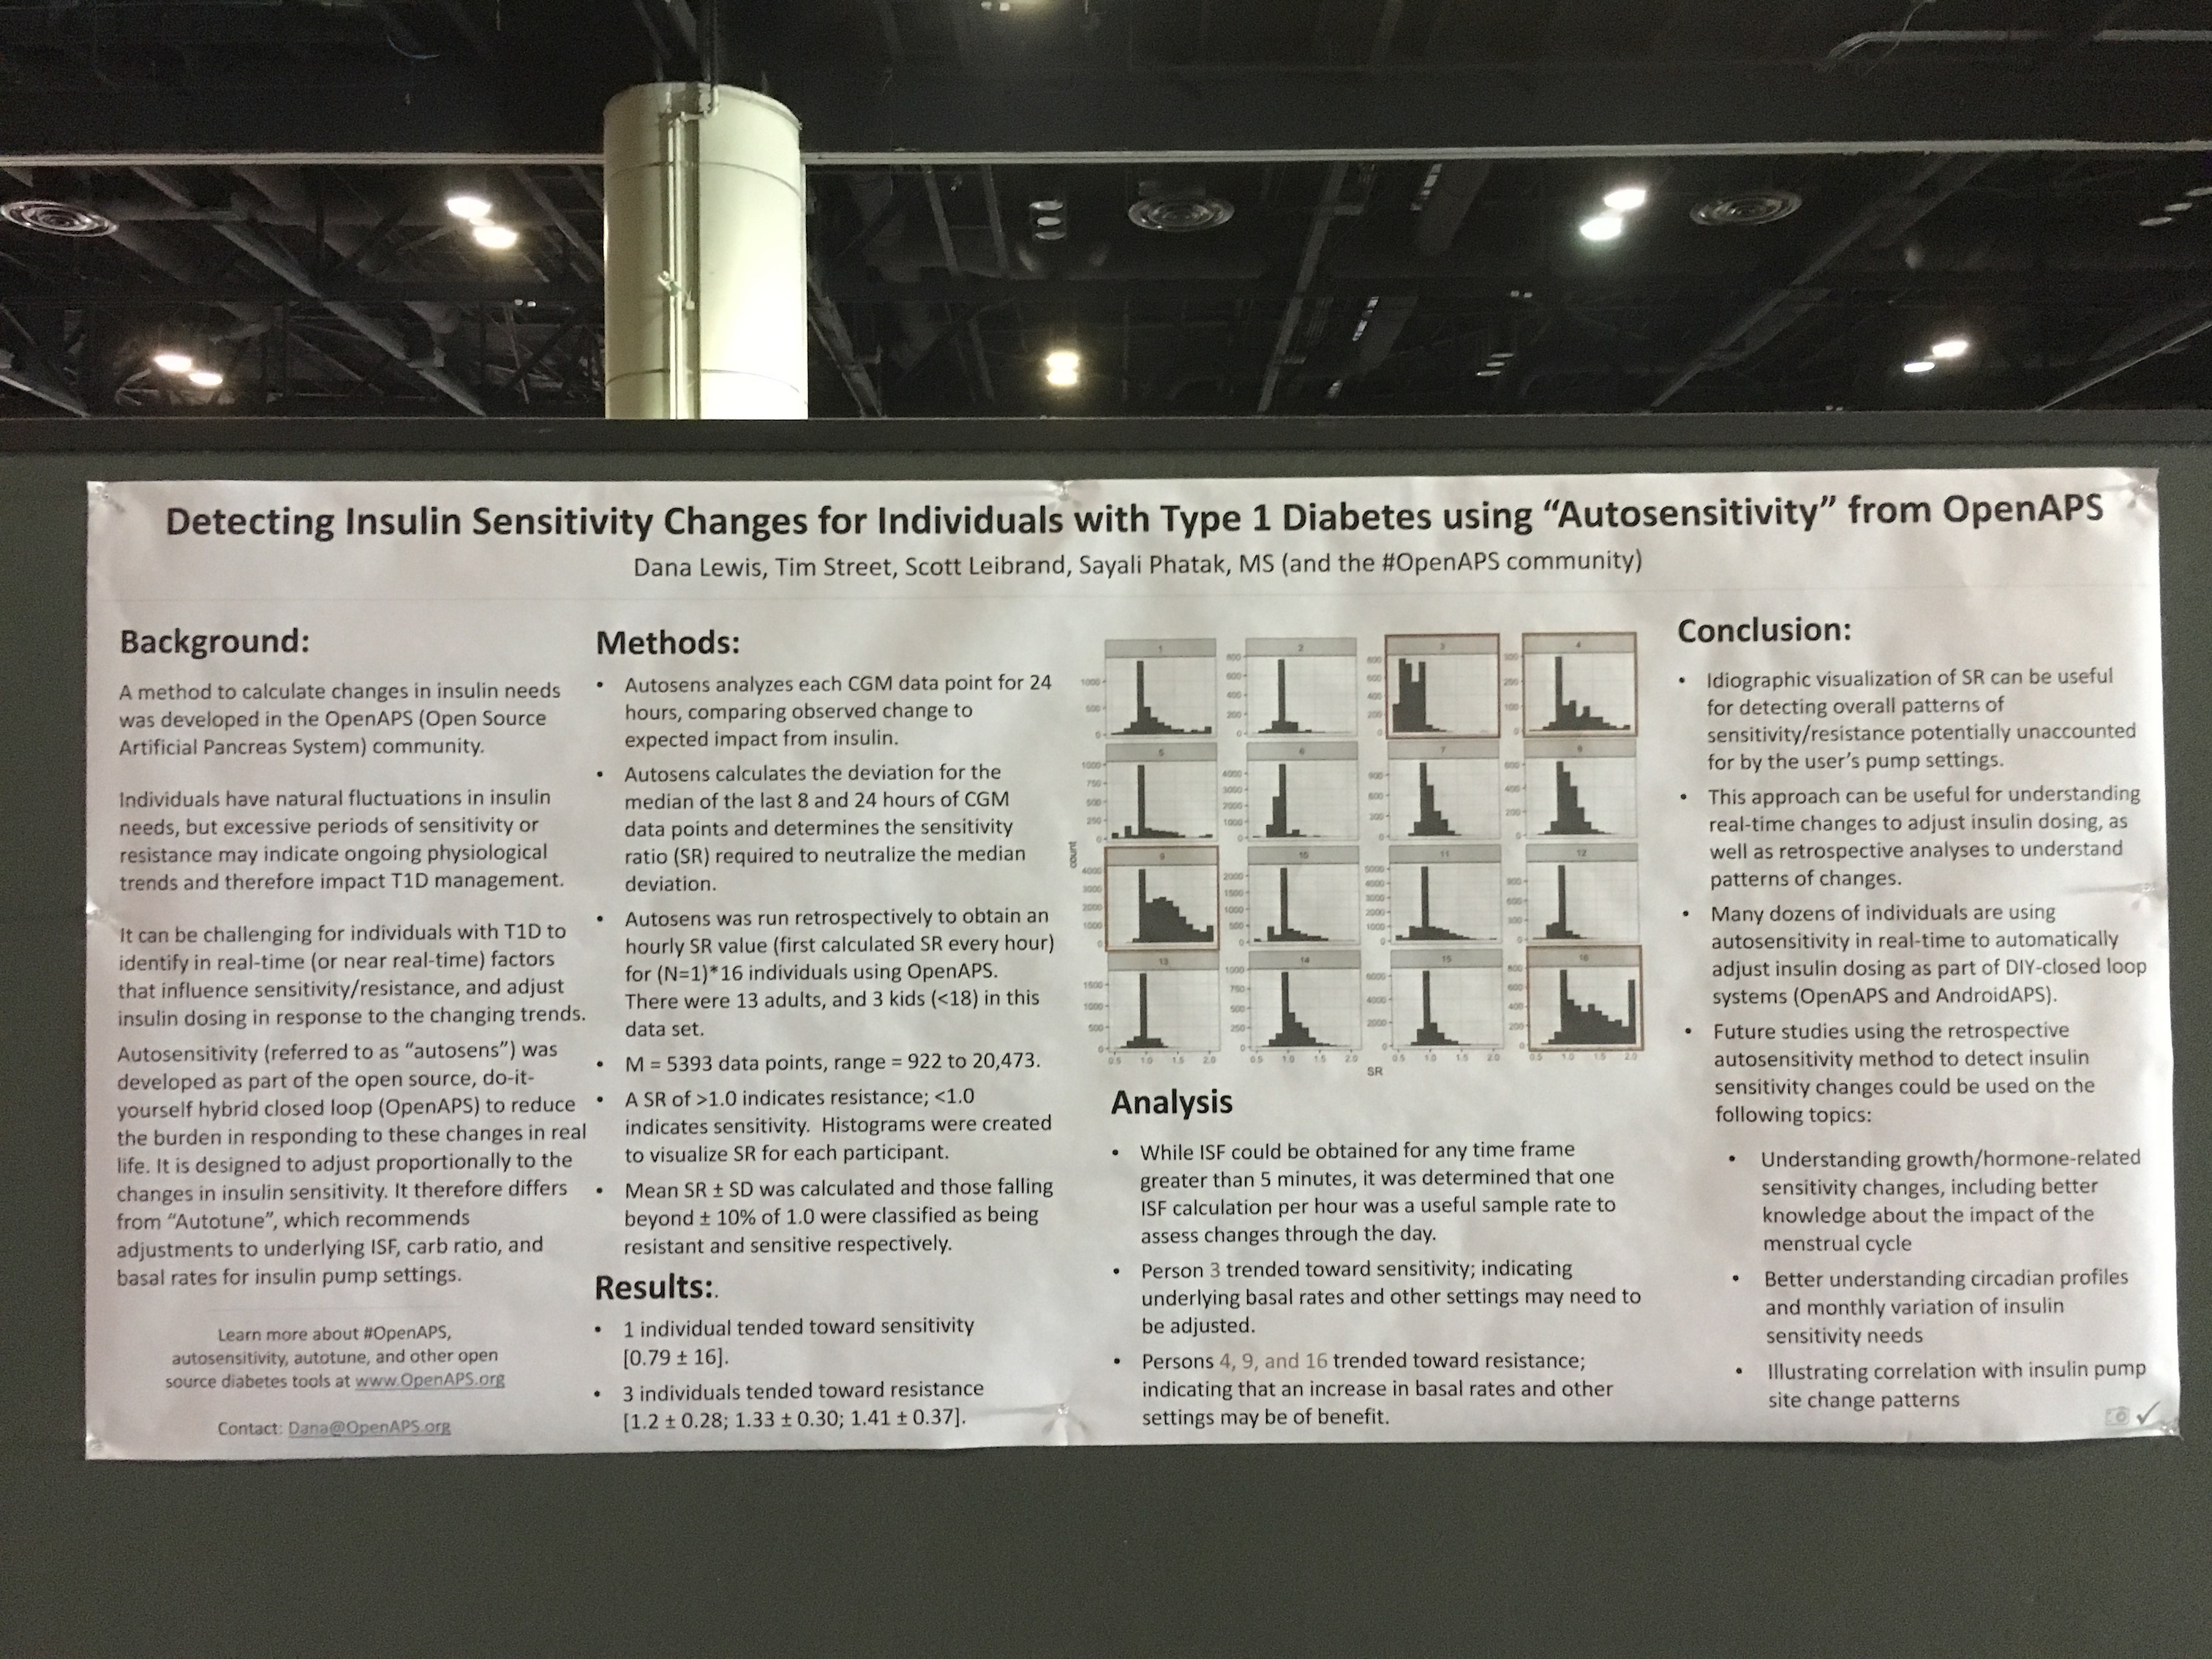
See below for full written summaries and pictures from each poster and the oral presentation.
—
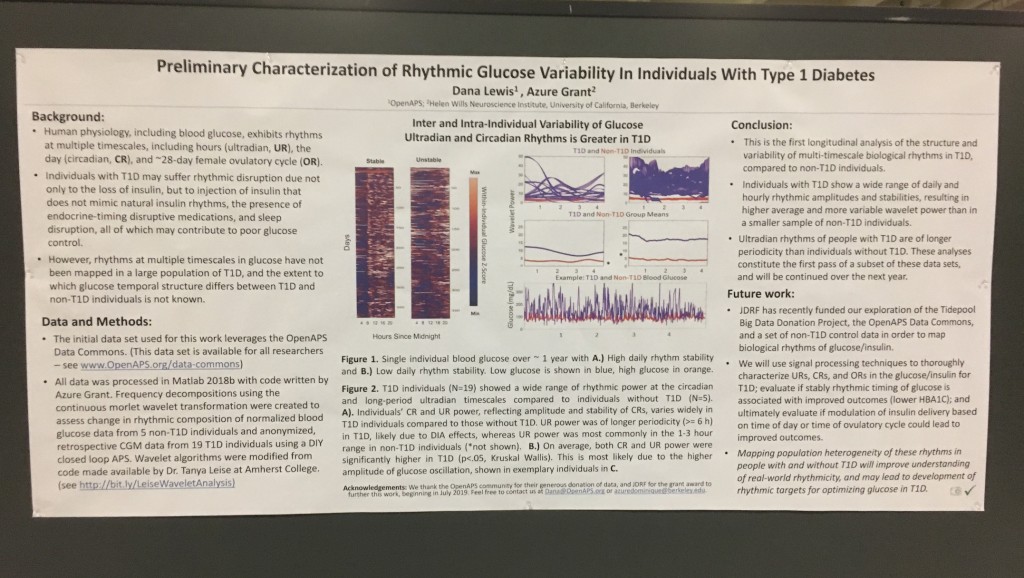
First up: the biological rhythms poster, formally known as 1056-P in category 12-D Clinical Therapeutics/New Technology–Insulin Delivery Systems, Preliminary Characterization of Rhythmic Glucose Variability In Individuals With Type 1 Diabetes!
As mentioned in this DiabetesMine interview, Azure Grant & I were thrilled to find out that we have been awarded a JDRF grant to further this research and undertake the first longitudinal study to characterize biological rhythms in T1D, which could also be used to inform improvements and personalize closed loop systems. This poster is part of the preliminary research we did in order to submit for this grant.
There is also a Twitter thread for this poster:
Background:
- Human physiology, including blood glucose, exhibits rhythms at multiple timescales, including hours (ultradian, UR), the day (circadian, CR), and the ~28-day female ovulatory cycle (OR).
- Individuals with T1D may suffer rhythmic disruption due not only to the loss of insulin, but to injection of insulin that does not mimic natural insulin rhythms, the presence of endocrine-timing disruptive medications, and sleep disruption.
- However, rhythms at multiple timescales in glucose have not been mapped in a large population of T1D, and the extent to which glucose rhythms differ in temporal structure between T1D and non-T1D individuals is not known.
Data & Methods:
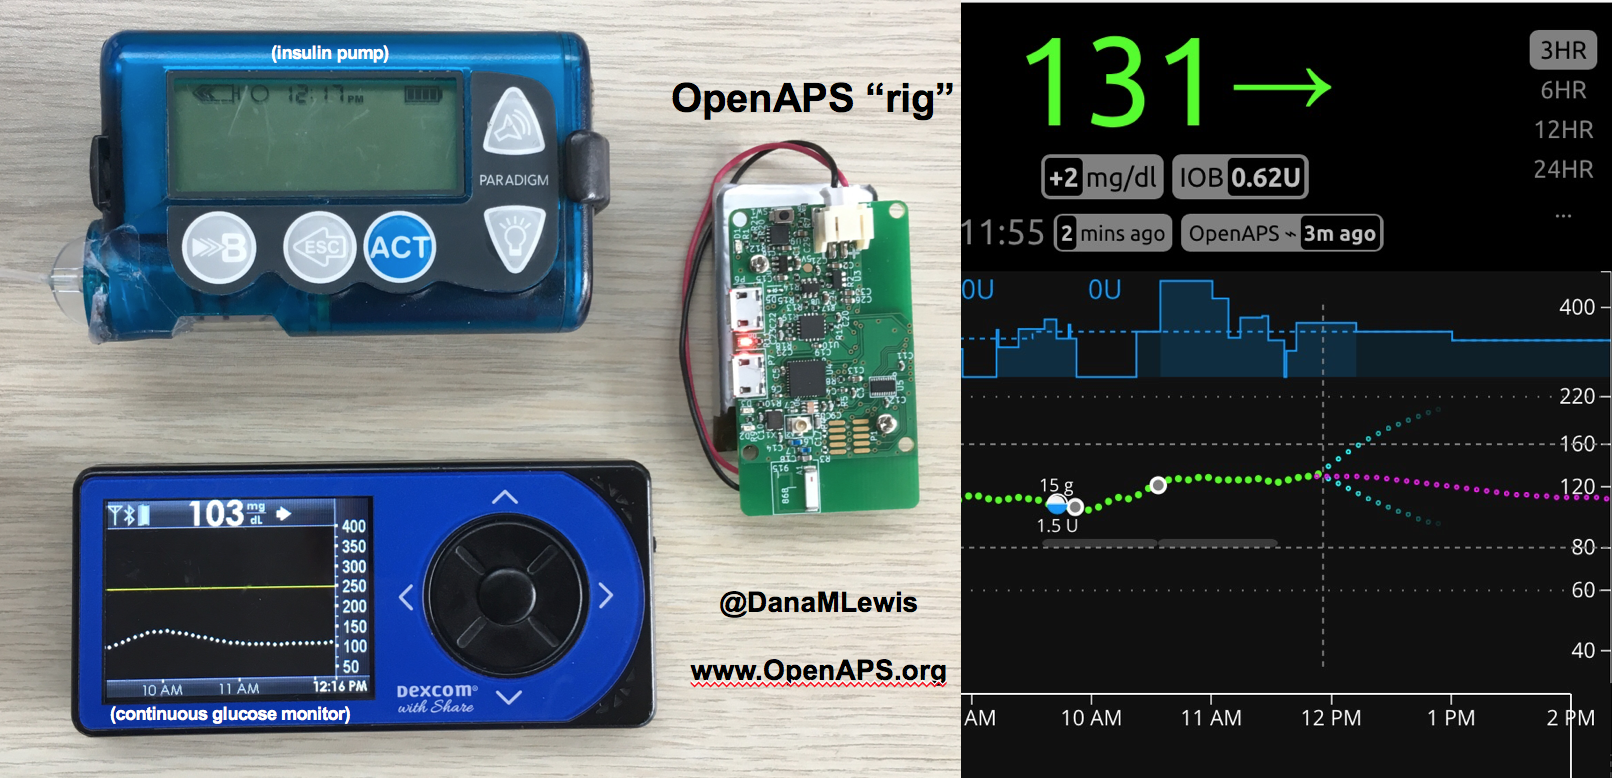
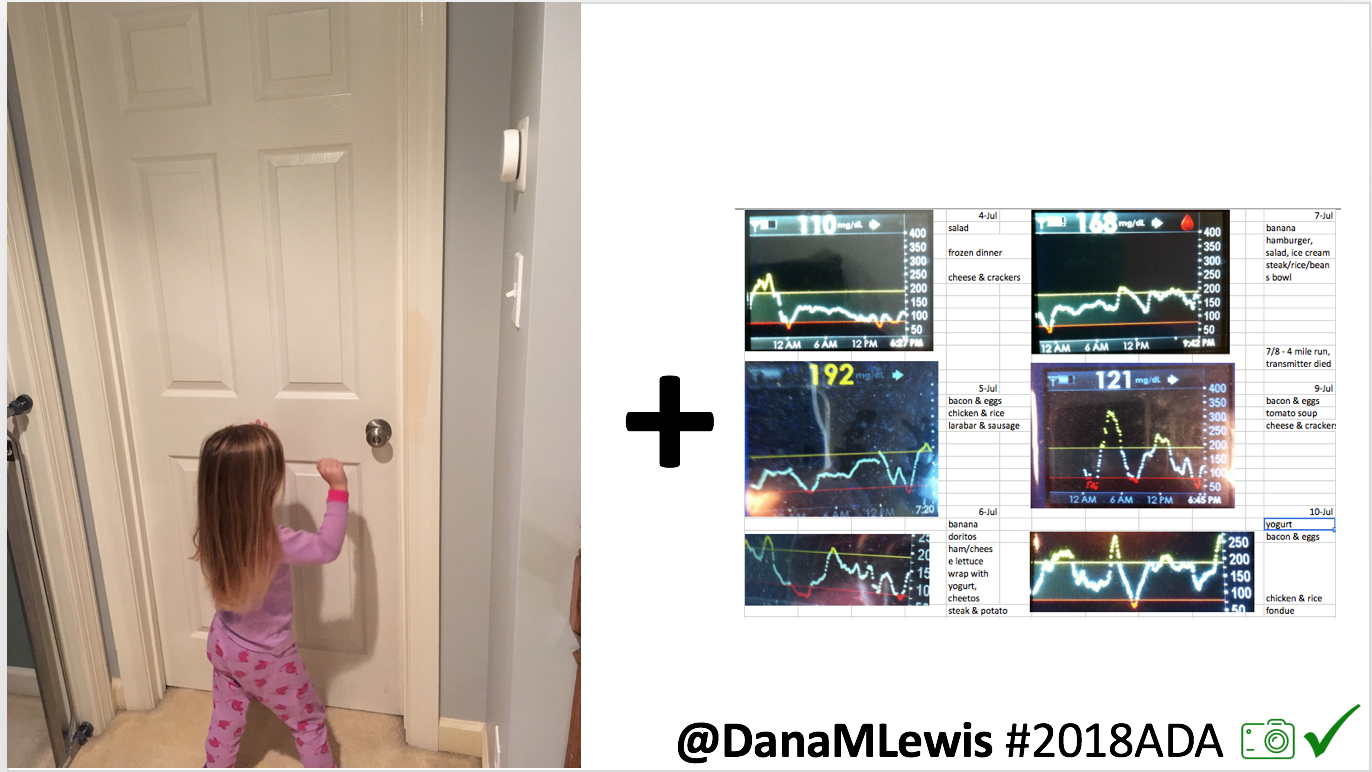
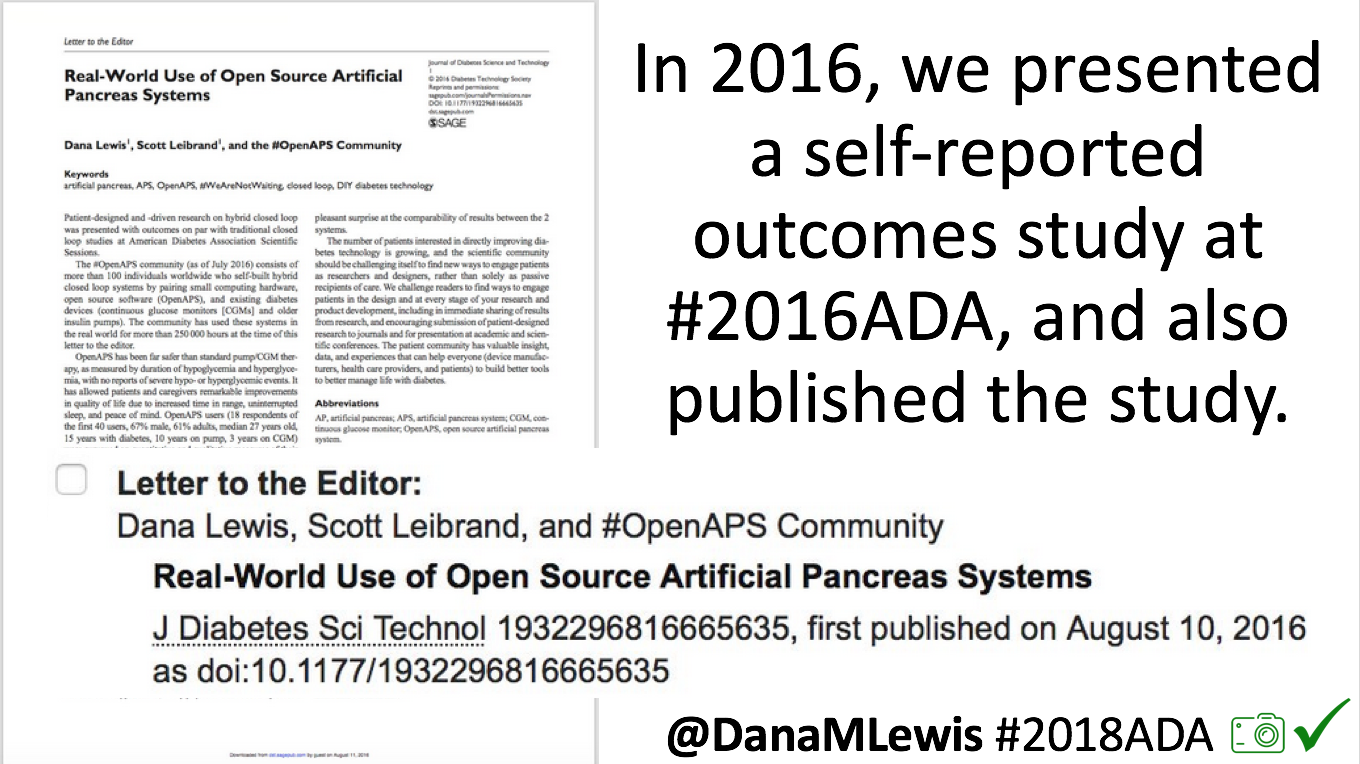
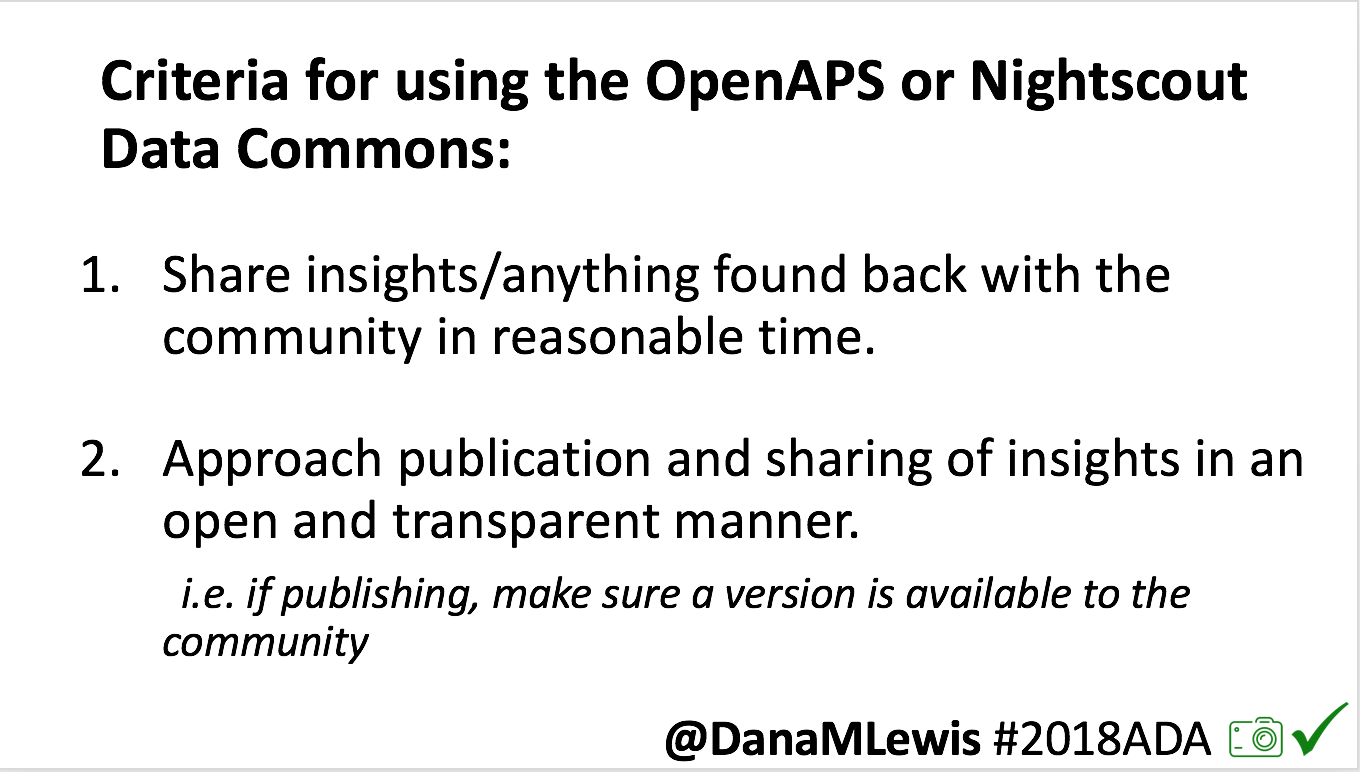
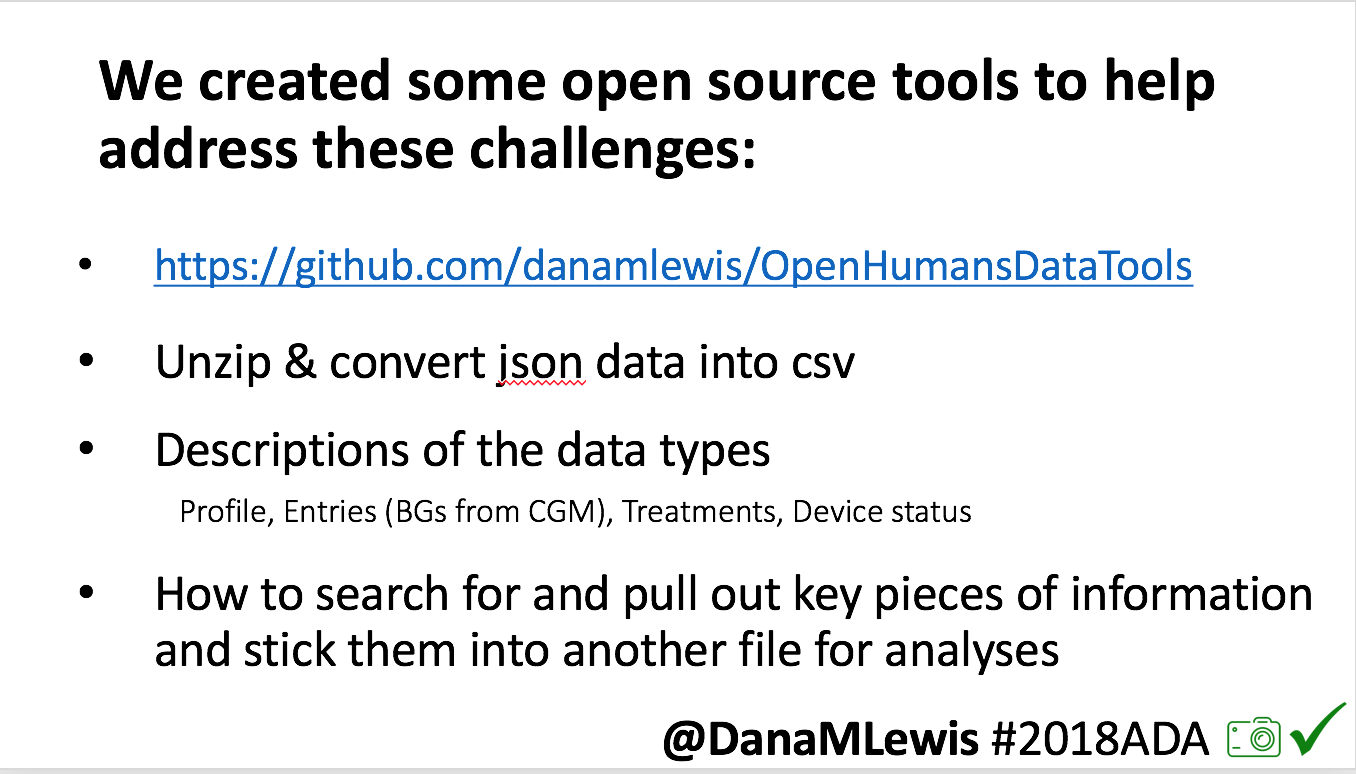
- The initial data set used for this work leverages the OpenAPS Data Commons. (This data set is available for all researchers – see www.OpenAPS.org/data-commons)
- All data was processed in Matlab 2018b with code written by Azure Grant. Frequency decompositions using the continuous morlet wavelet transformation were created to assess change in rhythmic composition of normalized blood glucose data from 5 non-T1D individuals and anonymized, retrospective CGM data from 19 T1D individuals using a DIY closed loop APS. Wavelet algorithms were modified from code made available by Dr. Tanya Leise at Amherst College (see http://bit.ly/LeiseWaveletAnalysis)
Results:
- Inter and Intra-Individual Variability of Glucose Ultradian and Circadian Rhythms is Greater in T1D
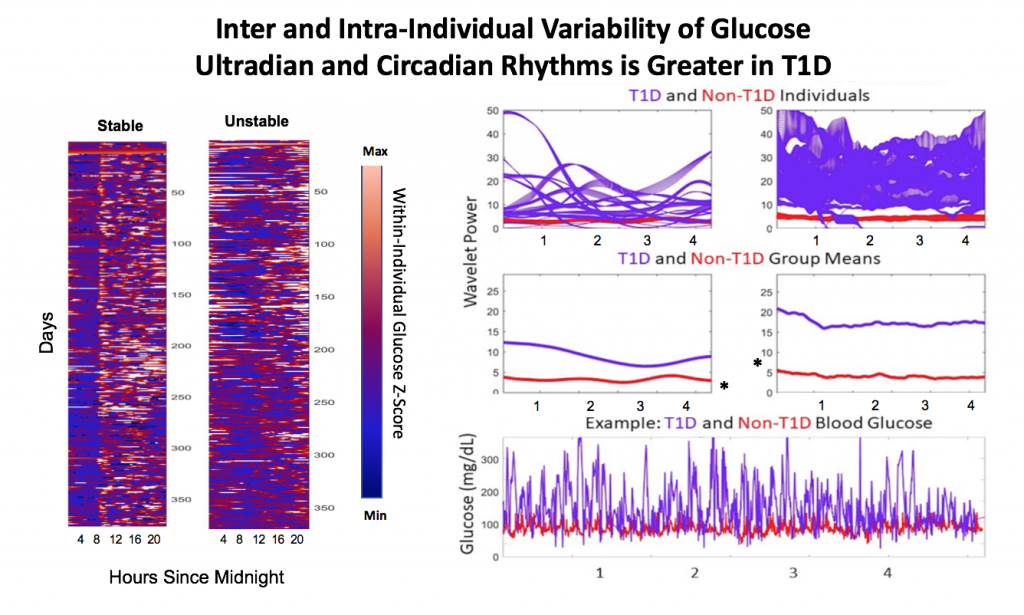
Figure 1. Single individual blood glucose over ~ 1 year with A.) High daily rhythm stability and B.) Low daily rhythm stability. Low glucose is shown in blue, high glucose in orange.
Figure 2. T1D individuals (N=19) showed a wide range of rhythmic power at the circadian and long-period ultradian timescales compared to individuals without T1D (N=5).
A). Individuals’ CR and UR power, reflecting amplitude and stability of CRs, varies widely in T1D individuals compared to those without T1D. UR power was of longer periodicity (>= 6 h) in T1D, likely due to DIA effects, whereas UR power was most commonly in the 1-3 hour range in non-T1D individuals (*not shown). B.) On average, both CR and UR power were significantly higher in T1D (p<.05, Kruskal Wallis). This is most likely due to the higher amplitude of glucose oscillation, shown in two individuals in C.
Conclusions:
- This is the first longitudinal analysis of the structure and variability of multi-timescale biological rhythms in T1D, compared to non-T1D individuals.
- Individuals with T1D show a wide range of circadian and ultradian rhythmic amplitudes and stabilities, resulting in higher average and more variable wavelet power than in a smaller sample of non-T1D individuals.
- Ultradian rhythms of people with T1D are of longer periodicity than individuals without T1D. These analyses constitute the first pass of a subset of these data sets, and will be continued over the next year.
Future work:
- JDRF has recently funded our exploration of the Tidepool Big Data Donation Project, the OpenAPS Data Commons, and a set of non-T1D control data in order to map biological rhythms of glucose/insulin.
- We will use signal processing techniques to thoroughly characterize URs, CRs, and ORs in the glucose/insulin for T1D; evaluate if stably rhythmic timing of glucose is associated with improved outcomes (lower HBA1C); and ultimately evaluate if modulation of insulin delivery based on time of day or time of ovulatory cycle could lead to improved outcomes.
- Mapping population heterogeneity of these rhythms in people with and without T1D will improve understanding of real-world rhythmicity, and may lead to non-linear algorithms for optimizing glucose in T1D.
Acknowledgements:
We thank the OpenAPS community for their generous donation of data, and JDRF for the grant award to further this work, beginning in July 2019.
Contact:
Feel free to contact us at Dana@OpenAPS.org or azuredominique@berkeley.edu.
—
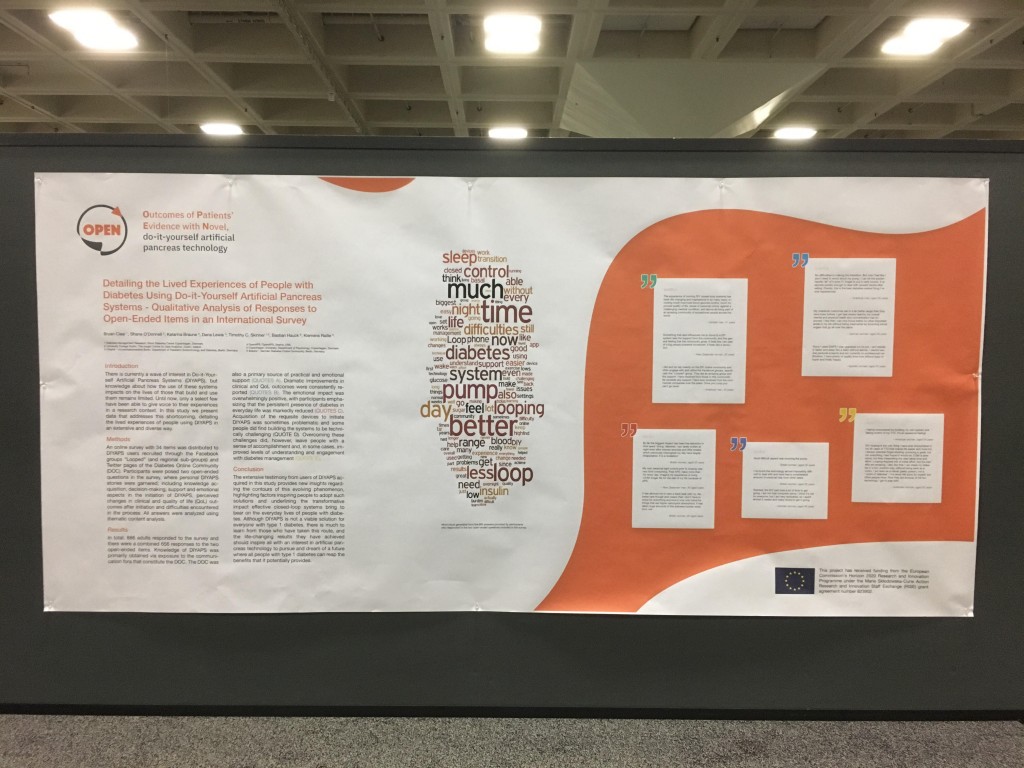
Next up, 78-LB, Detailing the Lived Experiences of People with Diabetes Using Do-it-Yourself Artificial Pancreas Systems – Qualitative Analysis of Responses to Open-Ended Items in an International Survey, co-authored by Bryan Cleal, Shane O’Donnell, Katarina Braune, Dana Lewis, Timothy C. Skinner, Bastian Hauck, Klemens Raille, and the OPEN consortium.
There is also a Twitter thread for this poster:
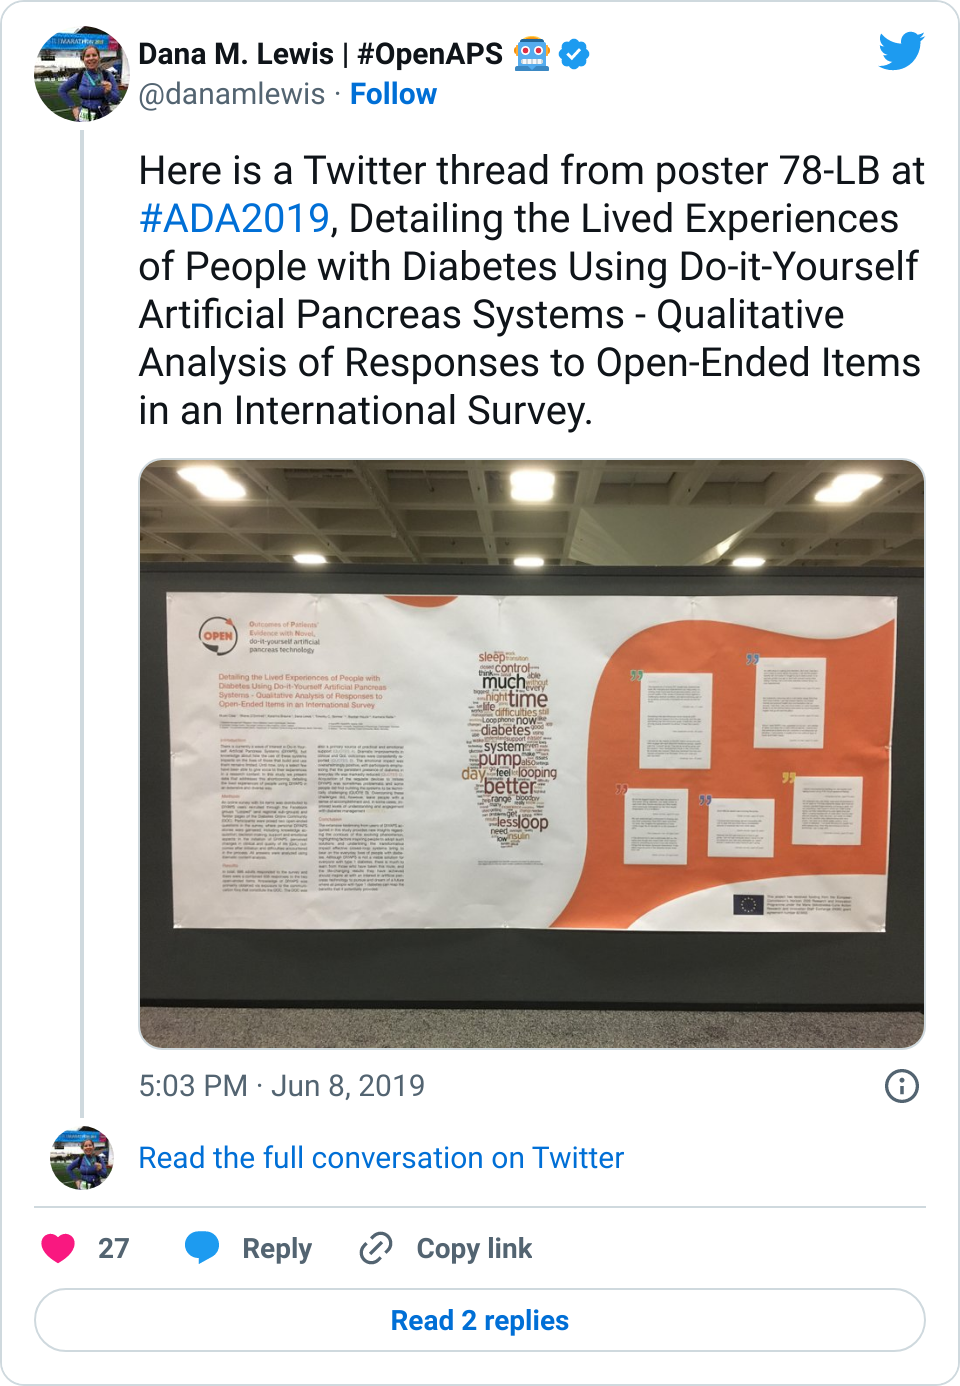
Introduction
There is currently a wave of interest in Do-it-Yourself Artificial Pancreas Systems (DIYAPS), but knowledge about how the use of these systems impacts on the lives of those that build and use them remains limited. Until now, only a select few have been able to give voice to their experiences in a research context. In this study we present data that addresses this shortcoming, detailing the lived experiences of people using DIYAPS in an extensive and diverse way.
Methods
An online survey with 34 items was distributed to DIYAPS users recruited through the Facebook groups “Looped” (and regional sub-groups) and Twitter pages of the Diabetes Online Community (DOC). Participants were posed two open-ended questions in the survey, where personal DIYAPS stories were garnered; including knowledge acquisition, decision-making, support and emotional aspects in the initiation of DIYAPS, perceived changes in clinical and quality of life (QoL) outcomes after initiation and difficulties encountered in the process. All answers were analyzed using thematic content analysis.
Results
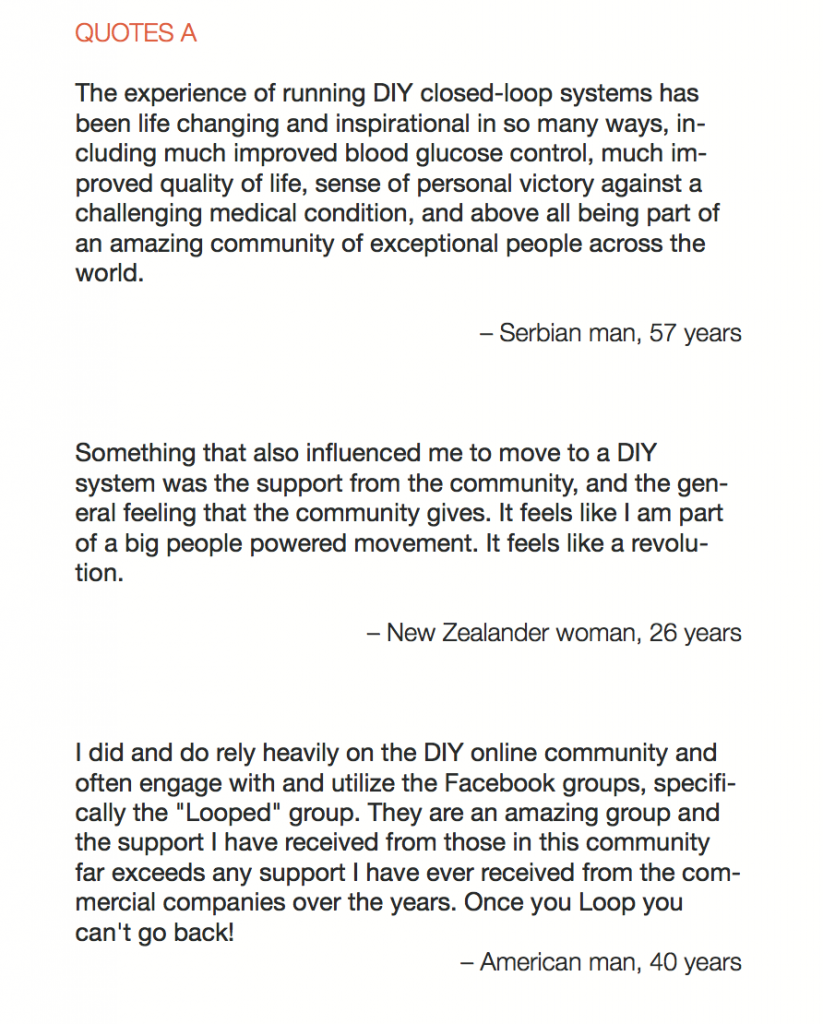
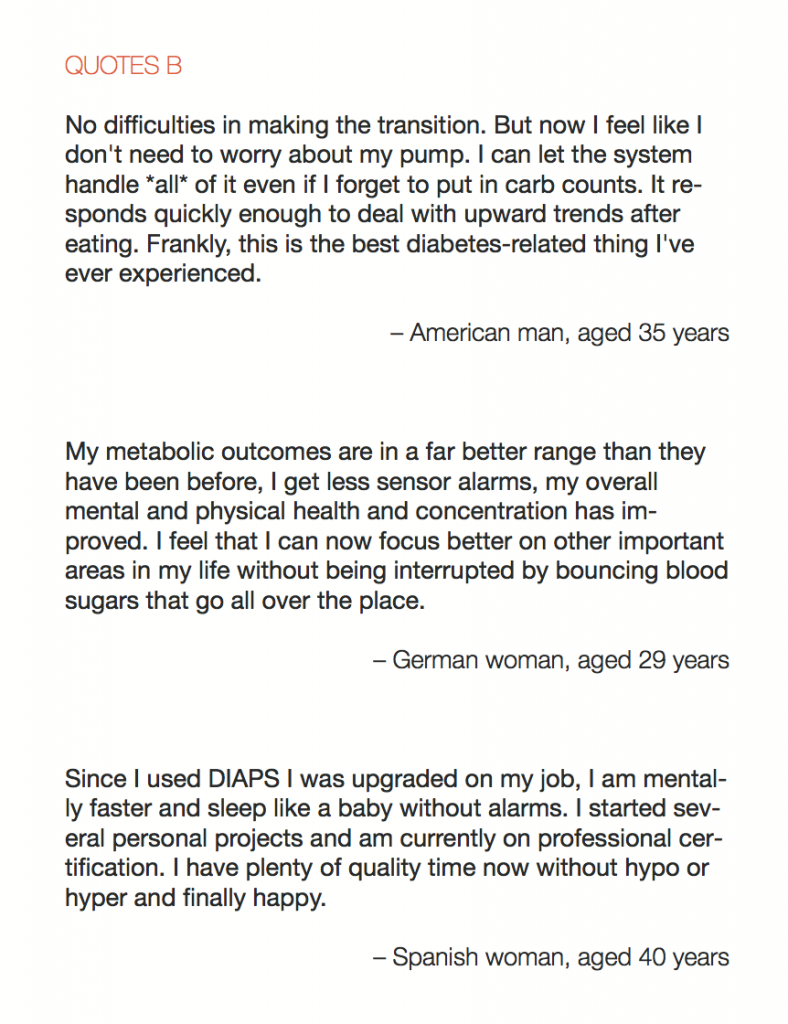
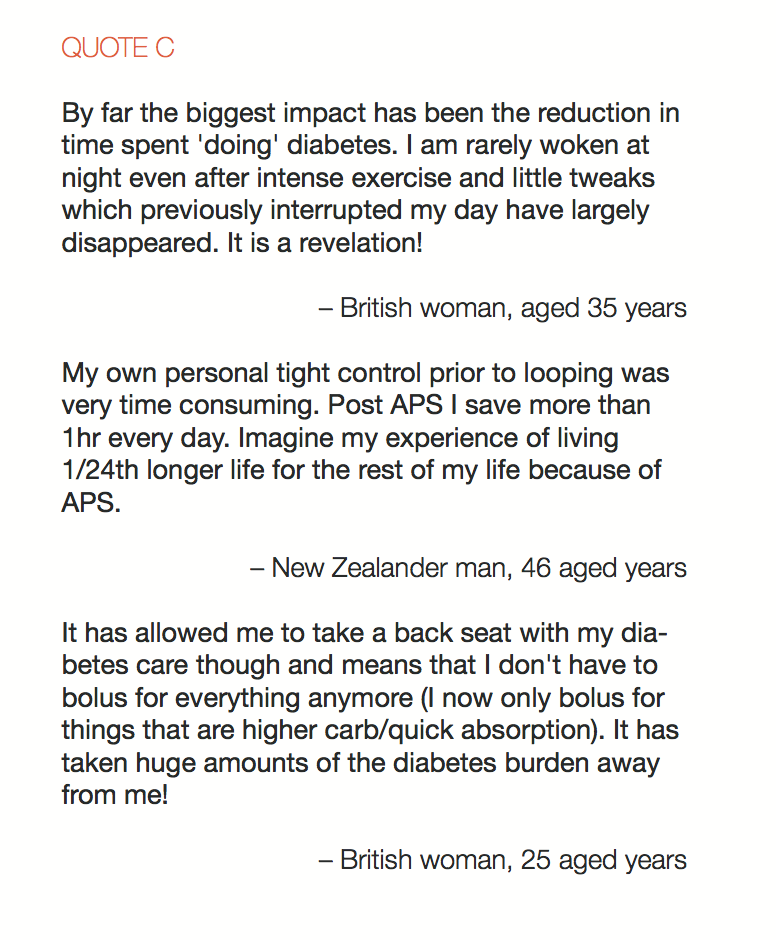
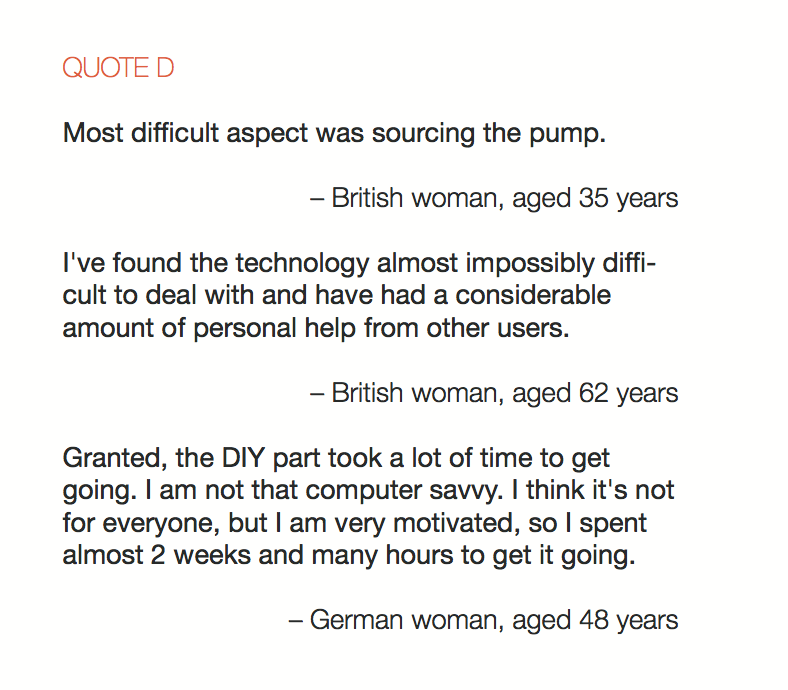
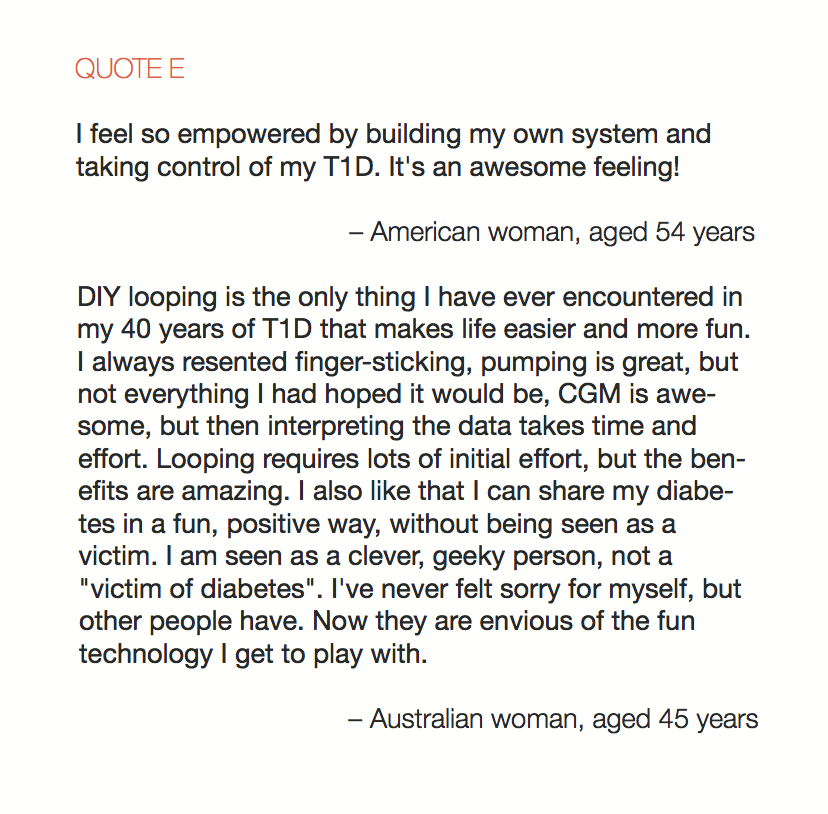
In total, 886 adults responded to the survey and there were a combined 656 responses to the two open-ended items. Knowledge of DIYAPS was primarily obtained via exposure to the communication fora that constitute the DOC. The DOC was also a primary source of practical and emotional support (QUOTES A). Dramatic improvements in clinical and QoL outcomes were consistently reported (QUOTES B). The emotional impact was overwhelmingly positive, with participants emphasizing that the persistent presence of diabetes in everyday life was markedly reduced (QUOTES C). Acquisition of the requisite devices to initiate DIYAPS was sometimes problematic and some people did find building the systems to be technically challenging (QUOTE D). Overcoming these challenges did, however, leave people with a sense of accomplishment and, in some cases, improved levels of understanding and engagement with diabetes management (QUOTE E).
Conclusion
The extensive testimony from users of DIYAPS acquired in this study provides new insights regarding the contours of this evolving phenomenon, highlighting factors inspiring people to adopt such solutions and underlining the transformative impact effective closed-loop systems bring to bear on the everyday lives of people with diabetes. Although DIYAPS is not a viable solution for everyone with type 1 diabetes, there is much to learn from those who have taken this route, and the life-changing results they have achieved should inspire all with an interest in artificial pancreas technology to pursue and dream of a future where all people with type 1 diabetes can reap the benefits that it potentially provides.
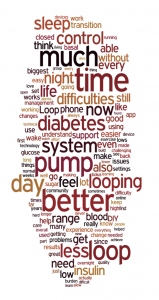
Also, see this word cloud generated from 665 responses in the two open-ended questions in the survey:
—
Next up is 117-LB, DIWHY: Factors Influencing Motivation, Barriers and Duration of DIY Artificial Pancreas System Use Among Real-World Users, co-authored by Katarina Braune, Shane O’Donnell, Bryan Cleal, Ingrid Willaing, Adrian Tappe, Dana Lewis, Bastian Hauck, Renza Scibilia, Elizabeth Rowley, Winne Ko, Geraldine Doyle, Tahar Kechadi, Timothy C. Skinner, Klemens Raille, and the OPEN consortium.
There is also a Twitter thread for this poster:
Background
Until recently, digital innovations in healthcare have typically followed a ‘top-down’ pathway, with manufacturers leading the design and production of technology-enabled solutions and patients involved only as users of the end-product. However, this is now being disrupted by the increasing influence and popularity of more ‘bottom-up’ and patient-led open source initiatives. A primary example is the growing movement of people with diabetes (PwD) who create their own “Do-it-Yourself” Artificial Pancreas Systems (DIY APS) through remote-control of medical devices employing an open source algorithm.
Objective
Little is known about why PwD leave traditional care pathways and turn to DIY technology. This study aims to examine the motivations of current DIYAPS users and their caregivers.
Research Design and Methods
An online survey with 34 items was distributed to DIYAPS users recruited through the Facebook groups “Looped” (and regional sub-groups) and Twitter pages of the “DOC” (Diabetes Online Community). Self-reported data was collected, managed and analyzed using the secure REDCap electronic data capture tools hosted at Charité – Universitaetsmedizin Berlin.
Results
1058 participants from 34 countries (81.3 % Europe, 14.7 % North America, 6.0 % Australia/WP, 3.1 % Asia, 0.1 % Africa), responded to the survey, of which the majority were adults (80.2 %) with type 1 diabetes (98.9 %) using a DIY APS themselves (43.0 % female, 56.8 % male, 0.3 % other) with a median age of 41 y and an average diabetes duration of 25.2y ±13.3. 19.8 % of the participants were parents and/or caregivers of children with type 1 diabetes (99.4 %) using a DIY APS (47.4 % female, 52.6 % male) with a median age of 10 y and an average diabetes duration of 5.1y ± 3.8. People used various DIYAPS (58.2 % AndroidAPS, 28.5 % Loop, 18.8 % OpenAPS, 5.7 % other) on average for a duration of 10.1 months ±17.6 and reported an overall HbA1c-improvement of -0.83 % (from 7.07 % ±1.07 to 6.24 % ±0.68 %) and an overall Time in Range improvement of +19.86 % (from 63.21 % ±16.27 to 83.07 % ±10.11). Participants indicated that DIY APS use required them to pay out-of-pocket costs in addition to their standard healthcare expenses with an average amount of 712 USD spent per year.
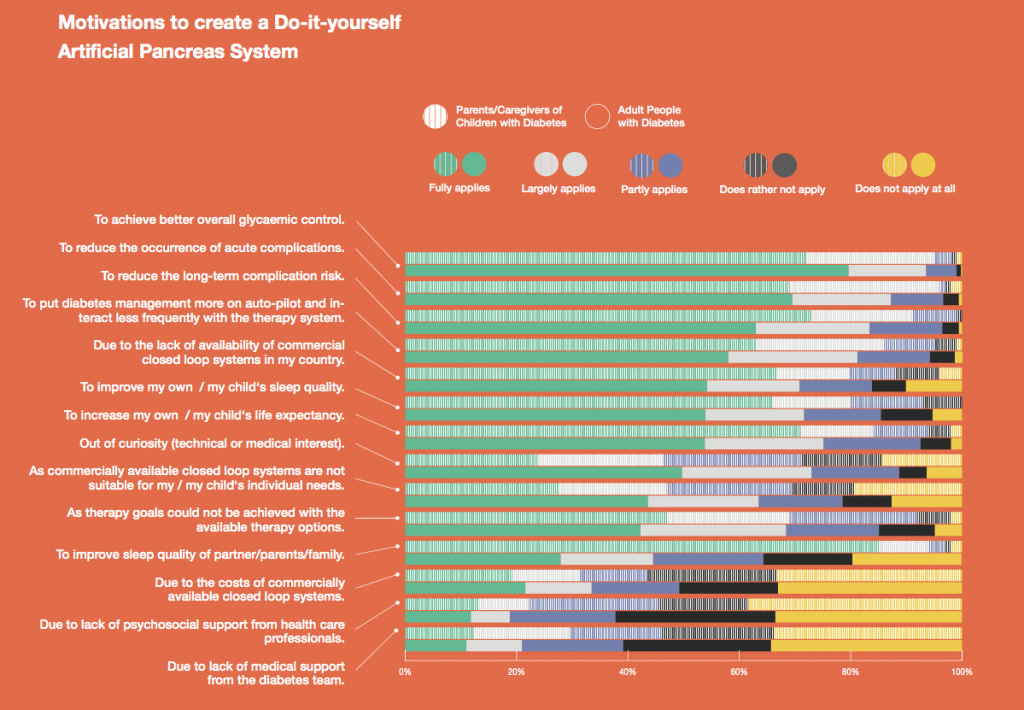
Primary motivations for building a DIYAPS were to improve the overall glycaemic control, reduce acute and long-term complication risk, increase life expectancy and to put diabetes on ‘auto-pilot’ and interact less frequently with the system. Lack of commercially available closed loop systems and improvement of sleep quality was a motivation for some. For caregivers, improvement of their own sleep quality was the leading motivation. For adults, curiosity (medical or technical interest) had a higher impact on their motivation compared to caregivers. Some people feel that commercial systems do not suit their individual needs and prefer to use a customizable system, which is only available to them as a DIY solution. Other reasons, like costs of commercially available systems and unachieved therapy goals played a subordinate role. Lack of medical or psychosocial support was less likely to be motivating factors for both groups.
Conclusions
Our findings suggest that people using Do-it-Yourself Artificial Pancreas systems and their caregivers are highly motivated to improve their/their children’s diabetes management through the use of this novel technology. They are also able to access and afford the tools needed to use these systems. Currently approved and available commercial therapy options may not be sufficiently flexible or customizable enough to fulfill their individual needs. As part of the project “OPEN”, the results of the DIWHY survey may contribute to a better understanding of the unmet needs of PwD and current challenges to uptake, which will, in turn, facilitate dialogue and collaboration to strengthen the involvement of open source approaches in healthcare.
—
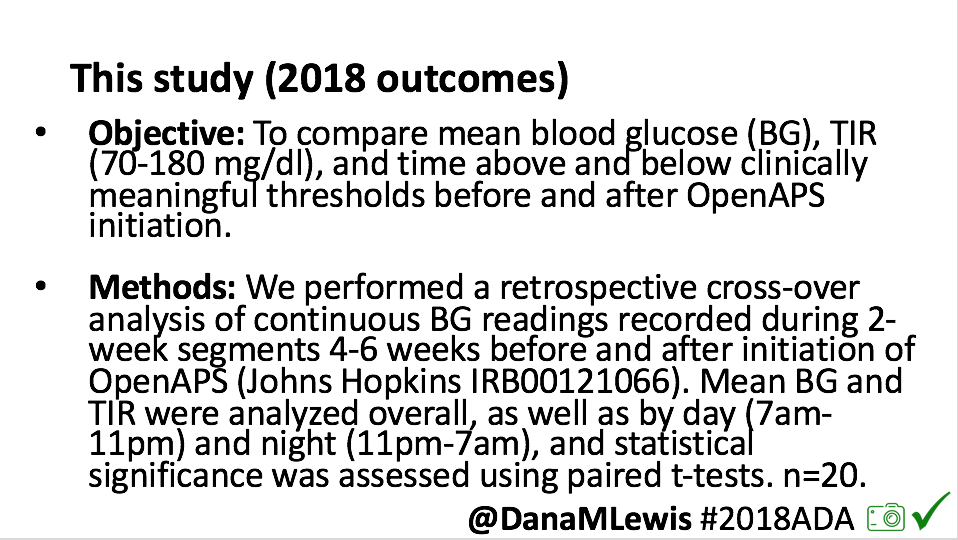
This is a written version of the oral presentation, In-Depth Review of Glycemic Control and Glycemic Variability in People with Type 1 Diabetes Using Open Source Artificial Pancreas Systems, co-authored by Andreas Melmer, Thomas Züger, Dana Lewis, Scott Leibrand, Christoph Stettler, and Markus Laimer.
Thread from “Glycemic Control and Glycemic Variability in People with Type 1 Diabetes Using Open Source Artificial Pancreas Systems”, presented by Andreas Melmer, incl. @dcberne1 colleagues @ChriStettler, @thomaszueger, @markuslaimer, & @scottleibrand & @DanaMLewis. #ADA2019
— Dana M. Lewis | #OpenAPS 🤖 (@danamlewis) June 8, 2019
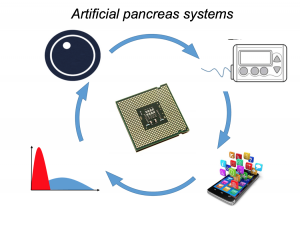
Artificial Pancreas Systems (APS) now exist, leveraging a CGM sensor, pump, and control algorithm. Faster insulin can play a role, too. Traditionally, APS is developed by commercial industry, tested by clinicians, regulated, and then patients can access it. However, DIYAPS is designed by patients for individual use.
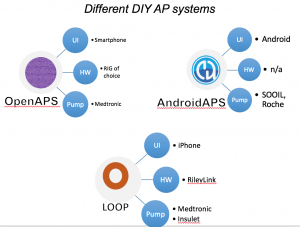
There are now multiple different kinds of DIYAPS systems in use: #OpenAPS, Loop, and AndroidAPS. There are differences in hardware, pump, and software configurations. The main algorithm for OpenAPS is also used in AndroidAPS. DIYAPS can work offline; and also leverage the cloud for accessing or displaying data, including for remote monitoring.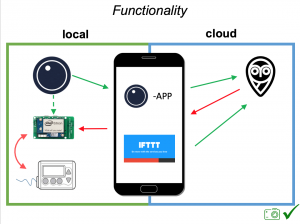
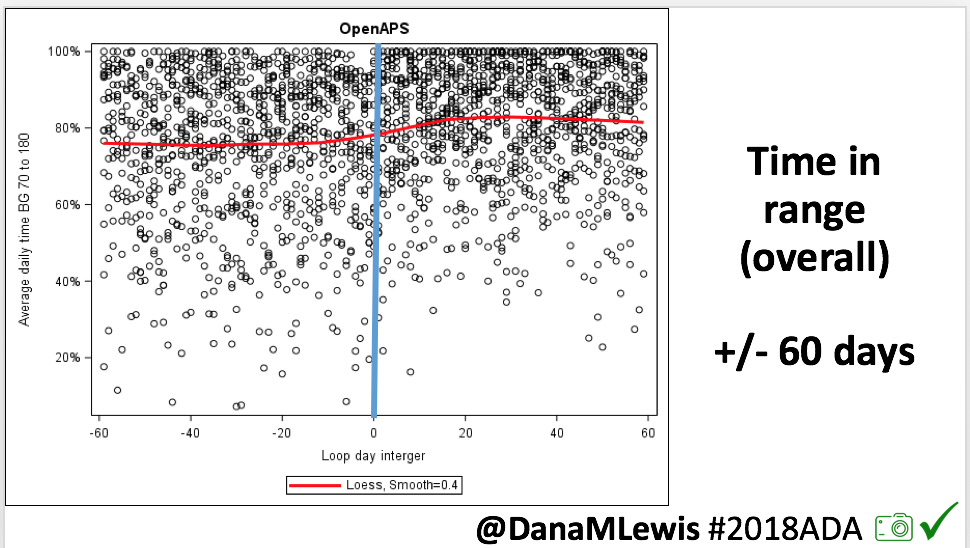
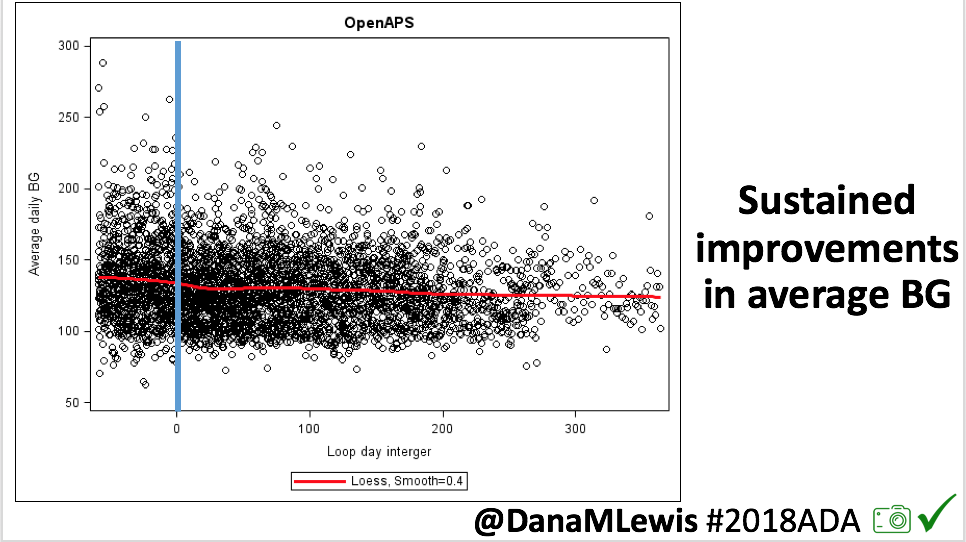
This study analyzed data from the OpenAPS Data Commons (see more here). At the time this data set was used, there were n=80 anonymized data donors from the #OpenAPS community, with a combined 53+ years worth of CGM data.
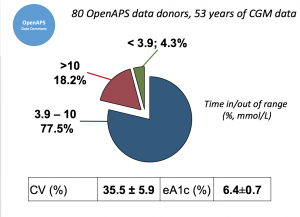 Looking at results for #OpenAPS data donors post-looping initiation, CV was 35.5±5.9, while eA1c was 6.4±0.7. TIR (3.9-10mmol/L) was 77.5%. Time spent >10 was 18.2%; time <3.9 was 4.3%.
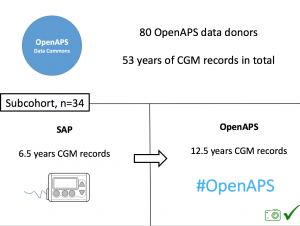 We selected a subcohort of n=34 who had data available from before DIY closed looping initiation (6.5 years combined of CGM records), as well as data from after (12.5 years of CGM records).
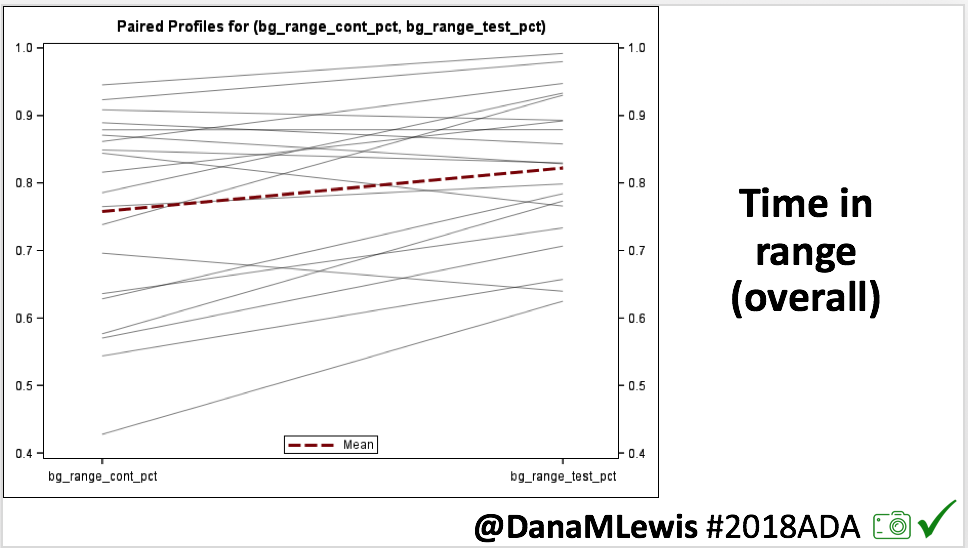
For these next set of graphs, blue is BEFORE initiation (when just on a traditional pump); red is AFTER, when they were using DIYAPS.
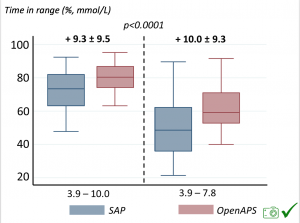 Time in a range significantly increased for both wider (3.9-10 mmol/L) and tighter (3.9-7.8 mmol/L) ranges.
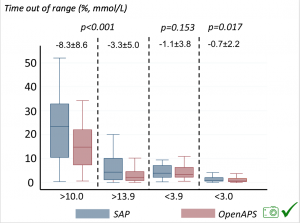 Time spent out of range decreased. % time spent >10 mmol/L decreased -8.3±8.6 (p<0.001); >13 mmol/L decreased -3.3±5.0 (p<0.001). Change in % time spent <3.9 mmol/L (-1.1±3.8 (p=0.153)), and <3.0 mmol/L (-0.7±2.2 (p=0.017)) was not significant.
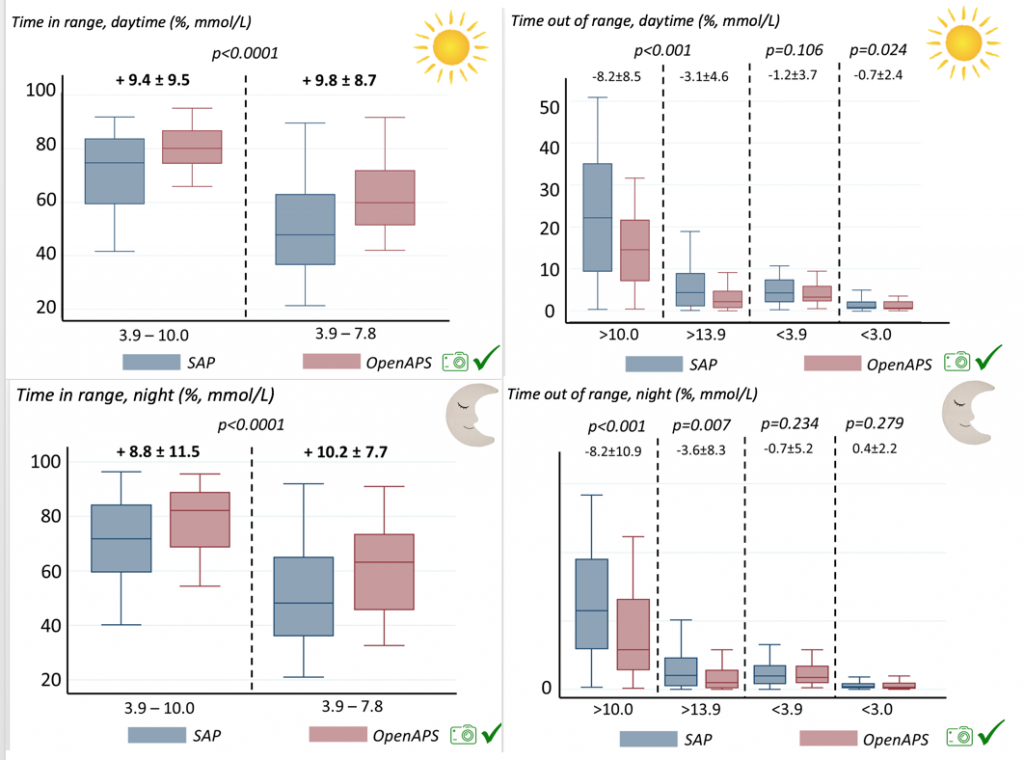
We also analyzed daytime and nightime (the above was reflecting all 24hr combined; these graphs shows the increase in TIR and decrease in time out of range for both day and night).
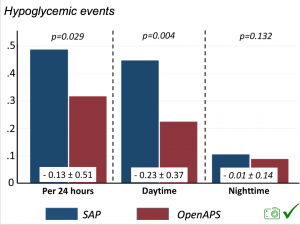 There were less CGM records in the hypoglycemic range after initiating DIYAPS.
Conclusion: this was a descriptive study analyzing available CGM data from #OpenAPS Data Commons. This study shows OpenAPS has potential to support glycemic control. However, DIYAPS are currently not regulated/approved technology. Further research is recommended.
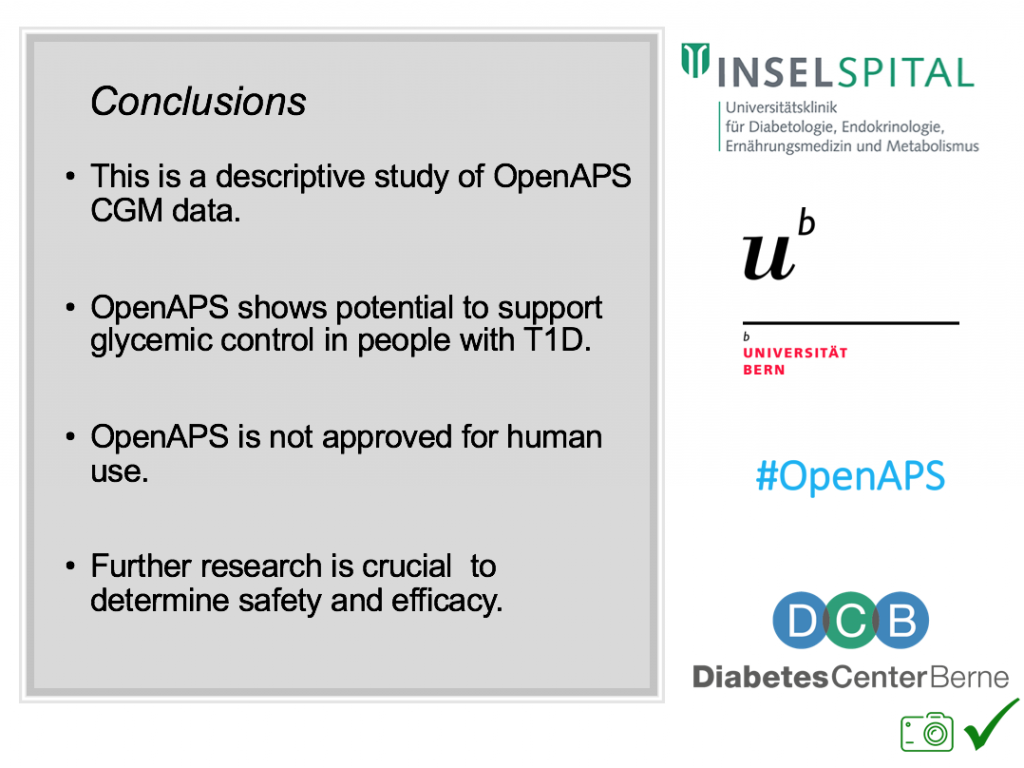
(Note: a version of this study has been submitted and accepted for publication in the Journal of Diabetes. Obesity, and Metabolism.)

 If it’s a fellow person with diabetes or a loved one, we talk about what problems they might be having or what areas they’d like to improve or what behaviors they’d like to change, if any. That’s usually way more effective than hearing “X.x%” of an A1c, and them wondering silently how to get there or what to do differently if someone wants to change things. (Or for clinicians who ask me, it turns into a discussion about choices and behaviors and tradeoffs that patients may choose to make.)


Recent Comments