Automating “wake up” mode with IFTTT and #OpenAPS to blunt morning hormonal rises

tl;dr – automate a trigger to your #OpenAPS rig to start “wake up” mode (or “eating soon”, assuming you eat breakfast) without you having to remember to do it.

Yesterday morning, I woke up and headed to my desk to start working. Because I’m getting some amazing flat line overnights now, thanks to my DIY closed loop (#OpenAPS), I’m more attuned to the fact that after I wake up and start moving around, my hormones kick in to help wake me up (I guess), and I have a small BG rise that’s not otherwise explained by anything else. (It’s not a baseline basal problem, because it happens after I wake up regardless of it being 6am or 8am or even 10:30am if I sleep in on a weekend. It’s also more pronounced when I feel sleep deprived, like my body is working even harder to wake me up.)

Later in the morning, I took a break to jot down my thoughts in response to a question about normal meal rises on #OpenAPS and strategies to optimize mealtimes. It occurred to me later, after being hyper attuned to my lunch results, that my morning wake-up rise up from 1oo perfectly flat to ~140 was higher than the 131 peak I hit after my lunchtime bowl of potato soup.

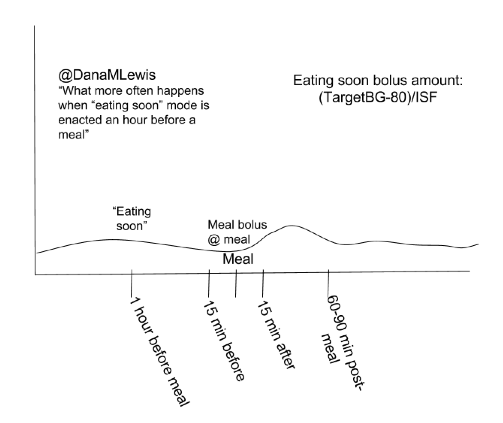
Hmm, I thought. I wish there was something I could do to help with those morning rises. I often do a temporary target down to 80 mg/dL (a la “eating soon” mode) once I spot the rise, but that’s after it’s already started and very dependent on me paying attention/noticing the rise.

I also have a widely varied schedule (and travel a lot), so I don’t like the idea of scheduling the temp target, or having recurring calendar events that is yet another thing to babysit and change constantly.

What I want is something that is automatically triggered when I wake up, so whether I pop out of the bed or read for 15 minutes first, it kicks in automatically and I (the non-morning person) don’t have to remember to do one more thing. And the best trigger that I could think of is when I end Sleep Cycle, the sleep tracking app I use.

I started looking online to see if there was an easy IFTTT integration with Sleep Cycle. (There’s not. Boo.) So I started looking to see if I could stick my Sleep Cycle data elsewhere that could be used with IFTTT. I stumbled across this blog post describing Sleep Cycle -> iOS Apple HealthKit -> UP -> Google Spreadsheet -> Zapier -> Add to Google Calendar. And then I thought I would add another IFTTT trigger for when the calendar entry was added, to then send “waking up” mode to #OpenAPS. But I don’t need all of the calendar steps. The ideal recipe for me then might be Sleep Cycle ->  iOS Health Kit -> UP -> IFTTT sends “waking up mode” -> Nightscout -> my rig. However, I then learned that UP doesn’t necessarily automatically sync the data from HealthKit, unless the app is open. Hmm. More rabbit holing. Thanks to the tweet-a-friend option, I talked to Ernesto Ramirez (long time QS guru and now at Fitabase), who found the same blog post I did (above) and when I described the constraints, then pointed me to Hipbone to grab Healthkit sleep data and stuff it into Dropbox.

(Why Sleep Cycle? It is my main sleep tracker, but there’s IFTTT integration with Fitbit, Jawbone Up, and a bunch of other stuff, so if you’re interested in this, figure out how to plug your data into IFTTT, otherwise follow the OpenAPS docs for using IFTTT to get data into Nightscout for OpenAPS, and you’ll be all set. I’m trying to avoid having to go back to my Fitbit as the sleep tracker, since I’m wearing my Pebble and I was tired of wearing 2 things. And for some reason my Pebble is inconsistent and slow about showing the sleep data in the morning, so that’s not reliable for this purpose. )

Here’s how I have enabled this “wake up” mode trigger for now:

  1. If you’re using Sleep Cycle, enable it to write sleep analysis data to Apple HealthKit.
  2. Download the Hipbone app for iPhone, connect it with your Dropbox, and allow Hipbone to read sleep data from HealthKit.
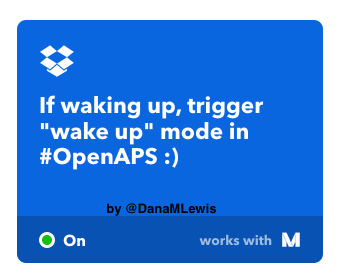
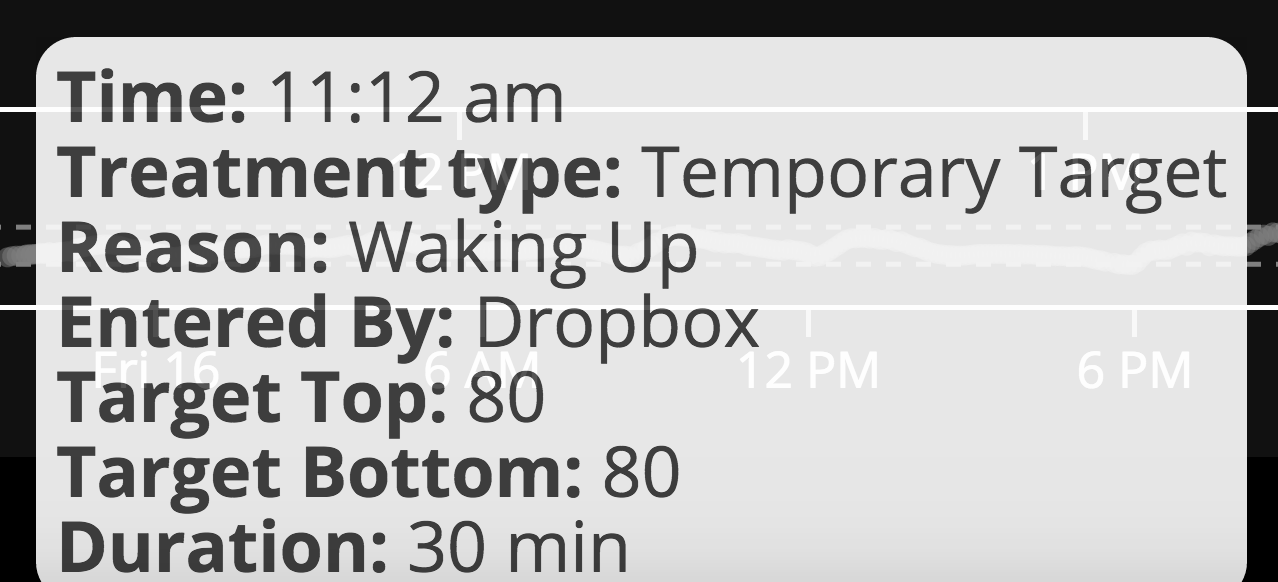
  3. Log in or create an account in IFTTT.com and create a recipe using Dropbox as the trigger, and Maker as the action to send a web request to Nightscout. (Again, see the OpenAPS docs for using IFTTT triggers to post to Nightscout, there’s all kinds of great things you can do with your Pebble, Alexa, etc. thanks to IFTTT.) To start, I made “waking up” soon a temporary target to 80 for 30 minutes.

Guess what? This morning, I woke up, ended sleep cycle, and ~10-11 minutes later got notifications that I had new data in Dropbox and checked and found “waking up” mode showing in Nightscout! Woohoo. And it worked well for not having a hormone-driven BG rise after I started moving around.

First "waking up" mode in #OpenAPS automation success

Ideally, this would run immediately, and not take 10-11 minutes, but it went automatically without me having to open Hipbone (or any other app), so this is a great interim solution for me until we find an app that will run more quickly to get the sleep data from HealthKit.

We keep finding great ways to use IFTTT triggers, so if you have any other cool ones you’ve added to your DIY closed loop ecosystem, please let me know!

Our take on how to DIY closed loop, safely

You will often see similar growth and evolution cycles across any type of online community, and the closed loop community is following this growth cycle as expected. Much like how Nightscout went from one very hard way to setup to get your CGM data in the cloud, to ultimately having dozens of DIY options and now more recently, multiple commercial options, closed looping is following similar trends. OpenAPS was the first open source option for people who wanted to DIY loop, and now there are a growing number of ways to build or run closed loops! And next year, there should be at least one commercial option publicly available in the U.S. followed by several more options in 2018 on the commercial market. Awesome! This is exactly the progress we were hoping to see, and facilitate happening more quickly, by making our work & encouraging others to make their work open source.

We’ve learned a lot (from building our own closed loop and watching others do so through OpenAPS) that we think is relevant to anyone who pursues DIY closed looping, regardless of the technology option they choose. This thought process and approach will likely also be relevant to those who switch to a closed loop commercial option in the future, so we wanted to document some of the thought process that may be involved.

Approaching closed looping safely

Before considering closed looping, people should know:

  • A (hybrid or even full) closed loop is not a cure. There will be a learning curve, much like switching to a pump for the first time.
  • Even after you get comfortable with a closed loop, there will still sometimes be high or low BGs, because we are still dealing with insulin that peaks in 60-90 minutes; we’ll still get kinked pump sites or pooled insulin; and we’ll still have hormones that drive our BGs up and down very rapidly in ways we can’t predict, but must react to. Closed looping helps a lot, but there’s still a lot that goes into managing diabetes.

Before using a DIY closed loop, people should consider:

  • Identifying or creating the method to visualize their data in a way they are comfortable with, both for real-time monitoring of loop activity and retrospective monitoring. This is a key component of DIY looping.
  • Running in “open loop” mode, where the system provides recommendations and you spend days or weeks analyzing and comparing those recommendations to how you would calculate and choose to take action manually.
  • Based on watching the “open loop” suggestions, decide your safety limits: you should set max basal and bolus rates, as well as max net IOB limits where relevant. Start conservative, knowing you can change them over time as you watch and validate how a particular DIY loop works with your body and your lifestyle.

Getting started with a DIY closed loop, people should think about the following:

  • Understand how it works, so you know how to fix it. Remember, by pursuing a DIY closed loop, you are responsible for it and the operation of it. No one is forcing you to do this; it’s one of many choices you can and will make with regards to how you personally choose to manage your diabetes.
  • But even more importantly, you need to understand how it works so you can choose if you need to step in and take manual action. You should understand how it works so you can validate “this is what it should be doing” and “I am getting the output and outcomes that I would expect if I were doing this decision making manually”.
  • Often, people will get frustrated by diabetes and take actions that the loop then has to compensate for. Or they’ll get lax on when they meal bolus, or not enter carbs into the system, etc. You will get much better results by putting better data into the system, and also by having a better understanding of insulin timing in your body, especially at meal times. Using techniques like “eating soon mode” will dramatically help anyone, with or without a closed loop, reduce and limit severity of meal spikes. Ditto goes for having good CGM “calibration hygiene” (h/t to Pete for this phrase) and ensuring you have thought about the ramifications of automating insulin dosing based on CGM data, and how you may or may not want to loop if you doubt your CGM data. (Like “eating soon”, ‘soaking’ a CGM sensor may yield you better first day results.)
  • Start with higher targets for the loop than you might correct to manually.
  • Move first from an “open loop” mode to a “low glucose suspend” type mode first, where max net IOB is 0 and/or max basal is set at or just above your max daily scheduled basal, so it low temps to prevent and limit lows, but does not high temp above bringing net IOB back to 0.
  • Gradually increase max net IOB above 0 (and/or increase max basal) every few days after several days without low BGs; similarly, adjust targets down 10 points for every few days gone without experiencing low BGs.
  • Test basic algorithms and adjust targets and various max rates before moving on to testing advanced features. (It will be a lot easier to troubleshoot, and learn how a new feature works, if you’re not also adjusting to closed looping in its entirety).
This is our (Dana & Scott‘s) take on things to think about before and when pursuing a closed loop option. But there’s about a hundred others running around the world with closed loops, too, so if you have input to share with people that they should consider before looping, leave a comment below! :) And if you’re looking to DIY closed loop before a commercial solution is available, you might also be interested in checking out the OpenAPS Reference Design and some FAQs related to OpenAPS.

Picture this: How to do “eating soon” mode

How do you prevent or limit meal spikes? It doesn’t take a closed loop artificial pancreas; it takes an understanding of insulin timing and the impact on your body.

I’ve written before about why getting insulin going in your body before meal carbs kick in is so important. You can read that really long post here. And I’ve written a slightly shorter post explaining how to do “eating soon mode” to achieve insulin activity peaking when you eat, without causing lows. But recently, I quickly scratched together an illustration to show the difference in the timing and outcomes between the “eating soon mode” approach compared to a traditional “pre-bolus” approach, and after receiving feedback that these images were helpful, decided to post them here.

(Again, for more context, read this post on how to calculate your eating soon amount; and this post for more of the science behind it and how we discovered this method 2+ (!) years ago. And as always, your diabetes may vary; I’m not a doctor; etc. but this is something that when applied consistently smooths out meal spikes, even when eating high fat or high protein or high carb or any kind of meal.)

What often happens with a pre-bolus of the meal insulin 15 minutes before a meal


The type of meal spike (minimal) you can achieve by getting insulin activity going 1 hour before the meal with "eating soon" mode approach
The type of meal spike (minimal) you can achieve by getting insulin activity going 1 hour before the meal with “eating soon” mode approach.

*Note – the calculation of (TargetBG-80)/ISF is assuming that you have already corrected to your normal target, i.e. 100 or 120.

Research studies and usability thoughts

It’s been a busy couple (ok, more than couple) of months since we last blogged here related to developments from #DIYPS and #OpenAPS. (For context, #DIYPS is Dana’s personal system that started as a louder alarms system and evolved into an open loop and then closed loop (background here). #OpenAPS is the open source reference design that enables anyone to build their own DIY closed loop artificial pancreas. See www.OpenAPS.org for more about that specifically.)

We’ve instead spent time spreading the word about OpenAPS in other channels (in the Wall Street Journal; on WNYC’s Only Human podcast; in a keynote at OSCON, and many other places like at the White House), further developing OpenAPS algorithms (incorporating “eating soon mode” and temporary targets in addition to building in auto-sensitivity and meal assist features), working our day jobs, traveling, and more of all of the above.

Some of the biggest improvements we’ve made to OpenAPS recently have been usability improvements. In February, someone kindly did the soldering of an Edison/Rileylink “rig” for me. This was just after I did a livestream Q&A with the TuDiabetes community, saying that I didn’t mind the size of my Raspberry Pi rig. I don’t. It works, it’s an artificial pancreas, the size doesn’t matter.

That being said… Wow! Having a small rig that clips to my pocket does wonders for being able to just run out the door and go to dinner, run an errand, go on an actual run, and more. I could do all those things before, but downsizing the rig makes it even easier, and it’s a fantastic addition to the already awesome experience of having a closed loop for the past 18 months (and >11,000 hours of looping). I’m so thankful for all of the people (Pete on Rileylink, Oscar on mmeowlink, Toby for soldering my first Edison rig for me, and many many others) who have been hard at work enabling more hardware options for OpenAPS, in addition to everyone who’s been contributing to algorithm improvements, assisting with improving the documentation, helping other people navigate the setup process, and more!

List of hardware for OpenAPS
That leads me to today. I just finished participating in a month-long usability study focused on OpenAPS users. (One of the cool parts was that several OpenAPS users contributed heavily to the design of the study, too!) We tracked every day (for up to 30 days) any time we interacted with the loop/system, and it was fascinating.

At one point, for a stretch of 3 days, we counted how many times we looked at our BGs. Between my watch, 3 phone apps/ways to view my data, the CGM receivers, Scott’s watch, the iPad by the bed, etc: dozens and dozens of glances. I wasn’t too surprised at how many times I glance/notice my BGs or what the loop is doing, but I bet other people are. Even with a closed loop, I still have diabetes and it still requires me to pay attention to it. I don’t *have* to pay attention as often as I would without a closed loop, and the outcomes are significantly better, but it’s still important to note that the human is still ultimately in control and responsible for keeping an eye on their system.

That’s one of the things I’ve been thinking about lately: the need to set expectations when a loop comes out on the commercial market and is more widely available. A closed loop is a tool, but it’s not a cure. Managing type 1 diabetes will still require a lot of work, even with a polished commercial APS: you’ll still need to deal with BG checks, CGM calibrations, site changes, dealing with sites and sensors that fall out or get ripped out…  And of course there will still be days where you’re sensitive or resistant and BGs are not perfect for whatever reason. In addition, it will take time to transition from the standard of care as we have it today (pump, CGM, but no algorithms and no connected devices) to open and/or closed loops.

This is one of the things among many that we are hoping to help the diabetes community with as a result of the many (80+ as of June 8, 2016!) users with #OpenAPS. We have learned a lot about trusting a closed loop system, about what it takes to transition, how to deal if the system you trust breaks, and how to use more data than you’re used to getting in order to improve diabetes care.

As a step to helping the healthcare provider community start thinking about some of these things, the #OpenAPS community submitted a poster that was accepted and will be presented this weekend at the 2016 American Diabetes Association Scientific Sessions meeting. This will be the first data published from the community, and it’s significant because it’s a study BY the community itself. We’re also working with other clinical research partners on various studies (in addition to the usability study, other studies to more thoroughly examine data from the community) for the future, but this study was a completely volunteer DIY effort, just like the entire OpenAPS movement has been.

Our hope is that clinicians walk away this weekend with insight into how engaged patients are and can be with their care, and a new way of having conversations with patients about the tools they are choosing to use and/or build. (And hopefully we’ll help many of them develop a deeper understanding of how artificial pancreas technology works: #OpenAPS is a great learning tool not only for patients, but also for all the physicians who have not had any patients on artificial pancreas systems yet.)

Stay tuned: the poster is embargoed until Saturday morning, but we’ll be sharing our results online beginning this weekend once the embargo lifts! (The hashtag for the conference is #2016ADA, and we’ll of course be posting via @OpenAPS and to #OpenAPS with the data and any insights coming out of the conference.)

The second year of #DIYPS (and my first full year with a closed loop)

As we developed #DIYPS from a louder alarm system to a proactive alert system (details here about the original #DIYPS system before we closed the loop) to a closed loop that would auto-adjust my insulin pump basal rates as-needed overnight, I have been tracking the outcomes.

There were the first few nights of “wow! this works! I wake up at night when I’m high/low”. Then there were the first 100 nights that involved more iteration, testing, and improvements as we built it out more. And then suddenly it had been a year of using #DIYPS, and it was awesome to see how my average BG and a1c were down – and stayed down – while equally as important, my % time in range was up and stayed up. Not to mention, the quality of life improvements of having better nights of sleep were significant.

Year two has been along the same lines – more improvements on A1c/average BGs, time in range, and sleep – but heavily augmented by the fact that I now have a closed loop. If you follow me on Twitter or have checked out the hashtag, you might be tired of seeing me post CGM graphs. At this point, they all look very similar:

Looping for over a year and OpenAPS still successfully preventing overnight hypoglycemia Overnight safely looping with OpenAPS

(It’s worth noting that I still use #DIYPS, especially during the day to trigger “eating-soon” mode or basically get a snapshot glance at what my BGs are predicted to be, especially if I plan to go out without my loop in tow.)

In this past year, we also went from closing the loop with the #DIYPS algorithms (which required internet connectivity so I could tell the system when I was having carbs), to deciding we wanted to find a way to make it possible for more people to safely DIY a closed loop. (And, we feel very strongly that the DIY part of closing the loop is very important and deciding to do so is a very personal question.)

Thus, #OpenAPS was born in February 2015. Ben West spent a lot of time in 2015 building out the openaps toolkit to enable communication with diabetes devices to make things like closed loops possible. And so the first few months of #OpenAPS seemed slow, while we were busy working on the toolkit and finding ways to take what we learned with the #DIYPS closed loop and model a closed loop that didn’t require knowledge of carbs and could work without internet connectivity (see more about the #OpenAPS reference design here).

In July, we saw a tipping point – multiple other people began to close the loop, despite the fact that we didn’t have very much documented or available to guide them beyond the reference design. (These first couple of folks are incredible! Watch the #OpenAPS hashtag on Twitter to see them share some of their experiences.) With their help, the documentation has grown by leaps and bounds, as has the number of people who were subsequently able to close the loop.

As of 12/31/15 as I write this post, there are 22 people who have told me that they have a closed loop running that’s based on the OpenAPS reference design. I make a big deal about marking the date when I make a statement about the number of people running #OpenAPS (i.e. (n=1)*22), because every time I turn around, someone else seems to have done it!

It’s so exciting to see what’s happened in 2015, and what this type of #WeAreNotWaiting spirit has enabled. For Scott & me this year: we’ve climbed mountains around the world (from Machu Picchu to Switzerland), gotten married, changed jobs, and explored Europe together. Diabetes was there, but it wasn’t the focus.

There are dozens of other amazing stories like this in the #WeAreNotWaiting community. As we look to the new year, and I start to wonder about what might be next, I realize the speed of technology and the spirit of ingenuity in this community makes it impossible to predict exactly what we’ll see in 2016.

What I do know is this: we’ll see more people closing the loop, and we’ll see more ways to close the loop, using devices other than the Raspberry Pi, Carelink stick and Medtronic pump.  We’ll see more new ways to communicate with old & new diabetes devices and more ways to make the diabetes parts of our lives easier – all because #WeAreNotWaiting.

How to do “eating soon” mode – #DIYPS lessons learned

“Do you prebolus for meals with #DIYPS?”

The answer to this question is complicated for me. I don’t “prebolus” like most people do (meaning “take some or all of your meal insulin about 15 minutes before you eat”).

I do take insulin before a meal. In fact, I do it up to an hour before the meal starts, by setting my correction target BG from it’s usual range (usually 100-120) to 80. This usually means I’m usually doing anywhere from .5-1u or more of insulin prior to a meal. But the amount of insulin has no direct relationship with the total amount of carbs I’ll end up eating during the meal.

Does it work? Yes. Do I go low? No, because it is unlikely that I would get anywhere near 80 by the time my carbs kick in for a meal (15 minutes after I eat), and therefore the initial carbs are handled by that initial amount of insulin from the eating soon-bolus. (Last year, I wrote a post about “eating soon mode” under the guise of lessons learned about meal time with #DIYPS – if you want to read the reason behind WHY eating soon mode is key in more detail, you can definitely read the longer version of the post. It also links another key concept I’ve learned about called carbohydrate absorption rate.)

So, how can you manually do “eating soon” mode?

1. If you know you’re going to eat anywhere in the next hour, manually calculate a correction bolus with a target BG of 80. (Example – if your correction ratio is 1:40, and you are currently 120, that means you would give yourself 1u of insulin.) An hour, 45 minutes, 30 minutes – whatever you make work is better than not doing it!

2. Eat your meal and bolus normally, but use your IOB as part of your meal calculation so you don’t forget about that insulin you already have going. (Helpful if your pump tracks IOB and you use a bolus calculator feature, but if you take injections, keep in mind about the insulin you’ve already given for the meal – just subtract that amount (1u in above example) from what you’d otherwise inject for the meal.

Note: if you use eating soon mode, you might want to delay the last unit or two of your meal insulin until after you see BGs rise, since sometimes you need less total insulin for the meal if you get insulin active early. (Often, we PWDs may overcompensate with more insulin than we need because it’s not timed correctly compared to the carb absorption rate.)

Example:

  • 5pm – You’re planning to eat around 5:30 or 6pm. Your BG is 120 and your correction ratio is 1:40. Setting your correction target to 80, that means you take 1u of insulin.
  • 6pm – You sit down to eat. Looking at your meal, you see 45 carbs and decide, with a carb ratio of 1:10, that you would take 4.5 units for the meal. Keeping in mind your earlier bolus of 1u, you end up taking 3.5 units for the meal. (4.5 total – 1u prebolus = 3.5 more units needed to cover the meal, see above note about considering delaying a unit or two of that bolus until you see your BGs impacted by carbs).

Result? You should have less of a spike from your carbs kicking in 15 minutes after you eat. It won’t always completely eliminate a spike, but it will provide a flattening effect. This is part of how I’m able to eat large (like 120g of gluten free pizza) meals and have flat or mostly flat BGs, and this is also one of the reasons I think using #DIYPS has dramatically improved my eAG and a1cs.

(See another post, with illustrations, about doing eating soon mode here.)