Hormones, CGM preferences, DIY, and why so many things are YDMV even when #WeAreNotWaiting

I posted one of my Nightscout graphs yesterday, showing a snapshot of my morning:

Example of how getting out of bed - rather than dawn phenomenon hormones - can increase BG levels.

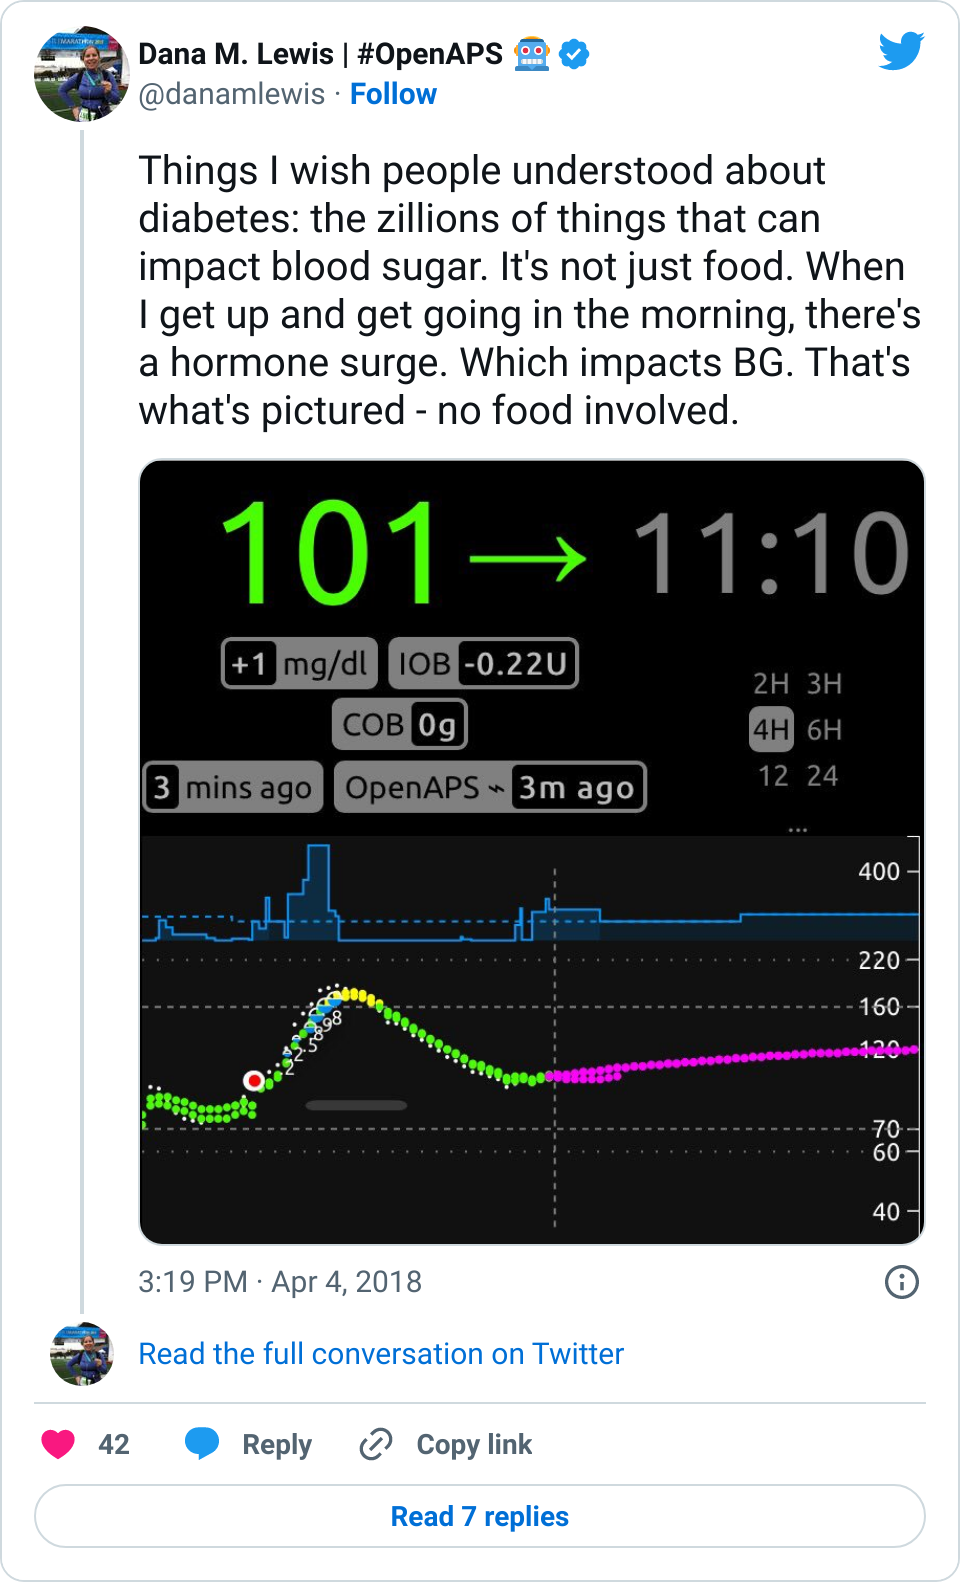
I hadn’t eaten, and my blood sugar still spiked up. I’ve noticed this happens in the mornings sometimes. When I have mentioned it over the years, people are quick to tell me my basal rates are wrong, and I should adjust them because dawn phenomenon. But actually, this isn’t dawn phenomenon. This happens after I physically get up and start moving for the day, whether that happens at 4am, or 6am, or 10am, or even waking up after noon. So, it’s not a basal thing, and modifying my basal rates doesn’t fix it. (And this is why I wanted to add wake-up mode to my suite of tools, to help address this.)

To me, this is a great example, (as I mentioned in my Twitter thread), of why diabetes is so hard: sooooo many things impact BG levels, and in many cases, we PWDs just have to roll with it and respond the best we can. In my case, #OpenAPS did a great job responding to the spike and bringing me back down within an hour or so.

One of the questions that popped up yesterday in response to that graph, though, was about the BG line: how did I have two BG lines?

The answer: I wear a G4 sensor, and usually have 2 receivers running off the same transmitter and sensor. One receiver is Share-d to my phone, and uploads to NS via the interwebz. The other receiver, although Share-capable, doesn’t (because the company only allows you to pair one receiver and upload via Share). I leave that CGM plugged into a rig to enable it to be a backup for offline looping. When online, this rig with the plugged in CGM uploads BGs from that receiver to NS.

Sometimes, because of different start/stop times and therefore differing calibration records, the receivers “drift” from each other, making it obvious on the graph when that happens.

Because if you give a mouse a cookie, other questions come up, someone had also asked me why I’m using G4, and why not G5. Someone else asked me in a different channel why I’m not using G5 and xDrip+ (a DIY option that doesn’t use Dexcom app or a Dexcom receiver for receiving the data or processing it), or another DIY tool to process my CGM data.

Now, as always, what I chose to use is my personal preference. It’s colored by my preference for what equipment I’m willing to carry; what phone I want to use; what data I want to have; my safety backup preferences; what my insurance covers and what I can afford; where I live; etc. So, just because I use this method, doesn’t mean I expect anyone else to want to do it. It’s just what I do. I don’t try to convince other people to use this method, and I also hope others can share info about what works for them without trying to hammer me over the head because what I’m doing is different. This is where YDMV (your diabetes may vary) comes in. It’s so true, and even within “people who DIY”, there’s a ton of variation – and that’s a good thing! I adore having options to find what works for me, and I want to have other people have options and choices to choose what works for them.

That being said, here’s the answer to how I run my CGMs and some of the things that have factored into my choice to not DIY CGM receivers/data processing most of the time:

  • With two G4 receivers, I can keep one in my pocket, paired to my phone and uploading via Share. When I’m out and about in the city or usually during the day, this is what I carry. When I run, I take the Share receiver.
  • But, I also like emergency back-ups. I like keeping a receiver plugged into an #OpenAPS rig so that if connectivity goes out/down, I can keep looping without a break in my stride. So, I could keep my Share receiver plugged into the rig, but that would involve me unplugging and replugging fairly frequently when I run errands or actually go for a short run, and meh. Hassle. So I keep “non-Share” receiver as the one that’s usually plugged into my ‘offline’ rig.
  • Having the G4 receiver plugged into the rig enables me to see raw data. Raw data is nice for a couple of things: assessing the health of my sensor (if it gets jumpy compared to the filtered data, I know the quality of the sensor is decreasing, and that helps me decide when to change it); giving me a clue to what’s going on when the filtered data goes to ??? or during the start up of a new sensor; and actually being able to run my rig and loop off some* of the raw data when I need to. (*With OpenAPS, you can choose to loop off of it within a certain range, and there’s an option to only set a certain amount of correction for a proportion of what otherwise would be proposed, with a higher level of raw data.)
  • With two receivers running, that also gives me more flexibility around sensor changes. Technically, the sensor is approved for 7 days. At the end of the 7 days, the receiver stops giving you data and forces you to “start” a new sensor session. That could be by inserting a new sensor; or it could be the same sensor on your body. But either way, theoretically it’s a 2 hour ‘warm up’ period from that session where you can’t see data. With 2 receivers, I can stagger the end and start of sensor sessions. I usually set a calendar alarm to restart one of the receivers on the night of the 6th day of the session, allowing me more flexibility on day 7 to choose when to restart or change my sensor.
  • This also means I can choose to “hot swap” when actually changing a sensor. I may choose to not hit ‘stop’ and ‘start’ on a sensor session on one of the receivers, but rather shut it off for about 30 minutes, and just do the stop/start on the other receiver (leaving it plugged into a rig to upload raw data to NS, and be able to see where the new sensor’s readings come in compared to the old one). When I power the non-restarted receiver back on about 30m after swapping the transmitter over to the new receiver (as soon as the raw readings have flattened out), it usually either goes to “no signal” for a few minutes, and then comes back with some data, an hour or more before the restarted sensor allows me to calibrate it and get data. There are downsides to this method: the data on the receiver that didn’t get restarted can be fairly inaccurate, as it’s still using the calibrations from the old sensor. So I don’t always do that, but when it’s more important to me to be able to see relative trend of where BG is (flat, or dropping or spiking), it’s nice to have that option. And since I often soak my new CGM sensors, the data from “day 1” of the sensor after a session “start” on the receiver is often better than if it was truly day 1 of the sensor being in my body.

Phew. Maybe that sounds like a lot of work, but the above setup works well for me for a variety of reasons, and also allows me the flexibility and choice for when I change sensors, when I am forced to be without data or potentially not loop, etc. Given that my schedule varies a lot, it helps since I’m not consistently in the same time zone and what works for starting or changing sensors one week in one part of the world doesn’t always align with convenience exactly 168 hours (7 days) later in another part of the world that I’m in, doing something differently.

Some of the reasons I haven’t switched to G5 include the fact that the transmitters only last for ~3 months instead of 6+ months; I’ve observed many people being frustrated by sensor not talking to the phone even when it’s right beside them; there’s no raw data on G5; you can’t have multiple receivers paired with your transmitter; etc.

Now, you might say, but that’s using Dexcom’s app, etc. With DIY solutions, those limitations don’t apply! And that’s true, to a degree – savvy folks in the community have figured out how to make it so you don’t *have* to use Dexcom’s app to display or process the data; you can replace the batteries on the transmitter; etc. But, just like my method above of using raw data isn’t necessarily going to work for everyone or might not be something someone else choose to do, the DIY options that go with G5 (or even G4 in some cases), aren’t something I believe is the right thing to do for me.

A lot of it comes down to safety. When we first started designing my DIY closed loop, we spent eons discussing how we could do this safely for me. And that evolved into further discussions about how other people could do this safely, too. A core of the OpenAPS Reference Design is that we are using already approved and vetted devices that exist on the market (e.g. existing pumps and CGMs). Those devices include approved and vetted methods for CGM data processing, too, which is even more important when the CGM data is being used to dose insulin as in OpenAPS. Now – this is not a requirement we can enforce: people can do what they want, and some people are even using non-CGMs (such as the Libre, a “Flash Glucose Monitoring” solution, plus a DIY NFC reader) as a CGM source for looping. But, whether it’s a DIY app or algorithm on CGM data, or a different glucose measuring device that’s not a CGM, that’s choice has some safety implications that I hope people are aware of.

First, the background for those who aren’t familiar: the CGM companies display a processed (“filtered”) version of the CGM data. That’s part of their proprietary stuff, but there’s reasons behind it: the raw data can be hectic and weird, and individual readings aren’t the point, anyway. The beauty of CGM is you can see the trends in addition to the estimated BG number.  In some scenarios, such as during sensor starts, during error messages that are displayed as ???, etc, the companies/FDA decided that the CGM should not show data, and instead show an error message/symbol, to help prevent anyone from making incorrect treatment decisions based off of confusing or misleading data.  That’s good enough most of the time.  As mentioned above, there are edge cases when seeing the raw is helpful, but most of the time, I’m happy with the filtered data.

But to me, there’s a difference between using raw or DIY-calibrated data for edge cases, vs. using them all the time. I’ve seen several cases in just the past few days with a newer “DIY CGM app”, which uses its own calibration algorithm for processing the unfiltered CGM readings.  These people have reported the app displaying normal BGs (say, 90 mg/dL), while they found themselves in the 40’s (rather low). It’s not clear whether that is due to the app’s calibration algorithm, something the user did in testing and calibrating, or if it’s just a bad sensor, and since most of them are not using the official receiver/app in parallel, that’s difficult to figure out.  But regardless, it’s happened enough times across numerous people for me to be concerned about a DIY CGM app being used as the primary source of CGM data. There are limitations to using company-built apps or physical devices for CGMs, but in the case where people can afford it, for safety I think it is important to at least use the approved and vetted receiver/app in parallel, to provide a backup and baseline level of alerting and alarming. The FDA & the companies have worked to create something that can be reliable for alarming when your BG is actually low (say <55 mg/dl) and alerting a human that something is going on. This is important regardless of whether people are looping or not, but it’s perhaps even more important when people are looping, since that data is driving insulin dosing decisions. Additionally, the company-created devices have been designed to deal with miscalibrations that aren’t in line with what the data from the receiver is showing, and have safety measures in place to “reject” calibrations and request new ones when necessary. Sure: there are times where that’s frustrating, but those features truly are “there for safety”, and are important for avoiding the rare but potentially serious outcomes that could be caused by incorrect CGM readings. Since safety is what we prioritize and design around in DIY closed looping, I hope people will consider that ,and prioritize safety first when choosing what to use as their primary data source.

Tl;dr – YDMV. I currently use G4 with two receivers, for the reasons described above. I think it’s important to prioritize safety over convenience most of the time, and understand the limitations of the solution that you choose (DIY or commercial). But everyone’s different, and their situation, preferences, etc. may drive different decision making. And did I mention YDMV?

Next generation #OpenAPS hardware work in progress – Pi HATs

tl;dr – No, they’re not here yet, but this is coming soon! Yay for new & more hardware options! See here to pre-order an Explorer HAT, eta of April 2018

Over the years, people have had a lot of awesome ideas on how

to improve the hardware that can be used with DIY closed looping. One such example, Oskar’s work with mmeowlink, led us to later work on smaller computer boards with built-in radio stick, aka the Edison/Explorer Board rig. We started working on that last fall; they were produced and available around November, and the community has been using those widely ever since.

However, like all things, the Edison/Explorer is not without it’s downsides. One of which is – there’s no screen. You historically have needed to plug in cables, or remote login to the rig, or have connectivity via your phone, to see what it’s doing. Sometimes this is more annoying than others.

Patrick Kelly, who has a daughter with T1D and began experimenting with OpenAPS, was one of the folks who wanted a screen on the rig. He suggested the idea, which Scott and I thought was awesome – but we don’t have the expertise to build that kind of hardware. Luckily, Patrick and his dad Jack Kelly, *do* have that expertise! They began exploring some of the options around creating a rig with a screen.

(This is one of my favorite parts of the OpenAPS community, where people bring in various types of expertise and we’re all able to collaborate to make everything from hardware and software and usability improvements!)

And at the same time…the rumors became reality, and we learned that Intel has decided to discontinue the Edison module. SAD PANDA. (Intel, if you’re reading this, please bring it back! We love the Edison!) That expedited the need to find the next generation hardware. Luckily, Patrick and Jack had been progressing on the screen, focusing on incorporating it into a “HAT” (board) for the Raspberry Pi. So after discussion with others in the community about pros/cons and availability about various other computing options other than the Pi, given the widespread availability of different types of Pi’s, we’ve decided to move forward with the Pi and a HAT (board) being the most usable option for the next round of hardware that we’ll be recommending to the community.

What exactly does a Pi HAT look like?

I’m so glad you asked 😉 Here is the Pi HAT with screen on a “Pi Zero W” (which I sometimes type as “Pi0” or “Pi 0”) and a “Pi 3” (pi three), compared to the Edison/Explorer Board. My trusty Chapstick is my unit of measurement, but given some of my international friends claim to not understand that yardstick, I threw in some Euro coins on the right as another measurement stick .;)

OpenAPS_hardware_development_Oct_2017_DanaMLewis
The Pi 0 is flipped on it’s back like a turtle – but the same Pi HAT can be used for the Pi 0 and the Pi 3. The HAT is bigger than the Pi so the radio stick doesn’t get blocked.

It’s the same radio as the Edison-based Explorer block, so same expected range.

What’s the point of the screen?

With a screen, you can easily see the logs of what the loop is doing: Pi_HAT_screen_OpenAPS_example_DanaMLewis

YOU CAN EASILY ADD AN OPEN WIFI NETWORK ON THE GO! (Yea, that all caps was intentional! :)). You can also see which wifi network it is on, check for IP address, etc.

Pi HAT adding wifi exampleWe’re still working on adding to the menus and playing around with what’s possible and what’s worthwhile for displaying on the menus by default.

You can do all kinds of fun stuff – which Scott found out after asking me one day, “what else should we add to the menu?” and I promptly said “a unicorn”. Scott said, “these don’t have emoji’s, though”.

Five minutes later, we have a DIY diabetes/OpenAPS unicorn built in ASCII, because why not? 😉

Pi_HAT_screen_unicorn_closeup_DanaMLewis

Ahem. Back to technical topics.

How is this board/HAT going to be made and when is it going to be available?

Like the Edison-based Explorer, the Pi’s Explorer HAT is an open source hardware design, and ERD (who sold the Explorer for the Edison) will also be doing the Pi HAT.

Timeline is not 100% nailed down yet, but it will probably be another month or so. (Which is about a year after the Edison Explorer was first ready…crazy how time flies in the open source community!) We’ll of course, as always, shout from the rooftops when it’s ready for ordering & experimenting with. We’ll also be updating the OpenAPS docs to reflect the new gear recommended to buy, the steps for getting it up and running, troubleshooting, etc.

What about Edison/Explorer boards? Will that rig type still be supported by OpenAPS? Should I get any more of those?

Yep. Edison/EB will still be supported & widely used. There are some still left.

  • But – if you already have an Edison/EB rig – I would make your next rig purchase a HAT for one of the Pi’s.
  • If you’re new to the OpenAPS community and supply still exists, I’d still consider grabbing the parts for an Edison/Explorer rig – they’re still great, and we’ll continue to use the ones we have for a long time, and will still be supported in documentation. But you’ll likely want a HAT for a Pi rig of some sort, too, to take advantage of the screen & all the features that go with that for ease of use.

What about battery life for the Pi0/Pi3? How fast does it run? AND YOU HAVEN’T ANSWERED ALL OF MY OTHER QUESTIONS?!?!

One of the downsides of our (Scott/my) approach of getting everything to the community as fast as possible – both hardware and software – means that sometimes (every time) we share things that are works in progress. (And we are testing a whole lot of stuff on software, too.) The new hardware is no different. We don’t have all the answers yet, and we’ll hope you’ll help us figure things out as we go! Here’s some of the pending questions we have:

  • Cost. (Pi’s are cheaper than Edison’s. Explorer HATs with screens are slightly more expensive. However, we’re expecting in sum that the HAT+screen rigs with Pi of choice will likely be cheaper than an Edison/Explorer.)
  • Battery life. We know the Pi0 itself is not as efficient as the Edison, so it’ll likely require a bigger battery for the same run time. (No idea exactly how much bigger because I’m not using these rigs in the real world 100% of time yet, because…)
  • Some Pi optimizations still need to be done. (The current code works just fine on a Pi3, but the Pi0 needs some optimization work done. The Pi 0, as you can see from the picture, is smaller, and will likely be the ‘mobile’ rig for many folks, while the Pi 3 might be a backpack/home rig.)
  • Other options for “HATs” that don’t have a screen. (Eric has also been prototyping another Pi HAT, that doesn’t have a screen, and it’ll be great to test and see how that works as a potential option, too. Hop into the openaps/hardware-dev channel to chat with him if you have questions about his approach. )

As we work on the optimizations (great place to dive in if you’re looking for a place to help out!) and updating the scripts and the docs to reflect the Pi suite of options, I’ll begin carrying this kind of rig and doing my usual break-everything-in-the-real-world-and-fix-all-the-things testing approach.

I’m excited. It’s so great to have this kind of collaboration with expertise in so many areas, with everyone centered on the goal of making life with diabetes easier and safer! Shout out to the Kelly family & their colleagues for all the work on the screen & HATs; to Scott for a lot of development work on both hardware and software side; to Morgan & ERD for continuing to be a part of making great open hardware more widely available; and many other people who are working on bits and pieces to make everything possible!

January 2018 update: rigs are still evolving! You can pre-order an Explorer HAT, eta of shipping is April 2018.

Showing the size of the Explorer "HAT" board next to chapstick for size comparison

See the openaps-menu software code here; and the Explorer HAT hardware repo is here.

More open innovation coming soon?

This is a big deal: JDRF just announced funding for companies to open up their device protocols, with an explicit mention of projects including OpenAPS.

This is something we’ve been asking companies for over many years, but even the most forward-thinking diabetes device companies are still limiting patients to read-only retrospective access to the patient’s own data. That’s a start, but it isn’t enough.  We need all device makers to take the next step toward full and open interoperability: participating in open-protocol development of pumps and AP systems. If funding from a major organization like JDRF is what will be needed to prioritize this, great: we’re really excited to see them doing so.

Many of us in the diabetes community have chosen to accept the risk of a flawed device, because of the net risk reduction -and quality of life improvements – that come from being able to DIY closed loop. But that doesn’t mean we’re 100% happy with that.

  • We shouldn’t have to bandaid our pumps – literally – with tape.
  • We shouldn’t have to buy them second hand.
  • We should be able to use in-warranty devices that aren’t physically broken.

In order to use our medical devices in the safest and most effective way possible, we need the ability to remotely and safely control our devices – and understand them – as we see fit.  That means the makers of the medical devices we rely on need to openly document the communications protocols their devices use, so that any informed patient, or any company or organization operating on their behalf, can safely interact with the device.

It’s a big deal for JDRF to put resources into helping companies figure out how to do this, and ease liability and regulatory concerns. Thanks to everyone who’s been a vocal advocate in the DIY community; in organizations like JDRF; and individuals advocating at the medical device companies as well.  And props to the FDA, who last month released official guidance encouraging device makers to “design their devices with interoperability as an objective” and “clearly specify the relevant functional, performance, and interface characteristics to the user.”

We all have the same goals – to make life better, and safer, for those of us living with type 1 diabetes. I’m excited to see more efforts like this that further align all of our activities toward these goals.

To the diabetes device companies: we’ve long said we are happy to help if you want to figure out how to do this. Hopefully, you already have ideas about how to do this smartly and safely. But if you need help, let us know – we’re happy to help, because #WeAreNotWaiting and neither should you.


Not bolusing for meals (Fiasp, 0.6.0 algorithm in oref0 dev branch, and more)

I tweeted last week+, “I just realized I’ve now gone about 3 weeks without meal bolusing.” That means just a meal announcement (i.e. carb entry estimate, a la 30 carbs or 60 carbs or whatever, based on my IFTTT buttons). No manual bolus.

Highlighting 3 weeks without meal bolusing, and just doing a carb announcement, with good outcomes thanks to OpenAPS

I kind of keep waiting for the other shoe to drop, because it sounds to good to be true. I’m sure you’re skeptical reading this.

I bet she’s doing SOME bolus.

Well, she must not be eating any carbs.

She must be having worse outcomes, bad post-meal BGs, etc.

Nope, nope, and nope.

  • While I started testing this new set of features with partial boluses and worked my way down (see more below on the testing topic), I’m now literally doing no manual meal bolus. I start eating, and press one button on my watch for a carb estimate entry (that via IFTTT goes to Nightscout and my rig).
  • I eat carbs. I’ve eaten 120 grams of carbs of gluten free biscuits and gravy; 60-90 grams of pasta; dinner followed by a few gluten free cookies, etc.
  • More nuanced details below, but:
    • My 70-180 time in range has stayed the same (93+%) compared to the versions I was testing before with manual meal boluses.
    • My 70-150 and 80-160 time in ranges have decreased slightly compared to manual meal boluses, but…
    • My average blood sugar has actually dropped down (as has my a1c to match).
    • (So this means I’m having a few more spikes above 160, usually topping off in 160-170 whereas before my manual meal boluses would have me top off around 150, when all was well.)

Also note – no eating soon required. No early bolus or pre-bolus. Just single button press as I stick food in my mouth.

Wow.

(See where I said, waiting for the other shoe to drop?)

That’s why I waited a while to even tweet about it. Maybe it’s a fluke. Maybe it won’t work for other people. Maybe, maybe, maybe. Who knows. It’s still fairly early to tell, but as other people are beginning to test the current dev branch of oref0 with 0.6.0-related features, other people are starting to see improvements as well. (And that could be some of the many other features we are adding to 0.6.0, ranging from exponential curves for insulin activity, to allowing SMBs to do more, to carb-ratio-tuned-autosensitivity, to huge autotune improvements, etc.) 

So while I don’t want to over-hype – and never do, what works for me will not work for everyone – I do want to share my cautious excitement over continuing to be able to push the envelope on algorithms and what might be possible outcome-wise for this kind of technology.

Suggesting no meal bolus means we can quit arguing about the name "artificial pancreas"

Here’s what is enabling me to be in the no-bolus zone for now well over a month, with still (to me) great outcomes worth the tradeoffs described above:

  1. Faster insulin. Thanks to our lovely looping friends in Germany/Austria, we came back from Europe with a few vials of Fiasp to try. I was HIGHLY skeptical about this. Some of our European friends saw great results right away, others didn’t. I didn’t get great results on it at first. Some of that may be due to natural changes between insulin types and not knowing exactly how to adjust my manual bolus strategy to the faster insulin action, but until we did some code changes to allow SMB‘s to do more and added some other features to what’s now 0.6.0, I wasn’t thrilled and in fact after about two weeks of it was about to switch off of it. So that brings me to #2.
  2. More improvements to the algorithm, which is now what will become the 0.6.0 release of oref0. There’s a whole lot of stuff packed in there. Exponential curves. Different carb absorption decay calculations. Allowing SMB to do more. Additional safety guards since we ramped SMB up.

How we started testing no-bolus approach:

  • I have always known that about 6u of insulin (thanks to testing dating back to my early DIYPS days, many many many moons ago) is about as much as I should bolus at any time. So, even if I ate 120 carbs, I usually did about a 6u bolus up front, and let the rig pick up the rest as needed over more hours. I started doing ~75% or something like that of boluses, based on wherever I felt like rounding to with my easy bolus buttons.
  • Whether I did 75% or 100%, I didn’t see a ton of difference at first…
  • ..so I took a leap and tried no-bolus with some SMB adjustments to allow it to ramp up faster with carb entry. Behaviorally, I find it a lot easier to do nothing 😀 vs. figure out the right amount of up front bolus. And outcomes wise (see above) it was very similar.

It definitely was an interesting approach to test. Between the Fiasp and the no-bolus up front, in some meals it matched really well and I had practically no rise. Due to incoming netIOB, food type, etc, sometimes I did have a rise – but while it spiked slightly higher (160-170 usually vs my earlier 150s with manual bolus), it was only up there for 2-3 data points and then came sharply down, leveling out smoothly in my preferred post-meal range. So an important lesson I learned was not to over-react to just the BG curve going up, without looking at the predictions to see where I was going to come just back down. (And as I had more than one meal where the spike and drop back to normal happened, it was very easy to adjust to the BG graph and not get that emotional tug to “do more” with a quick short rise like that).

Obviously, starting BG makes a difference. I’m usually starting <130 mg/dL when I see these spikes cap out at 170 or lower. I’ve started higher, and seen higher rises, too. They’re not all perfect: with occasional pump site issues, carb underestimates, unplanned carb stacking, and all the randomness of diabetes and a non-structured lifestyle (including live-testing bleeding edge algorithm changes), I’ve spent 12% of the last month >160 mg/dL, which is about the same as the 3 months before that. But in most cases (I’d say 95%), the no-bolus approach has actually yielded better outcomes than I expected AND has avoided post-meal lows better than I would have achieved with a manual bolus.

This is huge when you think about the QOL aspect of not having to do as much math at a meal; and when you think about all the complicating factors related to food – timing (do you bolus when you order, or when the food arrives, or earlier than that?), and the gluten factor. I have celiac disease, so if I’m eating out (which we do a lot, and especially since I travel frequently), bolusing prior to setting eyes on the food (knowing they didn’t plate it with bread, causing them to have to go back and start all over again) just isn’t smart. That’s why eating soon historically worked so well for me vs. traditional pre-boluses, because I could set the target entering the restaurant, bolus when I laid eyes on my hopefully safe food, and get reasonable (150 topping out) meal outcomes.

It also worked really well in the case where a restaurant cooked my gluten free pasta in the same pasta cooker and water as regular pasta, but didn’t inform me until after I found stray gluten noodles in the bottom of my pasta dish and started asking how that was possible since they (used to) do gluten free well. (Now, I pick up heaps of pasta, and sort pasta noodles one by one to make sure they all match before ever eating gluten free pasta. It makes waiters look at you very worriedly as you wave pasta around in the air, but better safe than glutened (again).) So, I was majorly glutened, and my digestion system was all out of sorts (isn’t that a nice polite way to describe getting glutened?) for many days, which of course impacted BG and insulin right then and for the days afterward. But because I had done carb entry and no-bolus, I was able to edit the carb entry down, and I didn’t have that much insulin stacked, and didn’t end up low after glutening, which is usually what happens.

Is that a super regular situation for most people? No. But it was super nice. And also helped me face pasta again last night, so I could put in a (very low in case of gluten) carb estimate, match my noodles, eat pasta, and let the SMBs ramp up to match absorption. It works very well for me.

Example BG graph from only announcing, not bolusing for, a meal with OpenAPS

Whether you have celiac or not, for many reasons (insert yours here), it’s nice to not to have to commit to the bolus up front. It’s closer to approaching what I think non-PWDs do at mealtimes: just eat.

(I haven’t done much testing (yet? TBD) for no-carb-entry and no-meal-bolus scenario, I expect I would have higher spikes but would be interesting to see if it would still come down reasonably fast. Probably wouldn’t be my go-to strategy because I don’t mind a general meal size estimate one button push, but would be nice to know what that curve shape would look like. If I test that, it’ll start with small snacks and ramp my way up.)

The questions I always get:

  1. Q: HOW DO I GET THIS?
    A: Caution: like all things OpenAPS but especially always true for the development branch, 0.6.0 is NOT released yet to master and is still highly experimental. I wouldn’t install dev unless you want to pay lots of close attention to it, and are willing to update multiple times over the course of the week, because Scott and I are merging features and tweaks almost daily to it.

    Got the disclaimers down? Ok. It’s in the dev branch of oref0. You should read this PR with notes on some more detail of what’s included, but you should also review the code diff to see all that’s changed, because it’s not all documented yet. Also, follow the instructions at the bottom to be able to install it without git. Hop into Gitter if you have questions about it!

    (Big huge thanks to folks like Tim and Matthias for early testing of 0.6.0; and to Tim for writing up about the initial rounds of 0.6.0-dev here (note that we’ve made further changes since this post), and others who’ve been testing & providing feedback and input into the dev branch!)

  2. Q: When will this get “released” to master?
    A: It depends. This is still a highly active dev branch, and we’re making a lot of changes and tweaking and testing things. The more people who test now and provide feedback will enable us to get to the final “prepare for release” testing stage. Lots and lots of testing, and things depend on how much existing needs tweaked, and what else we decide should go with this release. So, there’s never any specific release date.
  3. Q: What is Fiasp?
    A: Faster acting insulin that was only approved in Europe and Canada…until today. Convenient timing. I asked a PR person who messaged me about it, and they said it’s estimated to be available in U.S. pharmacies by late December/earlier Q1. As previously stated, available elsewhere in other parts of the world.

    Fiasp peaks sooner (say, ~45 minutes) with the same tail as everything else. It’s not instantaneous. For your million and one questions about whether it’s approved for your use in a tree, on a plane, at the zoo, and all other extrapolations – please ask Google/your doctor/the manufacturer, and not me. I don’t know. :)

  4. Q: Will any of this work for people NOT on Fiasp?
    A: Nothing is guaranteed (even for other people on Fiasp), but the folks who’ve started testing 0.6.0 even without Fiasp (on Humalog or Novolog/Novorapid, etc.) have been happier on it vs. earlier versions, too.

    I don’t expect Fiasp to work super well forever for me, given what I’ve heard from other people with months of experience on it…and given my first two weeks of Fiasp not being spectacular, I want people to not expect miracles. (Sorry, this blog post does not promise miracles, so sorry if you got super excited at the above. No miracles! This is not a cure! We still have diabetes!) Like all things artificial pancreas, I think it’s better to be cautiously hopeful with realistic expectations that things *might* be a little bit better than before, but as always, YDMV (your diabetes may/will always vary), your body will vary, and life happens, etc. so who knows.

Just 4 months ago, we published a blog post pointing out that the new features had allowed us to achieve 4 out of 5 of: no bolus; not counting carbs, medium/high carb meals, 80%+ time in range; and no hypoglycemia.  With Fiasp and  0.6.0 (currently what’s in the dev branch), we’ve now achieved all 5 simultaneously: I can eat large high-carb meals, enter very vague guesstimates of 60 or 90 carbs (no need for actual carb counting, just general size-based meal announcement), and still achieve 80%+ time in range 70-150 mg/dL without ever going <55 mg/dL.  Does that mean that OpenAPS with Fiasp finally meets the definition of a “real” Artificial Pancreas (step 5 on JDRF’s 6-step AP development pathway)?  We think it does.

So, tl;dr (because long post is long): with Fiasp and 0.6.0-dev branch, I’m able to not bolus for meals, and just enter a very generally sized meal estimate. It’s working well for me, and like all things, we’re working to make it available to other people via OpenAPS for others who want to try similar features/approaches. It may not work well for everyone. If it helps one other person, though, like everything else it’ll be worth it. Big thanks to Scott for LOTS of development in 0.6.0 and partnership in design of these features; too many people to name for testing and providing feedback and helping iterate on these features; and to the entire community for being awesome and helping us to continue to push the envelope on what might be possible for those of us with type 1 diabetes. :)

What you should know about closed looping (DIY like #OpenAPS or otherwise)

I’ve been wearing a DIY closed loop for something like 979 days..which means something like ~20,000 hours with this technology. Additionally, I’m not the only one. At the time of writing this post (see the latest count here), there are (n=1)*369+ (and that’s an undercount just based on who’s told us they’re looping) other DIYers out there, so the community has an estimated 1,800,000+ hours of cumulative experience, too.

Suffice to say, we’ve all learned a lot about this technology and how hybrid closed loop makes a difference in life with diabetes.

I previously gave a talk almost two years ago to the Sports & Diabetes Group Northwest here in Seattle, talking about #DIYPS, how we closed the loop, and #OpenAPS. (And you can see a recent TEDX talk I gave on OpenAPS here.) That was a springboard for meeting some awesome individuals who became very early DIY loopers in the Seattle area. And one of them (who also wore a pancreas at HIS wedding :)) had suggested we do another talk for SDGNW to update on some of what we have learned since then. But unfortunately, he got called out of town for work and couldn’t join me for presenting, so I went solo (ish, because Scott also came and contributed). I used a new analogy, because I think there’s a lot to think about before choosing and using closed loop technology, whether it’s DIY or commercial, and wanted to write it up for sharing here.

what_to_know_about_looping_danamlewis

First, some reminders for those familiar and some context for those who are not close to this technology. We’re talking about a hybrid closed loop, which is what I’m referring to when I say “artificial pancreas” or “AP” here. This type of technology makes small adjustments every few minutes to provide more or less insulin with the goal of keeping blood glucose (BG) levels in range. It’s complicated by the fact that insulin often peaks at 60-90 minutes…but food hits in ~15 minutes. So there’s often “catch up” being done with insulin to deal with food eaten previously, and also with hormones and other things that impact BGs that aren’t measurable. (This is also why it’s called hybrid, because for best outcomes people will still be doing some kind of meal announcement/bolus to deal with insulin timing.) As a result, even with pumps and CGMs, diabetes is still hard. A closed loop can do the needed math every five minutes, doesn’t go to sleep, and is very precise. It can respond more quickly (because it’s paying attention) than a human will in most situations, because we’re out living our lives/working/sleeping and not paying attention ONLY to diabetes. It’s not a cure, but it helps make living with diabetes better than it used to be.

However, I equate it to being a pilot who has seen technology on planes evolve to include “autopilot”. Even with hybrid closed loop technology, we’re still flying the “plane”.

looping_is_like_flying_plane_danamlewis

Here’s what I mean. There are stages for picking out and deciding to use the technology; preparing to use it/getting in the mode where you CAN use it; using it successfully; getting ready for the times when you can’t use it; and smoothing the way for the next time you use it.

It’s not perfect 24/7, you see, because we’re still using pump sites and continuous glucose monitor (CGM) sensors. The CGM sensor may last for 7 days, but then you have to change it out (or cough restart it cough), and you have a gap in data, which means you can’t loop. So you have this type of cycle regularly, and here’s what you need to know about each of these stages, regardless of whether we’re talking about DIY (like OpenAPS) or a commercial closed loop solution.

Preparing for takeoff

prepare_for_looping_danamlewisWhen you’re getting into the plane, you have a flight plan. You know when you will and won’t use the technology on board. Same for diabetes & closed looping. Make sure to think about the following for your tech of choice:

When will your loop work? When does it not? What happens if it breaks? What are your back up tools? How do you operate it: what happens if your sensor loses data, or you don’t calibrate? How does the algorithm work? What will it target your BG to be? What behaviors will you have to do (meal bolus or announcement, etc.) and how can you alter those to optimize performance? Also, what are the warning signs of failure to let you know when you need to take additional action with corrective insulin or eating carbs?

Taking off and the new technology learning curve

taking_off_learning_curve_danamlewisJust like switching from MDI pump (or even iPhone to Android and vice versa), you have a learning curve. When you go into looping or automated insulin delivery mode, you have to figure things out. You need to be able to figure out what’s happening and why it’s doing what it’s doing, so if you’re not happy with what’s happening, you can make a change. Why are you running high? Why are you running low? Knowing why it’s doing what it’s doing is critical for adjusting – either tweaking the closed loop settings, if you can, or adjusting your own behavior. Especially in the first few cycles of new tech, you’ll have a lot of learning around “I used to do things like X, but now I need to do them like Y.”

Why you might not be taking off and able to loop

blocking_takeoff_danamlewisYou also need to know why you can’t loop. There are three major categories of things that will prevent you from looping:

  1. No sensor, no looping.
  2. In some systems, wonky or missing data, no looping
  3. Communication errors between pieces of a system.

Some of these are obvious fixes (put in a new sensor if one fell out, or decide to put in a new sensor if the old one is bad), but depending on the system may involve some troubleshooting to get things going again.

Also, some of the commercial systems will kick you out of looping for various reasons (including lack of calibration), in addition to preventing you from looping in the first place without them, so knowing what these basic things are required for looping is useful to make sure you CAN automate.

Flying high: maintenance when you’re actually looping

maintenance_when_looping_danamlewisThere are some critical behaviors required for looping. (After all, when flying, there’s always a pilot present in the cockpit..right?!)

Some of these are basic behaviors you’ll be used to if you’ve been wearing a pump and CGM previously: keeping pump sites changed so the insulin works, and changing and calibrating CGM sensors.

HOWEVER – many people who “stretch” their CGM sensors find that they don’t want to stretch their sensors as far, as the data degrades over time. You do you, but keep in mind this might change when you’re looping vs. not, because you’re relying on good data to operate the system.

That being said, in addition to good sensor life, calibration hygiene is critical. You don’t want to loop off of wonky data, but also some commercial systems will kick you out if your calibration is way off and/or if you miss a calibration. (Personal opinion on this is a big ugh, which is why no DIY system that I know of does this.)

But if you keep your sites and sensors in good condition, this is where life is good. You’re looping! It’s microadjusting and helping keep things in range. Yay! This means better sleep, more time in range, and feeling better all around.

However, you still have diabetes, you’re still in the plane, so you still need to keep an eye on things. Monitoring the system is important (to make sure you’re still in autopilot and don’t need to actually fly the plane manually), so make sure you know how you (and your loved ones) can monitor the system’s operation, and know what your backup alarms are in case of system failures.

Note: there are approximately eleventy bajillion ways to remote monitor in DIY systems, but even if you have a commercial system that comes pre-baked without remote monitoring… you can add a DIY solution for that. So don’t feel like if you have a commercial AP that you can never use anything DIY – you can totally mix and match!

Dealing with turbulence

turbulence_danamlewisWhat kind of airplane/flight analogy would this be without including turbulence? :)

Like the things that can prevent looping in the first place, there are things that can throw off your looping. I already mentioned wonky sensor data that may mean either a blip in your looping time, or may kick you off looping. Again, your sensor life and your calibration practices will likely change.

But the other big disturbance, so to speak, is around body sensitivity changes. You know all the ways it can happen: you’re getting sick, recovering from getting sick, getting ready for/or are on/or are right after your period, or have an adrenaline spike, or have hormones surging, or have a growth spurt, or just exercised, etc.

This is what makes diabetes oh so hard so often. But this is where different closed loop systems can help, so this is one area you should ask about when picking a system: how does it adjust and adapt to sensitivity changes, and on what time frame? (In the DIY world, we use a number of techniques with this, ranging from autosensitivity to adapt on a 24 hour rolling scale of sensitivity changes, as well as using autotune to track bigger picture trends and changes needed to underlying settings. Reminder – anyone can use autotune if they’re willing to log bolus & carb data in Nightscout, not just closed loopers, so check that out if you’re interested! All DIY closed loop systems also use dynamic carbohydrate absorption in their respective algorithms, so that if you have slowed digestion for ANY reason, ranging from gastroparesis to getting glutened if you have celiac to merely walking after a meal, the system takes that into account and adjusts accordingly.)

The other things that can help you tough out some turbulence? Setting different modes, like an activity mode for exercise. The two things to know about exercise are:

  1. You don’t want to go into exercise with a bucket of IOB, so set activity mode WELL BEFORE you go out for activity. Depending on how much netIOB you have, that time may vary, but planning ahead with an activity mode makes a big difference for not going low during activity – even with a closed loop.
  2. Your sensitivity may be impacted for hours afterward, into the next day. See above about having a system that can respond to sensitivity changes like that, but also think about having multiple targets you can use temporarily (if your system allows it) so you can give the system a bigger buffer while it sorts out your body’s sensitivity changes.

Preparing for landing and making time between loops more smooth

prepare_for_landing_danamlewisJust like you’ll want to plan to go on the closed loop, you’ll want to plan for how to cycle off and then back on again. Depending on your system, there may be things you can do to smooth things out. One of the things I do is pre-soak a CGM sensor to skip the first day jumpy numbers. That makes a big difference for the first hours back on a “new” looping session. The other thing I do is stagger receiver start times (where I have two receivers that I stop/start at different times, so I’m not stuck for two hours without BG data to loop on).

But even if you can’t do that, you can do some other general planning ahead – like making sure your looping session doesn’t end in the middle of a big meal that’s being digested, or overnight. Those are the times when you’ll want to be looping the most.

Landing and preparing for the next looping session

Landing_danamlewisJust like learning to fly where you take a lot of training flights and review how the flight went, you’ll want to think about how things went and what you might change behavior-wise for your next looping session. Some of the things that may change over time as you learn more about your tech of choice:

  • Timing of meal announcement or boluses
  • Precision (if needed, or otherwise lack thereof) around carb counting
  • Using things like “eating soon” mode to optimize meal-time insulin effectiveness and reduce post-meal spikes
  • Using different activity patterns and targets to get ideal outcomes around exercise
  • Tweaking underlying settings (if you can)

General thoughts on looping

general_looping_reminders_danamlewisSome last thoughts about closed looping in general, regardless of the tech you might choose now or in the future:

  1. Picking one kind of technology does NOT lock you into it forever. If you’re DIYing now, you can choose commercial later. If you start on a commercial system, you can still try a DIY system.
  2. Don’t compare the original iPhone with an iPhone 6. Let’s be blunt: the Dexcom 7plus is a different beast than the Dexcom G4/G5. Similarly, Medtronic’s original “harpoon” sensor is different than their newest sensor tech. The Abbott Navigator is different than their Libre. Don’t be held up by perceptions of the old tech – make sure to check out the new stuff with a somewhat open mind.
  3. (Similarly, hopefully, in the future we’ll get to say the same about first-generation devices and algorithms. These things in commercial systems should change over time in terms of algorithm capabilities, targets, features, and usability. They certainly have in DIY – we’ve gotten smaller pancreases, algorithm improvements, all kinds of interoperability integration, etc.)
  4. All systems (both DIY and commercial) have pros and cons. They also each will have their own learning curves. Some of that learning is generalized, and will translate between systems. But again, iPhone to Android or vice versa – your cheese gets moved and there will be learning to do if you switch systems.
  5. Remember, everyone learns differently – and everyone’s diabetes is different. Figure out what works well for you, and rock it!


What I wish CDEs (diabetes educators) and other HCPs knew about DIY and other diabetes tech (#OpenAPS or otherwise)

I had the awesome opportunity to present at #AADE17, the annual education meeting for the American Association of Diabetes Educators, this past weekend. My topic was about OpenAPS and DIY diabetes… which really translates to some broader things I want all educators and HCPs to know about patients and technology, whether it’s DIY or just unknown to them. Unfortunately AADE didn’t record or livestream my session, so I wanted to write up a summary of the content here.

(If you’re new to this blog/me/OpenAPS, you can also watch this June 2017 TEDX talk where I share some of the story of how I ended up with a DIY artificial pancreas and how the OpenAPS community came to be; or this older talk from OSCON 2016 as well. As always, if you’re curious to learn more about OpenAPS or wondering how to build your own DIY artificial pancreas, OpenAPS.org is the first place to learn more!)

Diabetes is hard. Even if you are privileged to have access to insulin, education, and technology – it can still be so incredibly hard to get it right. And even if you do everything “right”, the outcomes will still vary. And after all, the devices themselves are not perfect, and we still have diabetes.

The lack of varying alarms and the unchangeable volume is what led me to create DIYPS (my open loop and louder alarm system), and the same frustration with lack of data access and visualization led John Costik, Lane Desborough, Ben West, and so many others to explore creating other DIY tools, such as Nightscout. And thanks to social media, we all didn’t have to create in a vacuum: we can share code (this is what open source means) and insight through social media, and build upon each other’s work. As a result, these collaborations, sharing, and iterative development is how OpenAPS, the open source artificial pancreas system movement, was created.

I tweet and talk and share frequently about how great it is having #OpenAPS in my life. Norovirus? No problem. Changes in sensitivity due to exercise? Not the biggie it used to be.

Showing flat overnight CGM graph representing sleep uninterupted by hypoglycemia thanks to OpenAPS

However, this technology is by no means a cure. It still requires work on the part of the person with diabetes. We still have to:

  • Change pump sites
  • Change CGM sensors
  • Calibrate regularly
  • Deal with bonked pump sites and sensors that fall out

And also, given the speed of insulin, most people are still going to engage with the system for some kind of meal bolus or announcement. This is why it’s called “hybrid” closed loop technology. (However, depending on the sophistication of the technology, you start to get to be able to choose what you want to optimize for and the behaviors you want to choose to do less of, which is great.)

In some cases, we humans know more than the technology: such as when a meal is going to happen/is coming, and when exercise is going to happen. So it’s nice to be able to interoperate your devices and be able to use your phone, watch, computer, etc. to be able to tell the system what to do differently (i.e. set higher targets in the case of activity, or lower targets to achieve “eating soon” mode , or in the case of waking up).

But in a LOT of cases, it’s tiring for the human to have to think about all the things. Such as whether a pump site is slowly dying and causing apparent insulin resistant. Or such as when you’re more sensitive 12-24 hours after exercise. Or during menstrual cycles. Or when sick. Or during a growth spurt. Or during jet lag. Or during a trip where you can’t find anything to eat. Etc. It’s a lot for us PWD’s to track, and this is where computers come in handy. Things like autosensitivity in OpenAPS to automatically detect changes in sensitivity and adjust the variables for calculations automatically; and autotune, to track the data of what’s actually happening and make recommendations for changing your underlying pump settings (ISF, carb ratio, and basal rates).

And how has this technology been developed by patients? Iteratively, as we figure out what’s possible. It’s not about boiling the ocean; it’s about approaching problems bit by bit as we have new tools to solve them, or new people with energy to think about the problem in different ways. It’s like thinking about getting a car – you wouldn’t expect the manufacturer to sell bits and pieces of the car frame, and you don’t really expect medical device manufacturers to sell bits and pieces of a pump or other device. However, patients are closest to the REAL problems in living with diabetes. Instead of a “car”, they’re looking for solutions for getting from point A to point B. And so in the car analogy, that means starting with a skateboard, scooter, or bike – and ending up with a car is great, but the car is not the point.

So no, any piece of technology isn’t going to be a cure or solve all problems or work perfectly for everyone. But that is true whether it’s DIY or a commercial tool: one size certainly does not fit all. And patients are individuals with their own lives and their own challenges with diabetes, with different motivations around what aspects of life with diabetes feel like friction and what they feel equipped to tackle and solve.

So, here’s some of what’s on my list for what I’d like CDE’s and other HCP’s to know as a result of the proliferation of technology around diabetes:

  • Yes, DIY tech is often off label. But that’s ok – it just means it’s off label; it doesn’t prevent you from listening to why patients are using it, what we think it’s doing for us, and it doesn’t prevent you from asking questions, learning more, or still advising patients.
  • Don’t make us switch providers by refusing to discuss it or listen to it, just because it’s new/different/you don’t understand it. (By the way: we don’t expect you to understand all possible technology! You can’t be experts on everything, but that doesn’t mean shunning what you don’t know.)
  • You get to take advantage of the opportunity when someone brings something new into the office – it’s probably the first of many times you’ll see it, and the first patient is often on the bleeding edge and deeply engaged and understands what they’re using, and open to sharing what they’ve learned to help you, so you can also help other patients!
  • You also get to take advantage of the open source community. It’s open, not just for patients to use, but for companies, and for CDEs and other HCPs as well. There are dozens if not hundreds of active people on Twitter, Facebook, blogs, forums, and more who are happy to answer questions and help give perspective and insight into why/how/what things are.
  • Don’t forget – many of the DIY tools provide data and insight that currently don’t exist in any traditional and/or commercially and/or FDA-approved tool. Take autotune for example – there’s nothing else out there that we know of that will tune basal rates, ISF, and carb ratio for people with pumps. And the ability of tools like Nightscout reports to show data from a patient’s disparate devices is also incredibly helpful for healthcare providers and educators to use to help patients.

And one final point specific to hybrid closed loop technology: this technology is going to solve a lot of problems and frustrations. But, it may mean that patients will shift the prioritization of other quality of life factors like ease of use over older, traditionally learned diabetes behaviors. This means things like precise carb counting may go by the wayside for general meal size estimations, because the technology yields similar outcomes. Being aware of this will be important for when CDE’s are working with patients; knowing what the patterns of behaviors are and knowing where a patient has shifted their choices will be helpful for identifying what behaviors can be adapted to yield different outcomes.

I think the increase in technology (especially various types of closed loops, DIY and commercial) will yield MORE work for CDE’s and HCP’s, rather than less. This means it’s even more important for them to get up to speed on current and evolving technology – because it’s by no means going away. And the first wave of DIY’ers have a lot we can share and teach not just other patients, but also CDE’s. So again, many thanks to AADE for the opportunity to share some of this perspective at #AADE17, and thanks to everyone for the engagement during and after the session!

How I made my #OpenAPS code shirt (and new pancreas case!)

“Wait, what does your shirt say?”

When we talk about the ability and right to self-experiment and to DIY, a common theme that comes up is about freedom of speech and the freedom to self-experiment. And there’s a well-known example of someone who put their code on a t-shirt. In the back of my mind, I always thought one day I would do that (create #OpenAPS shirts with code on them), but didn’t really get around to it, because we’re a little busy doing other things 😉 for the most part.

However, a few months ago I was itching to do something crafty, but I’m not a really crafty person. So, I decided to hack the process and use technology to facilitate my craftiness.

The design process

I’m not a designer, just like I’m not a traditional programmer/engineer/whatever. But what I learned from pancreas building applies to other DIY areas, too! I knew Spoonflower enables you to custom print cool fabric, but I didn’t realize anyone (like, you know, me) could upload a design and have it printed in your fabric of choice. You don’t need fancy design software, either – I used PowerPoint to create the design, exported as an image, and uploaded to Spoonflower.

(The one limitation is that before ordering any of the fabric in a traditional order, they require you to print a sample of it first. But if you do that, it’s a $12 sampler and you might as well do a couple of designs. You can iterate on your one design, or do multiples. And I like hashtags, so I designed some hashtag patterns, too. But don’t worry – since I already printed my oref0 code as a sampler, it doesn’t need to be re-sampler’ed – you can order away now if you so choose. )

Once I got my sampler, I went over to the Sprout Patterns website, which is connected to Spoonflower. I had my eye on this shirt, but there’s dresses and shirt patterns of all kinds. (You can also just get the fabric printed and do any kind of shirt pattern you want.) But the other reason I did Sprout? Because I have talented sisters- and cousins-in-law who were willing to sew the shirt for me, but they’re super busy. So I decided to pay the $25 to have someone from Sprout sew my shirt.

The finished shirt:
Dana Lewis oref0-determine-basal code shirt

How to get your own shirt (or the fabric for whatever you want)

Because I marked my design as “public”, you can go to Spoonflower today and order prints in any size and any of the fabric that you want with that design. (I used “modern jersey” for my shirt). As the “designer”, I do get 10% of the cost of any yard printed with one of my designs on it in SpoonFlowerCash, which means I’ll probably use any of that to design more patterns and order another set of samplers so there are more colors/code options/font sizes to choose from in the future.

However, if you want the shirt to come made for you, go start on Sprout. Pick the pattern you like, pick your size, and then you can “design” your shirt using any of the Spoonflower designs, including the #OpenAPS oref0-determine-basal code. You can find it by searching OpenAPS, oref0, determine-basal, my username (danamlewis), etc.

You can move the design around and figure out where you want it to go. You can make any piece of the panels/sides of the shirt in different patterns or colors, so you can pick an accent color for a sleeve or cuff or belt, etc.

Pro tip: If you’re doing the Sprout route with the White Glove Service (where they sew the shirt/garment for you), in the comment area, tell them you want the extra “scrap” fabric!

#OpenAPS code cases

I have a pile of scrap fabric that I sent pictures of to the wonderful Tallygear team, and talked Donna into trying it out to make me a pancreas case. 😀 (Like this idea for a case design? Let her know! She (or anyone else) can order this fabric on Spoonflower, too, to make cases. The fabric isn’t quite the same as the neoprene we’ve been using, but it’s still got some stretch and I’m incredibly biased but I think they’re awesome!)

Fabric leftover from my OpenAPS code shirt made into OpenAPS rig cases. Meta!

So, that’s how I ended up wearing a shirt that makes you do a double take and say hey, that code sure does look familiar….

If you end up printing the fabric or designing your own pattern or shirt or pancreas case after hearing about this, I’d love to hear about it, please do share pictures!

This. Matters. (Why I continue to work on #OpenAPS, for myself and for others)

If you give a mouse a cookie or give a patient their data, great things will happen.

First, it was louder CGM alarms and predictive alerts (#DIYPS).

Next, it was a basic hybrid closed loop artificial pancreas that we open sourced so other people could build one if they wanted to (#OpenAPS, with the oref0 basic algorithm).

Then, it was all kinds of nifty lessons learned about timing insulin activity optimally (do eating soon mode around an hour before a meal) and how to use things like IFTTT integration to squash even the tiniest (like from 100mg/dL to 140mg/dL) predictable rises.

It was also things like displays, button, widgets on the devices of my choice – ranging from being able to “text” my pancreas, to a swipe and button tap on my phone, to a button press on my watch – not to mention tinier sized pancreases that fit in or clip easily to a pocket.

Then it was autosensitivity that enabled the system to adjust to my changing circumstances (like getting a norovirus), plus autotune to make sure my baseline pump settings were where they needed to be.

And now, it’s oref1 features that enable me to make different choices at every meal depending on the social situation and what I feel like doing, while still getting good outcomes. Actually, not good outcomes. GREAT outcomes.

With oref0 and OpenAPS, I’d been getting good or really good outcomes for 2 years. But it wasn’t perfect – I wasn’t routinely getting 100% time in range with lower end of the range BG for a 24hour average. ~90% time in range was more common. (Note – this time in range is generally calculated with 80-160mg/dL. I could easily “get” higher time in range with an 80-180 mg/dL target, or a lot higher also with a 70-170mg/dL target, but 80-160mg/dL was what I was actually shooting for, so that’s what I calculate for me personally). I was fairly happy with my average BGs, but they could have been slightly better.

I wrote from a general perspective this week about being able to “choose one” thing to give up. And oref1 is a definite game changer for this.

  • It’s being able to put in a carb estimate and do a single, partial bolus, and see your BG go from 90 to peaking out at 130 mg/dL despite a large carb (and pure ballpark estimate) meal. And no later rise or drop, either.
  • It’s now seeing multiple days a week with 24 hour average BGs a full ~10 or so points lower than you’re used to regularly seeing – and multiple days in a week with full 100% time in range (for 80-160mg/dL), and otherwise being really darn close to 100% way more often than I’ve been before.

But I have to tell you – seeing is believing, even more than the numbers show.

I remember in the early days of #DIYPS and #OpenAPS, there were a lot of people saying “well, that’s you”. But it’s not just me. See Tim’s take on “changing the habits of a lifetime“. See Katie’s parent perspective on how much her interactions/interventions have lessened on a daily basis when testing SMB.

See this quote from Matthias, an early tester of oref1:

I was pretty happy with my 5.8% from a couple months of SMB, which has included the 2 worst months of eating habits in years.  It almost feels like a break from diabetes, even though I’m still checking hourly to make sure everything is connected and working etc and periodically glancing to see if I need to do anything.  So much of the burden of tight control has been lifted, and I can’t even do a decent job explaining the feeling to family.

And another note from Katie, who started testing SMB and oref1:

We used to battle 220s at this time of day (showing a picture flat at 109). Four basal rates in morning. Extra bolus while leaving house. Several text messages before second class of day would be over. Crazy amount of work [in the morning]. Now I just have to brush my teeth.

And this, too:

I don’t know if I’ve ever gone 24 hours without ANY mention of something that was because of diabetes to (my child).

Ya’ll. This stuff matters. Diabetes is SO much more than the math – it’s the countless seconds that add up and subtract from our focus on school/work/life. And diabetes is taking away this time not just from a person with diabetes, but from our parents/spouses/siblings/children/loved ones. It’s a burden, it’s stressful…and everything we can do matters for improving quality of life. It brings me to tears every time someone posts about these types of transformative experiences, because it’s yet another reminder that this work makes a real difference in the real lives of real people. (And, it’s helpful for Scott to hear this type of feedback, too – since he doesn’t have diabetes himself, it’s powerful for him to see the impact of how his code contributions and the features we’re designing and building are making a difference not just to BG outcomes.)

Thank you to everyone who keeps paying it forward to help others, and to all of you who share your stories and feedback to help and encourage us to keep making things better for everyone.


Introducing oref1 and super-microboluses (SMB) (and what it means compared to oref0, the original #OpenAPS algorithm)

For a while, I’ve been mentioning “next-generation” algorithms in passing when talking about some of the work that Scott and I have been doing as it relates to OpenAPS development. After we created autotune to help people (even non-loopers) tune underlying pump basal rates, ISF, and CSF, we revisited one of our regular threads of conversations about how it might be possible to further reduce the burden of life with diabetes with algorithm improvements related to meal-time insulin dosing.

This is why we first created meal-assist and then “advanced meal-assist” (AMA), because we learned that most people have trouble with estimating carbs and figuring out optimal timing of meal-related insulin dosing. AMA, if enabled and informed about the number of carbs, is a stronger aid for OpenAPS users who want extra help during and following mealtimes.

Since creating AMA, Scott and I had another idea of a way that we could do even more for meal-time outcomes. Given the time constraints and reality of currently available mealtime insulins (that peak in 60-90 minutes; they’re not instantaneous), we started talking about how to leverage the idea of a “super bolus” for closed loopers.

A super bolus is an approach you can take to give more insulin up front at a meal, beyond what the carb count would call for, by “borrowing” from basal insulin that would be delivered over the next few hours. By adding insulin to the bolus and then low temping for a few hours after that, it essentially “front shifts” some of the insulin activity.

Like a lot of things done manually, it’s hard to do safely and achieve optimal outcomes. But, like a lot of things, we’ve learned that by letting computers do more precise math than we humans are wont to do, OpenAPS can actually do really well with this concept.

Introducing oref1

Those of you who are familiar with the original OpenAPS reference design know that ONLY setting temporary basal rates was a big safety constraint. Why? Because it’s less of an issue if a temporary basal rate is issued over and over again; and if the system stops communicating, the temp basal eventually expires and resume normal pump activity. That was a core part of oref0. So to distinguish this new set of algorithm features that depart from that aspect of the oref0 approach, we are introducing it as “oref1”. Most OpenAPS users will only use oref0, like they have been doing. oref1 should only be enabled specifically by any advanced users who want to test or use these features.

The notable difference between the oref0 and oref1 algorithms is that, when enabled, oref1 makes use of small “supermicroboluses” (SMB) of insulin at mealtimes to more quickly (but safely) administer the insulin required to respond to blood sugar rises due to carb absorption.

Introducing SuperMicroBoluses (or “SMB”)

The microboluses administered by oref1 are called “super” because they use a miniature version of the “super bolus” technique described above.  They allow oref1 to safely dose mealtime insulin more rapidly, while at the same time setting a temp basal rate of zero of sufficient duration to ensure that BG levels will return to a safe range with no further action even if carb absorption slows suddenly (for example, due to post-meal activity or GI upset) or stops completely (for example due to an interrupted meal or a carb estimate that turns out to be too high). Where oref0 AMA might decide that 1 U of extra insulin is likely to be required, and will set a 2U/hr higher-than-normal temporary basal rate to deliver that insulin over 30 minutes, oref1 with SMB might deliver that same 1U of insulin as 0.4U, 0.3U, 0.2U, and 0.1U boluses, at 5 minute intervals, along with a 60 minute zero temp (from a normal basal of 1U/hr) in case the extra insulin proves unnecessary.

As with oref0, the oref1 algorithm continuously recalculates the insulin required every 5 minutes based on CGM data and previous dosing, which means that oref1 will continually issue new SMBs every 5 minutes, increasing or reducing their size as needed as long as CGM data indicates that blood glucose levels are rising (or not falling) relative to what would be expected from insulin alone.  If BG levels start falling, there is generally already a long zero temp basal running, which means that excess IOB is quickly reduced as needed, until BG levels stabilize and more insulin is warranted.

Safety constraints and safety design for SMB and oref1

Automatically administering boluses safely is of course the key challenge with such an algorithm, as we must find another way to avoid the issues highlighted in the oref0 design constraints.  In oref1, this is accomplished by using several new safety checks (as outlined here), and verifying all output, before the system can administer a SMB.

At the core of the oref1 SMB safety checks is the concept that OpenAPS must verify, via multiple redundant methods, that it knows about all insulin that has been delivered by the pump, and that the pump is not currently in the process of delivering a bolus, before it can safely do so.  In addition, it must calculate the length of zero temp required to eventually bring BG levels back in range even with no further carb absorption, set that temporary basal rate if needed, and verify that the correct temporary basal rate is running for the proper duration before administering a SMB.

To verify that it knows about all recent insulin dosing and that no bolus is currently being administered, oref1 first checks the pump’s reservoir level, then performs a full query of the pump’s treatment history, calculates the required insulin dose (noting the reservoir level the pump should be at when the dose is administered) and then checks the pump’s bolusing status and reservoir level again immediately before dosing.  These checks guard against dosing based on a stale recommendation that might otherwise be administered more than once, or the possibility that one OpenAPS rig might administer a bolus just as another rig is about to do so.  In addition, all SMBs are limited to 1/3 of the insulin known to be required based on current information, such that even in the race condition where two rigs nearly simultaneously issue boluses, no more than 2/3 of the required insulin is delivered, and future SMBs can be adjusted to ensure that oref1 never delivers more insulin than it can safely withhold via a zero temp basal.

In some situations, a lack of BG or intermittent pump communications can prevent SMBs from being delivered promptly.  In such cases, oref1 attempts to fall back to oref0 + AMA behavior and set an appropriate high temp basal.  However, if it is unable to do so, manual boluses are sometimes required to finish dosing for the recently consumed meal and prevent BG from rising too high.  As a result, oref1’s SMB features are only enabled as long as carb impact is still present: after a few hours (after carbs all decay), all such features are disabled, and oref1-enabled OpenAPS instances return to oref0 behavior while the user is asleep or otherwise not engaging with the system.

In addition to these safety status checks, the oref1 algorithm’s design helps ensure safety.  As already noted, setting a long-duration temporary basal rate of zero while super-microbolusing provides good protection against hypoglycemia, and very strong protection against severe hypoglycemia, by ensuring that insulin delivery is zero when BG levels start to drop, even if the OpenAPS rig loses communication with the pump, and that such a suspension is long enough to eventually bring BG levels back up to the target range, even if no manual corrective action is taken (for example, during sleep).  Because of these design features, oref1 may even represent an improvement over oref0 w/ AMA in terms of avoiding post-meal hypoglycemia.

In real world testing, oref1 has thus far proven at least as safe as oref0 w/ AMA with regard to hypoglycemia, and better able to prevent post-meal hyperglycemia when SMB is ongoing.

What does SMB “look” like?

Here is what SMB activity currently looks like when displayed on Nightscout, and my Pebble watch:

First oref1 SMB OpenAPS test by @DanaMLewisFirst oref1 SMB OpenAPS test as seen on @DanaMLewis pebble watch

How do features like this get developed and tested?

SMB, like any other advanced feature, goes through extensive testing. First, we talk about it. Then, it becomes written up in plain language as an issue for us to track discussion and development. Then we begin to develop the feature, and Scott and I test it on a spare pump and rig. When it gets to the point of being ready to test it in the real world, I test it during a time period when I can focus on observing and monitoring what it is doing. Throughout all of this, we continue to make tweaks and changes to improve what we’re developing. After several days (or for something this different, weeks) of Dana-testing, we then have a few other volunteers begin to test it on spare rigs. They follow the same process of monitoring it on spare rigs and giving feedback and helping us develop it before choosing to run it on a rig and a pump connected to their body. More feedback, discussion, and observation. Eventually, it gets to a point where it is ready to go to the “dev” branch of OpenAPS code, which is where this code is now heading. Several people will review the code and approve it to be added to the “dev” branch. We will then have others test the “dev” branch with this and any other features or code changes – both by people who want to enable this code feature, as well as people who don’t want this feature (to make sure we don’t break existing setups). Eventually, after numerous thumbs up from multiple members of the community who have helped us test different use cases, that code from the “dev” branch will be “approved” and will go to the “master” branch of code where it is available to a more typical user of OpenAPS.

However, not everyone automatically gets this code or will use it. People already running on the master branch won’t get this code or be able to use it until they update their rig. Even then, unless they were to specifically enable this feature (or any other advanced feature), they would not have this particular segment of code drive any of their rig’s behavior.

Where to find out more about oref1, SMB, etc.:

  • We have updated the OpenAPS Reference Design to reflect the differences between oref0 and the oref1 features.
  • OpenAPS documentation about oref1, which as of July 13, 2017 is now part of the master branch of oref0 code.
  • Ask questions! Like all things developed in the OpenAPS community, SMB and oref1-related features will evolve over time. We encourage you to hop into Gitter and ask questions about these features & whether they’re right for you (if you’re DIY closed looping).

Special note of thanks to several people who have contributed to ongoing discussions about SMB, plus the very early testers who have been running this on spare rigs and pumps. Plus always, ongoing thanks to everyone who is contributing and has contributed to OpenAPS development!

Scuba diving, snorkeling, and swimming with diabetes (and #OpenAPS)

tl;dr – yes, you can scuba dive with diabetes, snorkel with diabetes, and swim with diabetes! Here’s what you need to know.

I meant to write this post before I left for a two-week Hawaii trip, and since I answered about a question a day on various platforms as I posted pictures from the trip, I really wish I had done it ahead of time. Oh well. :) I especially wish someone had written this post for me 2 years ago, before my first scuba dive, because I couldn’t find a lot of good information on the practicalities of good approaches for dealing with all the details of scuba diving with diabetes and an insulin pump and CGM and now closed loops. Scuba diving, snorkeling, and swimming with diabetes are actually pretty common, so here are a few things to keep in mind/tips from me, before diving (pun intended) into some explanations of what I think about for each activity diabetes-wise.

scuba_diving_with_diabetes_tips_water_activities_by_Dana_M_Lewis

General tips for water activities when living with diabetes:

  1. Most important: be aware of your netIOB going into the activity. Positive netIOB plus activity of any kind = expedited low BG. This is the biggest thing I do to avoid lows while scuba diving or snorkeling – trying to time breakfast or the previous meal to be a few hours prior so I don’t have insulin peaking and accelerated by the activity when I’m out in the water and untethered from my usual devices.
  2. Second most important: CGM sensor and transmitter on your body can get wet (shower, pools, hot tubs, oceans, etc.), but keep in mind it can’t read underwater. And sometimes it gets waterlogged from short or long exposure to the water, so it may take a while to read even after you get it above water or dry off. And, historically I’ve had sensors come back and the CGM will sometimes read falsely high (100-200 points higher than actual BG), so exercise extreme caution and I highly recommend fingerstick testing before dosing insulin after prolonged water exposure.
  3. Know which of your devices are waterproof, watertight, etc. Tip: most pumps are not waterproof. Some are watertight*. The * is because with usual wear and tear and banging into things, small surface cracks start showing up and make your pump no longer even watertight, so even a light splash can kill it. Be aware of the state of your pump and protect it accordingly, especially if you have a limited edition super special super rare DIY-loopable pump. I generally take a baggie full of different sized baggies to put pump/CGM/OpenAPS rig into, and I also have a supposedly waterproof bag that seals that I sometimes put my bagged devices into. (More on that below).
    1. And in general, it’s always wise to have a backup pump (even if it’s non-loopable) on long/tropical/far away trips, and many of the pump companies have a loaner program for overseas/cruise/tropical travel.
  4. Apply sunscreen around your sites/sensors because sunburn and applying or removing them hurts. However, as I learned on this trip, don’t do TOO much/any sunscreen directly on top of the adhesive, as it may loosen the adhesive (just surrounding the edges is fine). I usually use a rub sunscreen around the edges of my pump site and CGM sensor, and do the rest of my body with a spray sunscreen. And pack extra sites and sensors on top of your extras.

Why extras on top of your extras? Because you don’t want to have a vacation like I did where I managed to go through 5 pump site catastrophes in 72 hours and run out of pump sites and worry about that instead of enjoying your vacation. Here’s what happened on my last vacation pump-site wise:

  • Planned to change my site the next morning instead of at night, because then I would properly use up all the insulin in my reservoir. So I woke up, put in a new pump site (B) on my back hip, and promptly went off to walk to brunch with Scott.
  • Sitting down and waiting for food, I noticed my BG was rocketing high. I first guessed that I forgot to exit the prime screen on the pump, which means it wasn’t delivering any insulin (even basal). Wrong. As I pulled my pump off my waist band, I could finally hear the “loud siren escalating alarm” that is “supposed” to be really audible to anyone…but wasn’t audible to me outside on a busy street. Scott didn’t hear it, either. That nice “siren” alarm was “no delivery”, which meant there was something wrong with the pump site and I hadn’t been getting any insulin for the last hour and a half. Luckily, I have gotten into the habit of keeping the “old” pump site (A) on in case of problems like this, so I swapped the tubing to connect to the “old” site A and an hour or so later as insulin started peaking, felt better. I pulled site B out, and it was bent (that’s why it was no delivery-ing). I waited until that afternoon to put in the next pump site (C) into my leg. It was working well into dinner, so I removed site A.
  • However, that night when I changed clothes after dinner, site C ripped out. ARGHHHH. And I had removed site A, so I  had to put on another site (D). Bah, humbug. Throw in someone bumping a mostly-full insulin vial off the counter and it shattering, and I was in one of my least-pleased-because-of-diabetes moods, ever. It was a good reminder of how much a closed loop is not a cure, because we still have to deal with bonked sites and sites in general and all this hoopla.
  • Site D lasted the next day, while we went hiking at Haleakala (a 12.2 mile hike, which was amazing that neither my site or my sensor acted up!). However, on the third day in this adventure, I put on sunscreen to go to the beach with the whole family. When we came back from the beach, I went to remove my cover up to shower off sand before getting into the pool. As my shirt came over my head, I saw something white fly by – which turned out to be 4th pump site, flying around on the end of the pump tube, rather than being connected to my body. There went Site D. In went my fifth site (E), which I tackled down onto my body with extra flexifix tape that I usually use for CGM sensors because I. Was. Fed. Up. With. Pump. Sites!
  • Thankfully, site E lasted a normal life and lasted til I got home and did my next normal site change, and all is back to normal.

Lessons learned about pump sites: I repeat, don’t sunscreen too much on the adhesive, just sunscreen AROUND the adhesive. And pack extras, because I went through ~2 weeks of pump sites in 3 days, which I did not expect – luckily I had plenty of extra and extras behind those!

Now on to the fun stuff.

Scuba Diving with diabetes:

  • 2 years ago was my “Discovery” dive, where you aren’t certified but they teach you the basics and do all the equipment for you so you just do some safety tutorials and go down with a guide who keeps you safe. For that dive, I couldn’t find a lot of good info about scuba diving with diabetes, other than logical advice about the CGM sensor not transmitting under water, the receiver not being waterproof, and the pump not being waterproof. I decided to try to target my BG in advance to be around 180 mg/dl to avoid lows during the dive, and for extra safety eat some skittles before I went down – plus I suspended and removed my pump. Heh. That worked too well, and I was high in the mid-200s in between my two dives, so I found myself struggling to peel my wetsuit off in between dives to connect my pump and give a small bolus. The resulting high feeling after the second dive when my BG hadn’t re-normalized yet plus the really choppy waves made me sea-sick. Not fun. But actually diving was awesome and I didn’t have any lows.
    • Pro tip #1 for scuba diving with diabetes: If you can, have your pump site on your abdomen, arm, or other as-easy-as-possible location to reconnect your pump for between-dive boluses so you don’t have to try to get your arm down the leg of your wetsuit to re- and disconnect.
  • I decided I wanted to get PADI certified to scuba dive. I decided to do the lessons (video watching and test taking) and pool certification and 2/4 of my open water dives while on a cruise trip last February. Before getting in the pool, I didn’t do anything special other than avoid having too much (for me that’s >.5u) of netIOB. For the open water dives at cruise ports, I did the same thing. However, due to the excitement/exertion of the first long dive, along with having to do some open water safety training after the first dive but before getting out (and doing my swim test in choppy open water), I got out of the water after that to find that I was low. I had to take a little bit longer (although maybe only 10 extra minutes) than the instructor wanted to finish waiting for my BG to come up before we headed out to the second dive. I was fine during and after the second dive, other than being exhausted.
    • Pro tip #2 for scuba diving with diabetes: Some instructors or guides get freaked out about the idea of having someone diving with diabetes. Get your medical questionnaire signed by a doctor in advance, and photocopy a bunch so you can take one on every trip to hand to people so they can cover themselves legally. Mostly, it helps for you to be confident and explain the safety precautions you have in place to take care of yourself. It also helps if you are diving with a buddy/loved one who understands diabetes and is square on your safety plan (what do you do if you feel low? how will you signal that? how will they help you if you need help in the water vs. on the boat, etc.?). For my training dives, because Scott was not with me, I made sure my instructor knew what my plan was (I would point to my arm where my sensor was if I felt low and wanted to pause/stop/head to the surface, compared to the other usual safety signals).
  • This past trip in Hawaii I was finishing off a cold at the beginning, so at the end of the trip I started with a shore dive so I could go slow and make sure it was safe for me to descend. I was worried about going low on this one, since we had to lug our gear a hundred feet or so down to the beach and then into the water (and I’ve never done a shore dive prior to this). I did my usual prep: temp basal to 0 on my pump for a few hours (so it can track IOB properly) and suspend; place it and CGM and OpenAPS rigs in baggies in my backpack; and confirming that my BG was flat at a good place without IOB, I didn’t eat anything extra. We went out slowly, had a great dive (yay, turtles), and I was actually a little high coming back up after the dive rather than low. My CGM didn’t come back right away, so I tested with a fingerstick and hooked my pump back up right away and gave a bolus to make up for the missed insulin during the dive. I did that before we headed off the beach and up to clean off our gear.
    • Pro tip #3 for scuba diving with diabetes: Don’t forget that insulin takes 60-90 minutes to peak, so if you’ve been off your pump and diving for a while, even if you are low or fine in that moment, that missing basal will impact you later on. Often if I am doing two dives, even with normal BG levels I will do a small bolus in between to be active by the time I am done with my second dive, rather than going 3+ hours with absolutely no insulin. You need some baseline insulin even if you are very active.
  • While in Hawaii, we also got up before the crack of dawn to head out and do a boat dive at Molokini. It was almost worth the 5am wakeup (I’m not a morning person :)). As soon as I woke up at 5am, I did an “eating soon” and bolused fully for my breakfast, knowing that we’d be getting on the boat at 6:30amish (peak insulin time), but it’d take a while to get out to the dive site (closer to 7:30am), so it was better to get the breakfast bolus in and let it finish counteracting the carbs. I did, but still ran a little higher than I would have liked while heading out, so I did another small correction bolus about half an hour before I temped to zero, suspended, and disconnected and baggied/bagged/placed the bag up in the no-water-shelf on the boat. I then did the first dive, which was neat because Molokini is a cool location, and it was also my first “deep” dive where we went down to about ~75 feet. (My previous dives have all been no deeper than about ~45 feet.) Coming back onto the boat, I did my usual of getting the gear off, then finding a towel to dry my hands and do a fingerstick BG test to see what I was. In this case, 133 mg/dl. Perfect! It would take us almost an hour for everyone to get back on the boat and then move to dive spot #2, so I peeled down my wetsuit and reconnected my pump to get normal basal during this time and also do a small bolus for the bites of pineapple I was eating. (Given the uncertainties of accuracy of CGM coming out of prolonged water exposure, since they sometimes run 100+ points high for me, I chose not to have the loop running during this dive and just manually adjust as needed). We got to spot #2 and went down for the dive, where we saw sharks, eels, and some neat purple-tailed fish. By the end of the dive, I started to feel tired, and also felt hungry. Those are the two signs I feel underwater that probably translate to being low, so I was the first from our group to come up when we got back from the boat. I got on the boat, removed gear, dried hands, tested, and…yep. 73 mg/dl. Not a bad low, but I’m glad I stopped when I did, because it’s always better to be sure and safe than not know. I had a few skittles while reconnecting my pump, and otherwise was fine and enjoyed the rest of the experience including some epic dolphin and whale watching on the return boat ride back to the harbor!
    • Pro tip #4 for scuba diving with diabetes: You may or may not be able to feel lows underwater; but listening to your body and using your brain to pay attention to changes, about low or not, is always a really good idea when scuba diving. I haven’t dived enough  (7 dives total now?) or had enough lows while diving to know for sure what my underwater low symptoms are, but fatigue + hunger are very obvious to me underwater. Again, you may want to dive with a buddy and have a signal (like pointing to the part of your body that has the CGM) if you want to go up and check things out. Some things I read years ago talked about consuming glucose under water, but that seems above my skill level so I don’t think I’ll be the type of diver who does that – I’d rather come to the surface and have someone hand me from the boat something to eat, or shorten the dive and get back on the boat/on shore to take care of things.

All things considered, scuba diving with diabetes is just like anything else with diabetes – it mostly just takes planning ahead, extra snacks (and extra baggies) to have on hand, and you can do it just like anyone else. (The real pain and suffering of scuba diving in my opinion comes not from high or low BGs; but rather pulling hair out of your mask when you take it off after a dive! Every time = ouch.)

Snorkeling with diabetes:

  • Most of my snorkeling experiences/tips sound very similar to the scuba diving ones, so read the above if you haven’t. Remember:
    • Don’t go into a snorkel with tons of positive IOB.
    • Have easy-access glucose supplies in the outer pockets of your bag – you don’t want to have to be digging into the bottom of your beach bag to get skittles out when you’re low!
    • Sunscreen your back well 😉 but don’t over-sunscreen the adhesive on sites and sensors!
    • Make sure your pump doesn’t get too hot while you’re out snorkeling if you leave it on the beach (cover it with something).
    • You could possibly do baggies inside a waterproof bag and take your pump/cgm/phone out into the water with you. I did that two years ago when I didn’t trust leaving my pump/receiver/phone on shore, but even with a certified waterproof bag I spent more time worrying about that than I did enjoying the snorkel. Stash your pump/gear in a backpack and cover it with a towel, or stick it in the trunk/glove compartment of your car, etc.
    • Remember CGMs may not read right away, or may read falsely high, so fingerstick before correcting for any highs or otherwise dosing if needed.

Swimming with diabetes:

  • Same deal as the above described activities, but with less equipment/worries. Biggest things to think about are keeping your gear protected from splashes which seem more common poolside than oceanside…and remember to take your pump off, phone or receiver out of your pocket, etc. before getting in the water!

Wait, all of this has been about pump/CGM. What about closed looping? Can you #OpenAPS in the water?

    • If you don’t have your pump on (in the water), and you don’t have CGM data (in the water, because it can’t transmit there), you can’t loop. So for the most part, you don’t closed loop DURING these activities, but it can be incredibly helpful (especially afterward to make up for the missing basal insulin) to have once you get your pump back on.

However, if your CGM is reading falsely high because it’s waterlogged, you may want to set a high temporary target or turn your rig off during that time until it normalizes. And follow all the same precautions about baggies/waterproofing your rig, because unlike the pump, it’s not designed for even getting the lightest of splashes on it, so treat it like you treat your laptop. For my Hawaii trip, I often had my #OpenAPS rig in a baggie inside of my bag, so that when my pump was on and un-suspended and I had CGM data, it would loop – however, I kept a closer eye on my BGs in general, including how the loop was behaving, in the hour following water activities since I know CGM is questionable during this time.

I’m really glad I didn’t let diabetes stop me from trying scuba diving, and I hope blog posts like this help you figure out how you need to plan ahead for trying new water activites. I’m thankful for technology of pumps and CGMs and tools like #OpenAPS that make it even easier for us to go climb mountains and scuba dive while living with diabetes (although not in the same day ;)).

UPDATE in 2023: I went scuba diving recently using a Dexcom G6, and it did not have any issues once out of the water with falsely high readings! It reconnected instantly (no delay) to my phone once I was back in range and backfilled correctly and had a correct value for the most recent value. So, this is a huge improvement beyond what I described above with earlier generation (e.g., G4 and G5) sensors, but it still has the downside that it can’t transmit data underwater. You can also read here about how I use Libre for underwater reading when I’m doing several water activities and find it worth my while to invest in a single Libre sensor for having CGM data underwater.