It takes a lot of energy to run ultramarathons (ultras).
To ensure they have enough fuel to complete the run, people usually want to eat X-Y calories per hour, or A-B carbs per hour, while running ultramarathons. It can be hard to know if you’re staying on top of fueling, especially as the hours drag on and your brain gets tired; plus, you can be throwing away your trash as you go so you may not have a pile of wrappers to tell you what you ate.
During training, it may be useful to have a written record of what you did for each run, so you can establish a baseline and work on improving your fueling if that’s something you want to focus on.
For me specifically, I also find it helpful to record what enzyme dosing I am taking, as I have EPI (exocrine pancreatic insufficiency, which you can read more about here) and if I have symptoms it can help me identify where my dosing might have been off from the previous day. It’s not only the amount of enzymes but also the timing that matters, alongside the timing of carbs and insulin, because I have type 1 diabetes, celiac, and EPI to juggle during runs.
Previously, I’ve relied on carb entries to Nightscout (an open source CGM remote monitoring platform which I use for visualizing diabetes data including OpenAPS data) as a record of what I ate, because I know 15g of carbs tracks to a single serving of chili cheese Fritos that are 10g of fat and 2g of protein, and I take one lipase-only and one pancrelipase (multi-enzyme) pill for that; and 21g of carbs is a Honey Stinger Gluten Free Stroopwaffle that is 6g of fat and 1g of protein, and I typically take one lipase-only. You can see from my most recent ultra (a 50k) where I manually took those carb entries and mapped them on to my blood sugar (CGM) graph to visualize what happened in terms of fuel and blood sugar over the course of my ultra.
However, that was “just” a 50k and I’m working toward bigger runs: a 50 mile, maybe a 100k (62 miles), and/or a 100 mile, which means instead of running for 7-8 hours I’ll be running for 12-14 and 24-30(ish) hours! That’s a lot of fuel to need to eat, and to keep track of, and I know from experience my brain starts to get tired of thinking about and eating food around 7 hours. So, I’ll need something better to help me keep track of fuel, enzymes, and electrolytes over the course of longer runs.
I also am planning on being well supported by my “crew” – my husband Scott, who will e-bike around the course of my ultra or my DIY ultra loops and refill my pack with water and fuel. In some cases, with a DIY ultra, he’ll be bringing food from home that I pre-made and he warms up in the microwave.
One of the strategies I want to test is for him to actually hand me the enzymes for the food he’s bringing me. For example, hand me a baggie of mashed potatoes and also hand me the one multi-enzyme (pancrelipase, OTC) pill I need to go with it. That reduces mental effort for me to look up or remember what enzyme amount I take for mashed potatoes; saves me from digging out my baggie of enzymes and having to get the pill out and swallow it, put the baggie away without dropping it, all while juggling the snack in my hands.
He doesn’t necessarily know the counts of enzymes for each fuel (although he could reproduce it, it’s better if I pre-make a spreadsheet library of my fuel options and that helps me both just pick it off a drop down and have an easy reference for him to glance at. He won’t be running 50-100 miles, but he will be waking up every 2-3 hours overnight and that does a number on his brain, too, so it’s easier all around if he can just reference the math I’ve already done!
So, for my purposes: 1) easy tracking of fuel counts for real-time “am I eating according to plan” and 2) retrospective “how did I do overall and should I do something next time” and 3) for EPI and BG analysis (“what should I do differently if I didn’t get the ideal outcome?”), it’s ideal to have a tracking spreadsheet to log my fuel intake.
Here’s what I did to build my ultimate fuel self-tracking self-populating spreadsheet:
First, I created a tab in my spreadsheet as a “Fuel Library”, where I listed out all of my fuel. This ranges from snacks (chili cheese Fritos; Honey Stinger Gluten Free Stroopwaffle; yogurt-covered pretzels, etc.); to fast-acting carbs (e.g. Airhead Minis, Circus Peanuts) that I take for fixing blood sugars; to other snack/treats like chocolate candy bars or cookies; as well as small meals and warm food, such as tomato soup or part of a ham and cheese quesadilla. (All gluten free, since I have celiac. Everything I ever write about is always gluten free!)
After I input the list of snacks, I made columns to input the sodium, calories, fat, protein, and carb counts. I don’t usually care about calories but a lot of recommendations for ultras are calories/hr and carbs/hr. I tend to be lower on the carb side in my regular daily consumption and higher on fat than most people without T1D, so I’m using the calories for ultrarunning comparison to see overall where I’m landing nutrient-wise without fixating on carbs, since I have T1D and what I personally prefer for BG management is likely different than those without T1D.
I also input the goal amount of enzymes. I have three different types of pills: a prescription pancrelipase (I call PERT, which stands for pancreatic enzyme replacement therapy, and when I say PERT I’m referring to the expensive, prescription pancrelipase that’s been tested and studied for safety and efficacy in EPI); an over-the-counter (OTC) lipase-only pill; and an OTC multi-enzyme pancrelipase pill that contains much smaller amounts of all three enzymes (lipase, protease, amylase) than my PERT but hasn’t been tested for safety and efficacy for EPI. So, I have three enzyme columns: Lipase, OTC Pancrelipase, and PERT. For each fuel I calculate which I need (usually one lipase, or a lipase plus a OTC pancrelipase, because these single servings are usually fairly low fat and protein; but for bigger meal-type foods with more protein I may ‘round up’ and choose to take a full PERT, especially if I eat more of it), and input the number in the appropriate column.
Then, I opened another tab on my spreadsheet. I created a row of headers for what I ate (the fuel); time; and then all the macronutrients again. I moved this down to row 3, because I also want to include at the top of the spreadsheet a total of everything for the day.
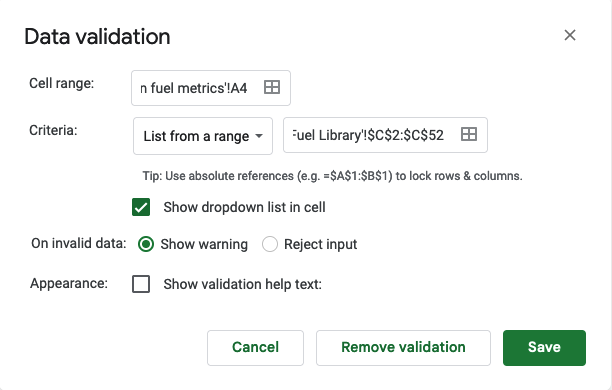
In Column A, I selected the first cell (A4) for me, then went to Data > Data Validation and clicked on it. It opens this screen, which I input the following – A4 is the cell I’m in for “cell range”, the criteria is “list from a range”, and then I popped over to the tab with my ‘fuel library’ and highlighted the relevant data that I wanted to be in the menu: Food. So that was C2-C52 for my list of food. Make sure “show dropdown list in cell” is marked, because that’s what creates the dropdown in the cell. Click save.
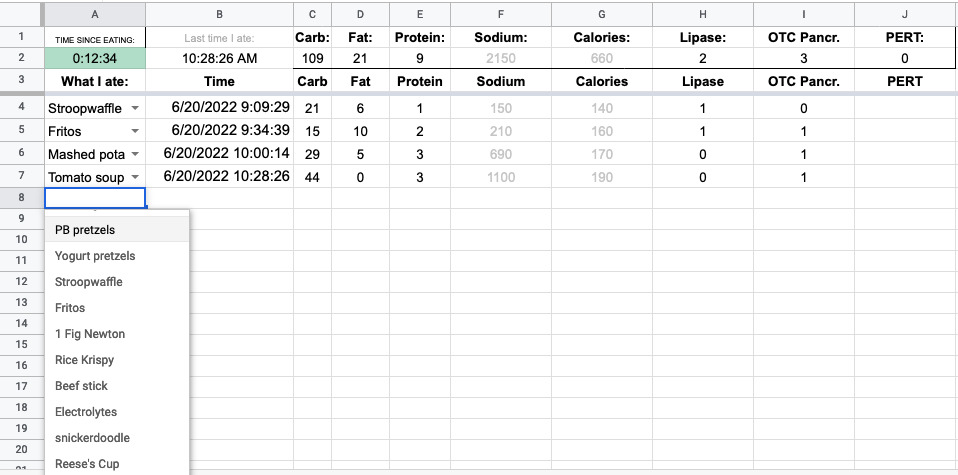
You’ll want to drag that down to apply the drop-down to all the cells you want. Mine now looked like this, and you can see clicking the dropdown shows the menu to tap on.
After I selected from my menu, I wanted column B to automatically put in the time. This gets obnoxious: google sheets has NOW() to put in the current time, but DO NOT USE THIS as the formula updates with the latest time any time you touch the spreadsheet.
I ended up having to use a google script (go to “Extensions” > Apps Script, here’s a tutorial with more detail) to create a function called onEdit() that I could reference in my spreadsheet. I use the old style legacy script editor in my screenshot below.
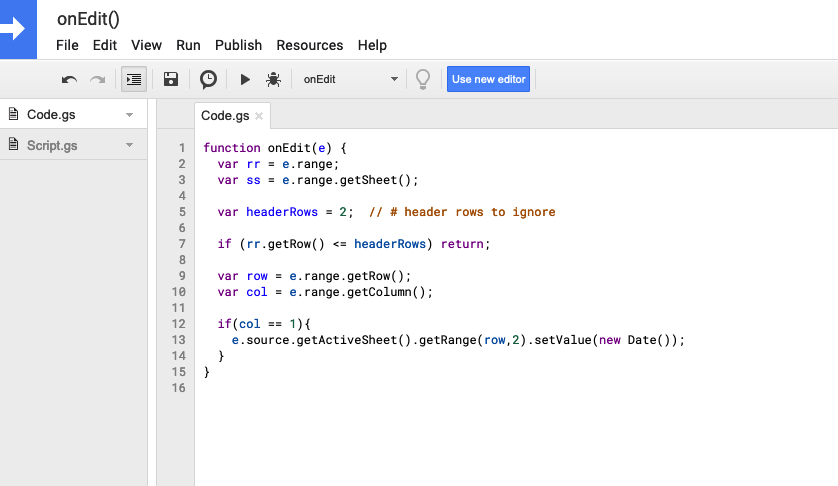
Code I used, if you need to copy/paste:
function onEdit(e) {
var rr = e.range;
var ss = e.range.getSheet();
var headerRows = 2; // # header rows to ignore
if (rr.getRow() <= headerRows) return;
var row = e.range.getRow();
var col = e.range.getColumn();
if(col == 1){
e.source.getActiveSheet().getRange(row,2).setValue(new Date());
}
}
After saving that script (File > Save), I went back to my spreadsheet and put this formula into the B column cells: =IFERROR(onEdit(),””). It fills in the current date/time (because onEdit tells it to if the A cell has been updated), and otherwise sits with a blank until it’s been changed.
Note: if you test your sheet, you’ll have to go back and paste in the formula to overwrite the date/time that gets updated by the script. I keep the formula without the “=” in a cell in the top right of my spreadsheet so I can copy/paste it when I’m testing and updating my sheet. You can also find it in a cell below and copy/paste from there as well.
Next, I wanted to populate my macronutrients on the tracker spreadsheet. For each cell in row 4, I used a VLOOKUP with the fuel name from A4 to look at the sheet with my library, and then use the column number from the fuel library sheet to reference which data element I want. I actually have things in a different order in my fuel library and my tracking sheet; so if you use my template later on or are recreating your own, pay attention to matching the headers from your tracker sheet and what’s in your library. The formula for this cell ended up being “=IFERROR(VLOOKUP(A4,’Fuel Library’!C:K,4, FALSE),””)”, again designed to leave the column blank if column A didn’t have a value, but if it does have a value, to prefill the number from Column 4 matching the fuel entry into this cell. Columns C-J on my tracker spreadsheet all use that formula, with the updated values to pull from the correctly matching column, to pre-populate my counts in the tracker spreadsheet.
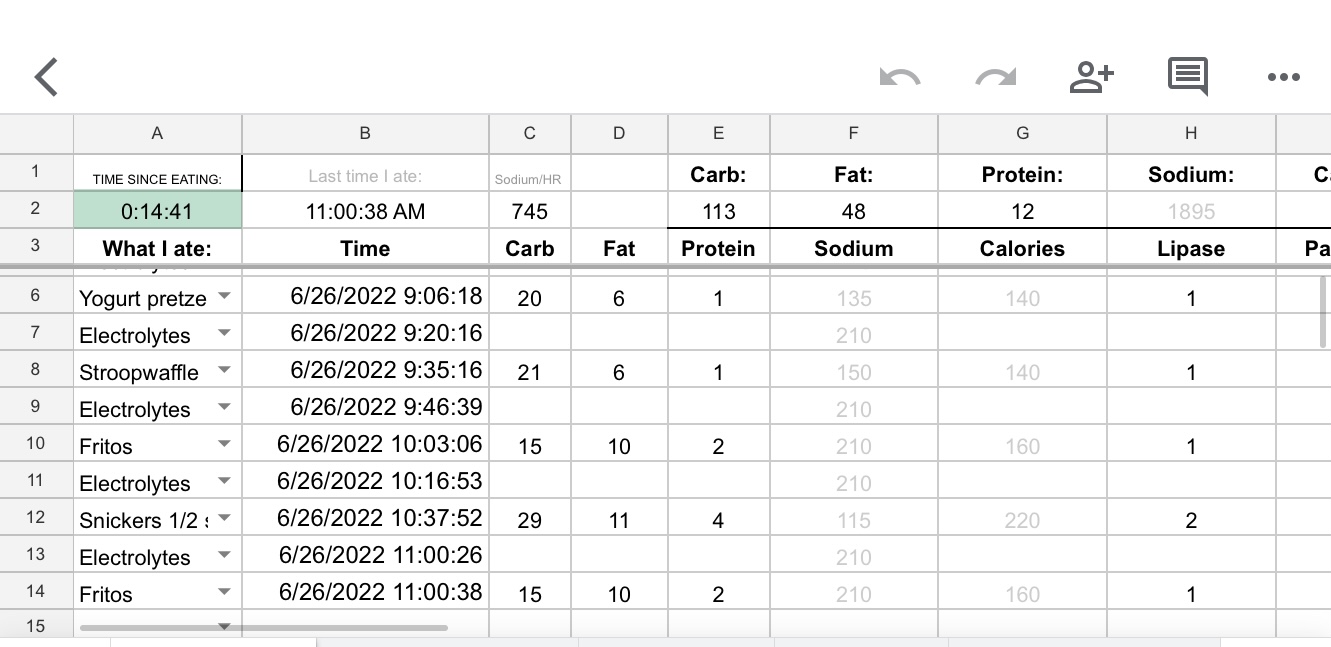
Finally, the last thing I wanted was to track easily when I last ate. I could look at column B, but with a tired brain I want something more obvious that tracks how long it’s been. This also is again to maybe help Scott, who will be tasked with helping me stay on top of things, be able to check if I’m eating regularly and encourage me gently or less gently to be eating more as the hours wear on in my ultras.
I ended up creating a cell in the header that would track the last entry from column B. To do this, the formula I found is “INDEX(B4:B,MATCH(143^143,B4:B))”, which checks for the last number in column B starting in B4 and onward. It correctly pulls in the latest timestamp on the list.
Then, in another cell, I created “=NOW()-B2”, which is a good use for the NOW() formula I warned about, because it’s constantly updating every time the sheet gets touched, so that any time I go to update it’ll tell me how long it’s been since between now and the last time I ate.
But, that only updates every time I update the sheet, so if I want to glance at the sheet, it will be only from the last time I updated it… which is not what I want. To fix it, I need to change the autorefresh calculation settings. Go to File > Settings. Click “Calculations” tab, and the first drop down you want to change to be “On change and every minute”.
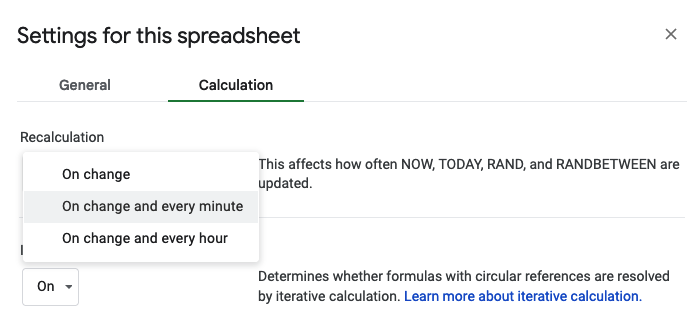
Now it does what I want, updating that cell that uses the NOW() formula every minute, so this calculation is up to date even when the sheet hasn’t been changed!
However, I also decided I want to log electrolytes in my same spreadsheet, but not include it in my top “when did I last eat” calculator. So, I created column K and inserted the formula IF(A4=”Electrolytes”,””,B4), which checks to see if the Dropdown menu selection was Electrolytes. If so, it doesn’t do anything. If it’s not electrolytes, it repeats the B4 value, which is my formula to put the date and time. Then, I changed B2 to index and match on column K instead of B. My B2 formula now is INDEX(K4:K,MATCH(143^143,K4:K)), because K now has the food-only list of date and time stamps that I want to be tracking in my “when did I last eat” tracker. (If you don’t log electrolytes or don’t have anything else to exclude, you can keep B2 as indexing and matching on column B. But if you want to exclude anything, you can follow my example of using an additional column (my K) to check for things you do want to include and exclude the ones you don’t want. Also, you can hide columns if you don’t want to see them, so column K (or your ‘check for exclusions’ column wherever it ends up) could be hidden from view so it doesn’t distract your brain.
I also added conditional formatting to my tracker. Anytime A2, the time since eaten cell, is between 0-30 minutes, it’s green: indicating I’m on top of my fueling. 30-45 minutes it turns yellow as a warning that it’s time to eat. After 45 minutes, it’ll turn light red as a strong reminder that I’m off schedule.
I kept adding features, such as totaling my sodium consumption per hour, too, so I could track electrolytes+fuel sodium totals. Column L gets the formula =IF(((ABS((NOW()-B4))*1440)<60),F4,””) to check for the difference between the current time and the fuel entry, multiplying it by 1440 to convert to minutes and checking to see that it’s less than 60 minutes. If it is, then it prints the sodium value, and otherwise leaves it blank. (You could skip the ABS part as I was testing current, past, and future values and wanted it to stop throwing errors for future times that were calculated as negatives in the first argument). I then in C2 calculate the sum of those values for the total sodium for that hour, using =SUM(L4:L)
(I thought about tracking the past sodium per hour values to average and see how I did throughout the run on an hourly basis…but so far on my 3 long runs where I’ve used the spreadsheet, the very fact that I am using the tracker and glancing at the hourly total has kept me well on top of sodium and so I haven’t need that yet. However, if I eventually start to have long enough runs where this is an issue, I’ll probably go back and have it calculate the absolute hour sodium totals for retrospective analysis.)
This works great in the Google Sheets app on my phone, which is how I’ll be updating it during my ultras, although Scott can have it open on a browser tab when he’s at home working at his laptop. Every time I go for a long training run, I duplicate the template tab and label it with the date of the run and use it for logging my fueling.
(PS – if you didn’t know, you can rearrange the order of tabs in your sheet, so you can drag the one you want to be actively using to the left. This is useful in case the app closes on your phone and you’re re-opening the sheet fresh, so you don’t have to scroll to re-find the correct tab you want to be using for that run. In a browser, you can either drag and drop the tabs, or click the arrow next to the tab name and select “move left” or “move right”.)

Click here to make a copy of my spreadsheet.
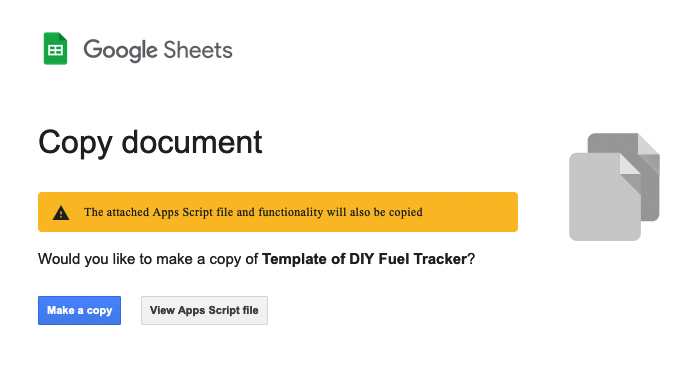
Take a look at my spreadsheet after you make a copy (click here to generate a copy if you didn’t use the previous mentioned link), and you’ll note in the README tab a few reminders to modify the fuel library and make sure you follow the steps to ensure that the script is associated with the sheet and validation is updated.
Obviously, you may not need lipase/pancrelipase/PERT and enzyme counts; if you do, your counts of enzymes needed and types of enzyme and quantity of enzymes will need updating; you may not need or want all of these macronutrients; and you’ll definitely be eating different fuel than I am, so you can update it however you like with what you’re eating and what you want to track.
This spreadsheet and the methods for building it can also be used for other purposes, such as tracking wait times or how long it took you to do something, etc.
(If you do find this blog post and use this spreadsheet concept, let me know – I’d love to hear if this is useful for you!)

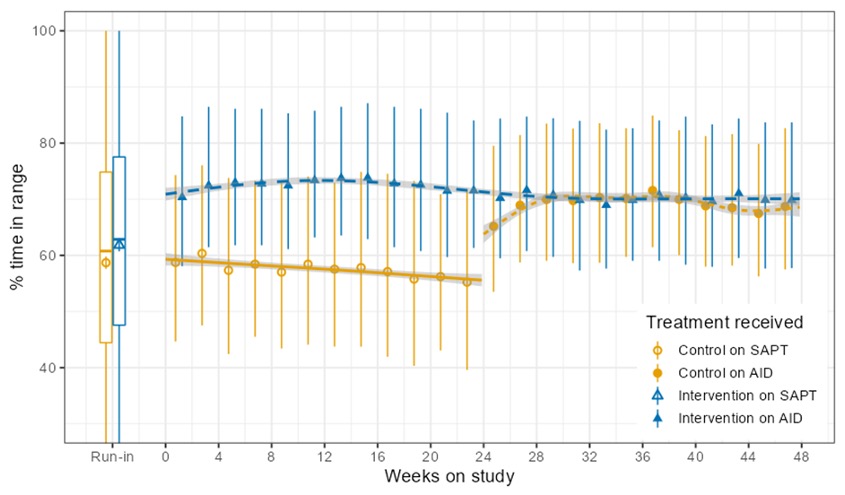

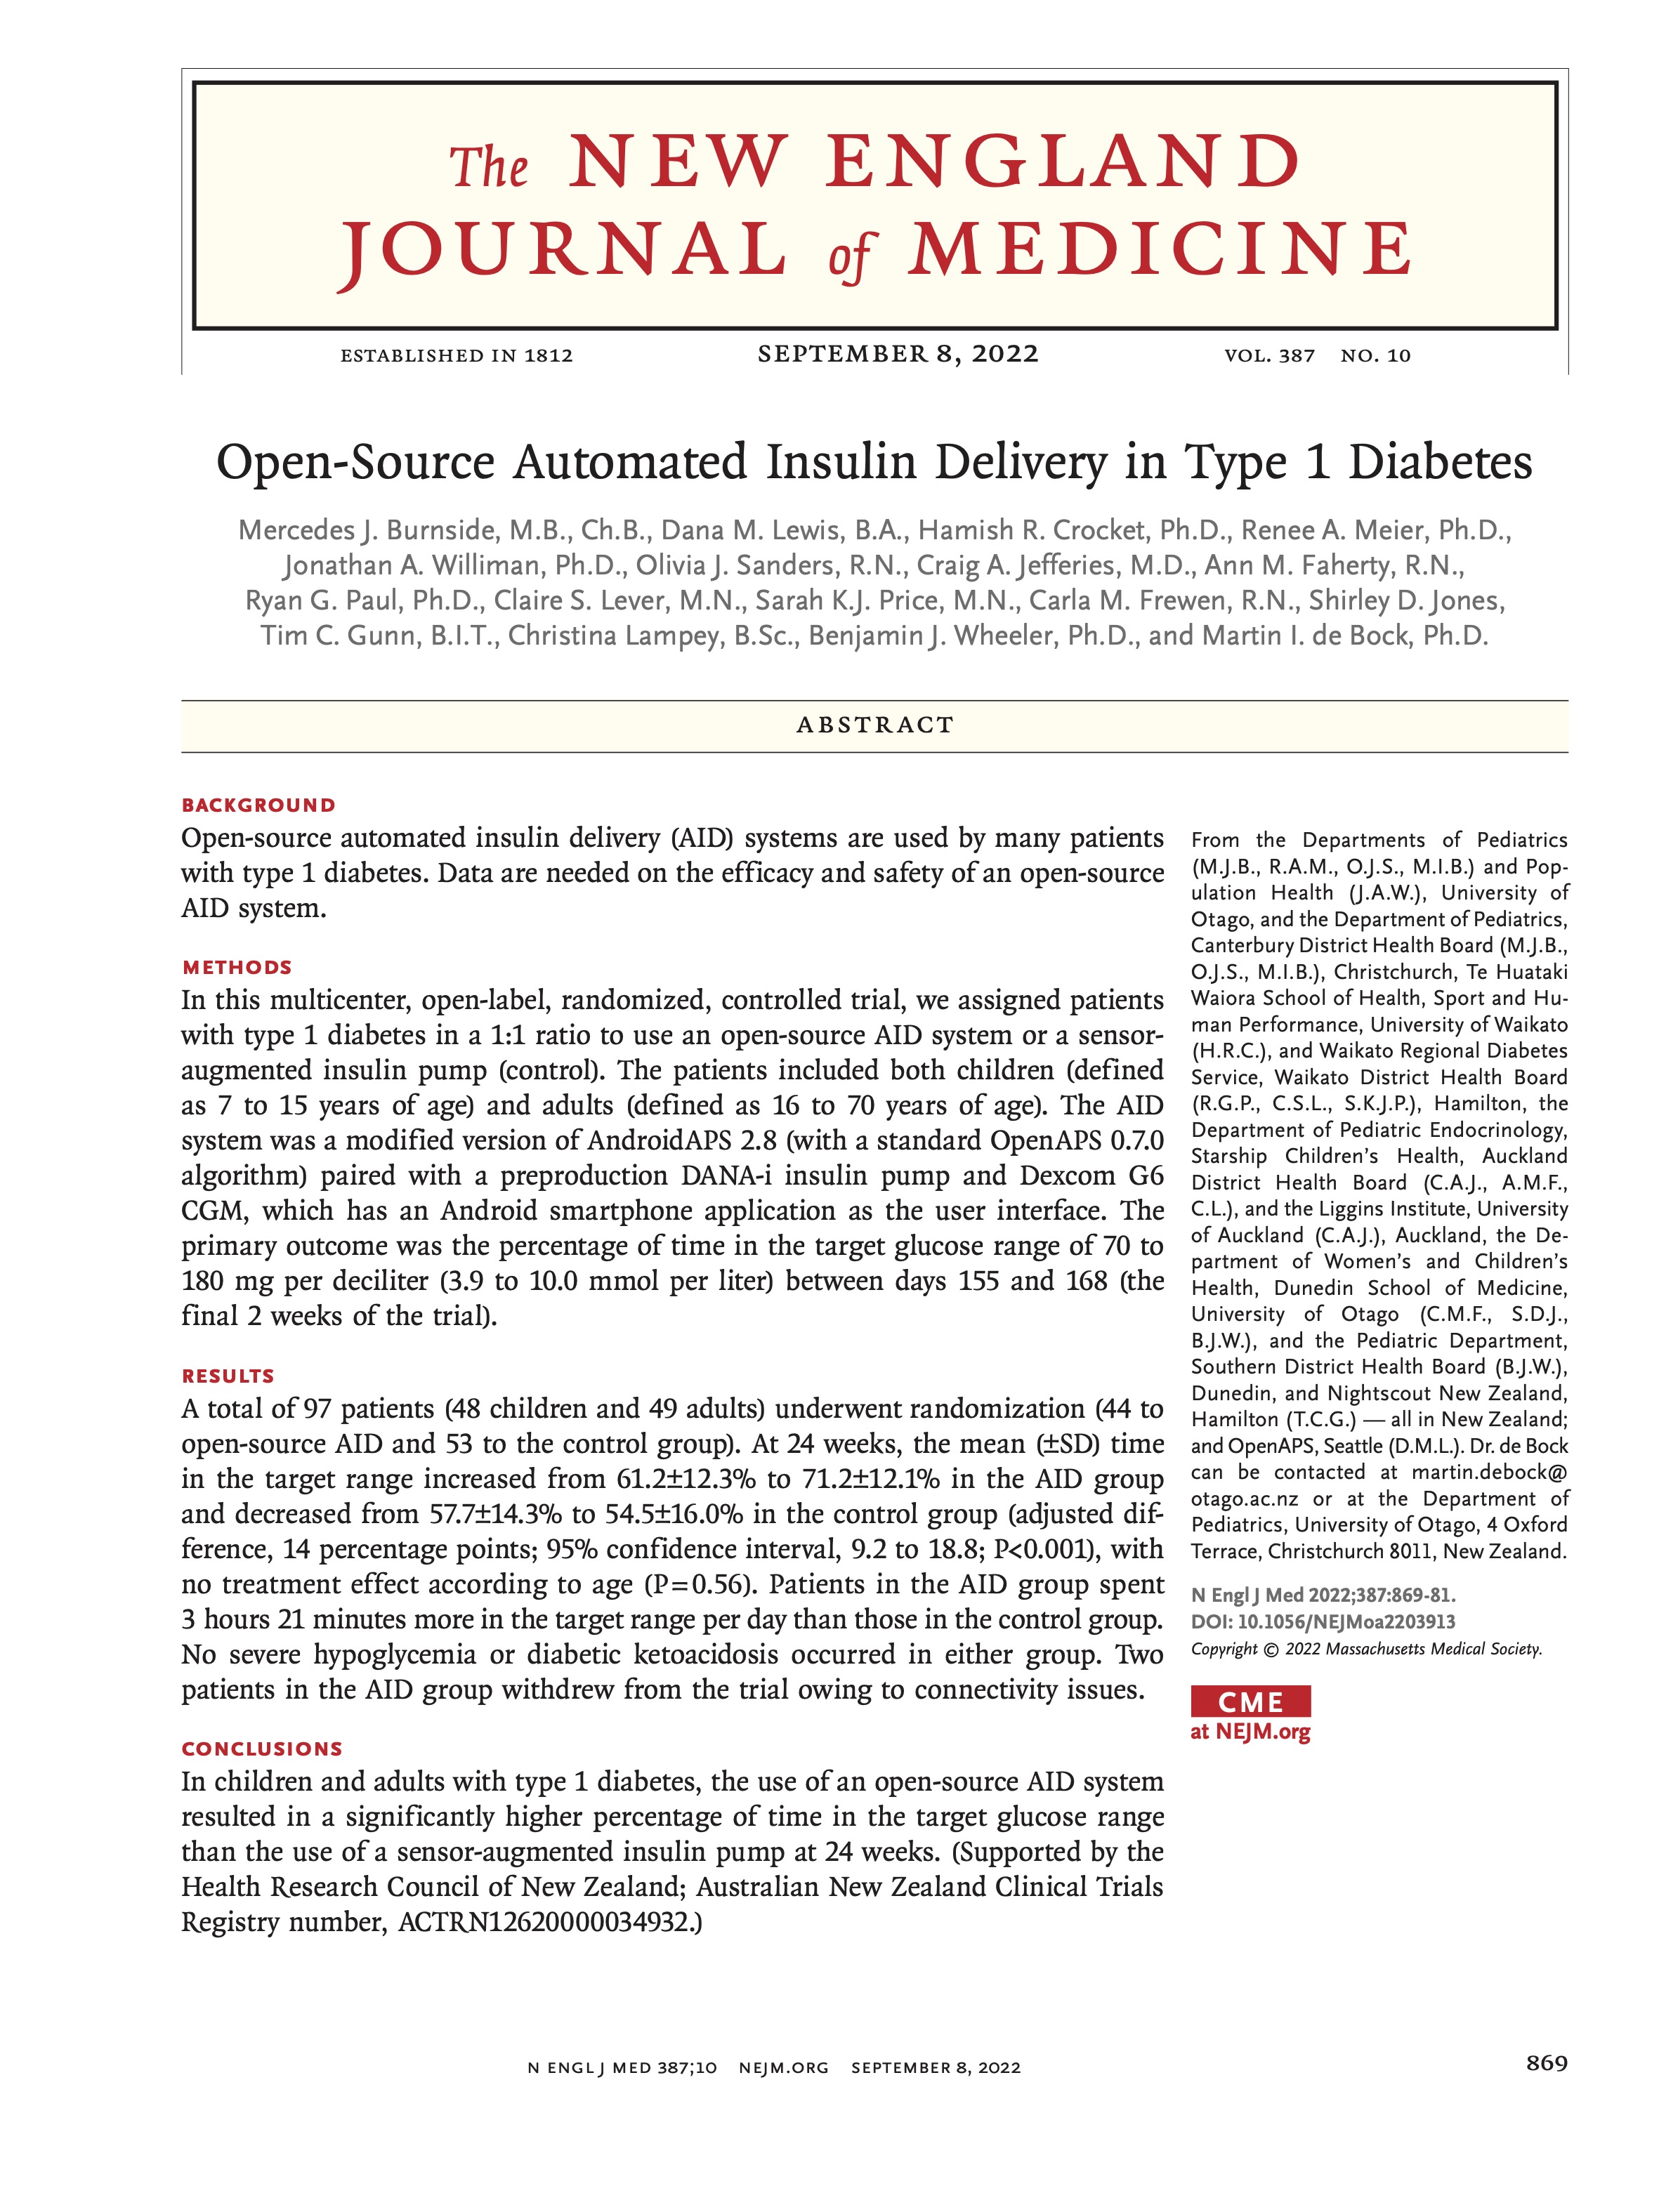 I’m thrilled to share that the results of the first RCT on open source automated insulin delivery (AID) is now published in a peer-reviewed medical journal (New England Journal of Medicine, known as NEJM). You can find it at NEJM
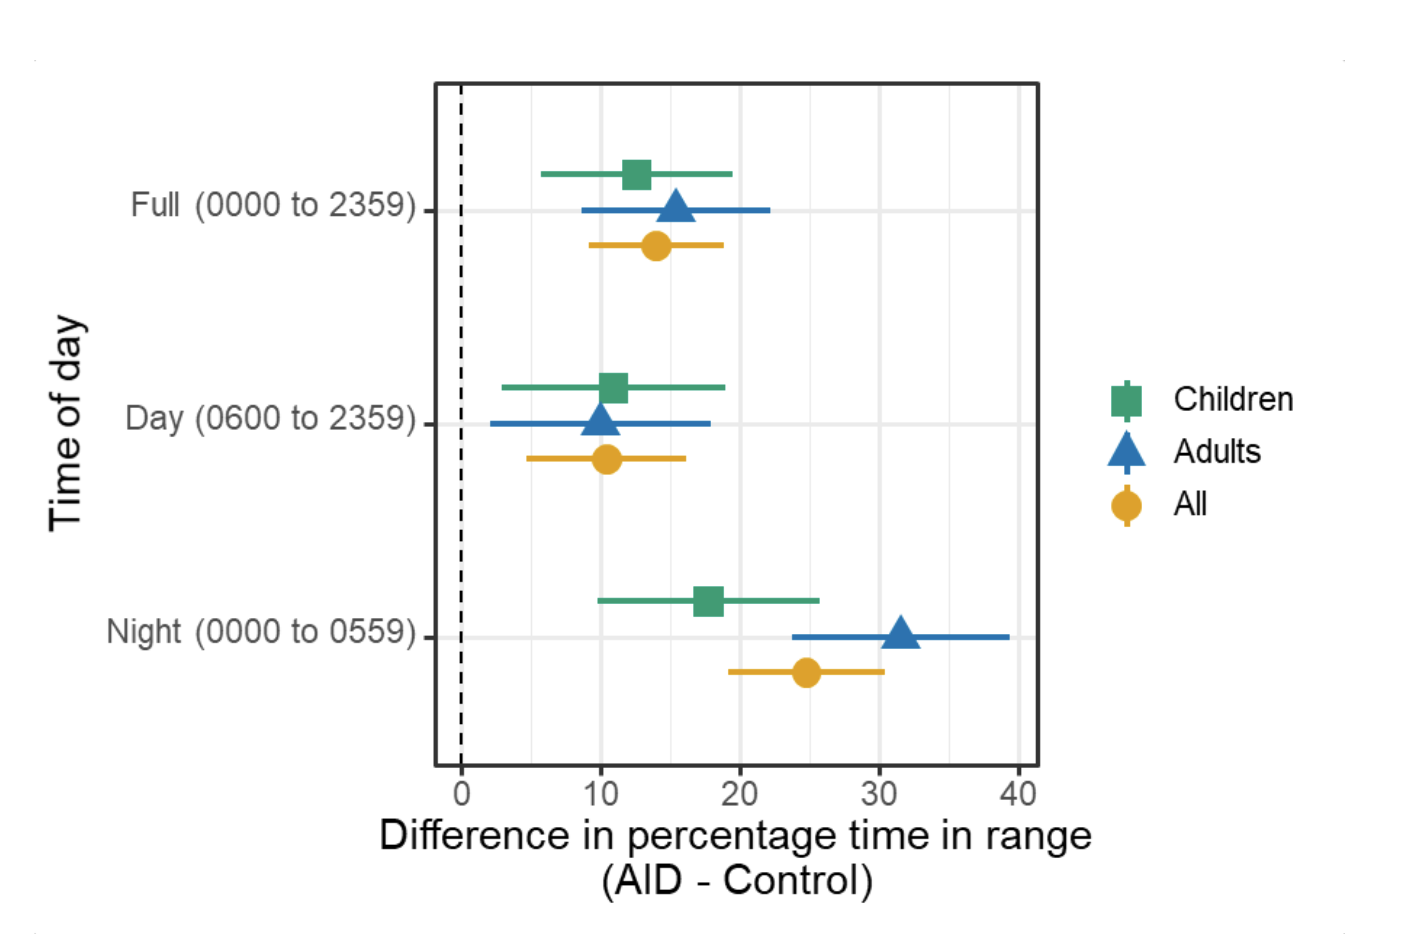


Recent Comments