When I broke my toe last week, I went back and re-read my post that I wrote with what was helpful when I broke my ankle 3 years ago. As I thought, there were still several pertinent ideas and tools that were useful for a broken toe. But I’ve also discovered a few more specific to broken toes, so this post covers a quick summary of the ones I’ve used for both a broken ankle and a broken toe, and which new tools I’ve found useful this time around. (All links are Amazon affiliate links.)
The biggest help I found from my previous post was a reminder that yes, it hurts to break a bone, and yes, I am going to be fatigued for a long time as my body heals and regrows bones. Thankfully it’s “just” a (pretty badly) broken toe but it’s less bone to regrow than a trimalleolar ankle fracture!

Things that I had from last time that were immediately useful:
- Crutches. (I bought my forearm crutches from the ER in New Zealand, and then kept them for just in case someone ever needed crutches again. So luckily, I had crutches for getting to urgent care, otherwise I probably would’ve had to crawl down the hall to our car.)
- Laptop lap desk, also using the same one I had from before.
What I wish I still had and got again or thought about getting:
- Shower bench. We gave ours away, and it took what felt like a long time for the one I ordered this time to come (I ordered Wednesday and it came Saturday). Shower benches make a huge difference for safely getting clean and my overall quality of life, as I love showers. I’ll probably keep ours in the back of the closet from now on, like the crutches, so we don’t have the same hassle we did this time with trying to get it to our house.
- Knee scooter. Again, we gave my knee scooter away. This time I got a hands-free crutch (below) but still thought a knee scooter would be useful around the house, especially if the forearm crutches bothered my hands. I jumped on one of our local “buy nothing groups” to see if someone had one I could borrow, because I remember seeing people asking for and giving away scooters. I actually found a recent post where someone asked and multiple were offered, and reached out to one of the people who had offered one up. She not only lent it to me, she ended up bringing it over and dropping it off so Scott didn’t have to drive to go get it! It’s also a much more robust knee scooter than I had before – I call it my all-terrain scooter – and it’s fantastic for being outside on my beloved paved trails for exercise, but it is a little less optimal for getting around corners inside the house. For my broken ankle, the one I had before was perfect. For a broken toe and my desire for outdoor activity, this one (again, I borrowed one but it looks like itis this one) is perfect for me right now.
- Cast bag for keeping my foot dry in showers. We gave the one I bought last time away, and I wish I had one even though I don’t have a cast. I have my foot taped and I dislike the feeling of the wet tape on my foot for hours after the shower. I didn’t buy another one, but I would’ve used it if we still had the one from before.
- Pouch/bag for crutches. I pulled out the same pouch I had used before that’s on a long drawstring to wrap around my crutch handles. It’s a little floppy given they are forearm crutches, but I use the pouch to occasionally carry my phone across the house if I don’t have pockets in my shorts, or a 12 oz can of soda. (Otherwise for carrying stuff around, the basket on the knee scooter is more ideal).
Here are some things I had this time that were helpful that I didn’t have from last time:
- Hands free crutch. ( This is the one I got.) This is designed so your leg is secured with your weight resting through your knee, and your knee is held in a 90 degree angle with your foot pointed out behind you. You can walk around the house or outside with it. My main issue with it is that you can’t change the angle of your knee, so you can’t sit down with it (including for the bathroom), so you have to unstrap it every time you want to sit down. If you’re up and moving around for a few minutes, or going out for a walk, then the hands-free crutch is awesome and I really like it. For moving around inside the house for a quick trip – like to go from a chair to the bathroom or to go grab a drink – I would just as likely choose my crutches or the knee scooter, depending on what was nearby.But the main reason I got the hands-free crutch was because with my broken ankle, I had 6 weeks in a cast and then a boot where I slowly resumed weight-bearing activity. That was a long time with my ankle not moving, and my ankle and my right hip ended up being really weak by the time I returned to weight bearing. Given that I’m not immobilized in a cast this time, I’m trying to keep my ankle moving in the air and also keep my right hip more active. The hands-free crutch felt expensive since I wasn’t getting it as my primary mobility aid, but I can already physically feel a difference for getting to use it to go on short walks in terms of not losing as much muscle in my hip and leg as I would if I was just scootering or crutching around. Also, the mental health benefits of having a variety of activity options – either hands-free crutch walks or scootering – is really nice.PS – one more tip, make sure to measure the circumference/width around your thigh. I was on the upper end of thigh size for their recommended use case with this hands-free crutch. As soon as I got it, I saw why. They have these adjustable pieces that get set to help keep the device against your upper thigh. They can go wider than the circumference they describe, but then it won’t be as secure on your upper leg. If I was an inch or two above the recommendation, I might have still gotten it, as I’m not planning to do more than straight forward walks with it, but something to consider, if you’re trying to work on your feet with it or move around with kids more nimbly, is that it may influence your balance on it if it’s not as tight.
- Tape. At urgent care, they used BRIGHT PINK in your face medical tape that sticks to itself. They told me I could change it for any other tape if it got debris in it and it stopped sticking to itself. It was really tight across my whole foot and bothered me all day and the first night, so we ended up cutting it where it was across the left side of my right foot (by the big toe), then using other tape that I already had to re-wrap the entire thing. The pink tape is still there, but the “hold the tape to the entire foot” tape is now purple (way better color to look at) and the tightness across the top of my foot is no longer as painful.I happened to already have this roll of tape because I also use this tape sometimes to put lambs wool and wrap it around my toes to prevent blisters with ultra running, which is another great use case for it.
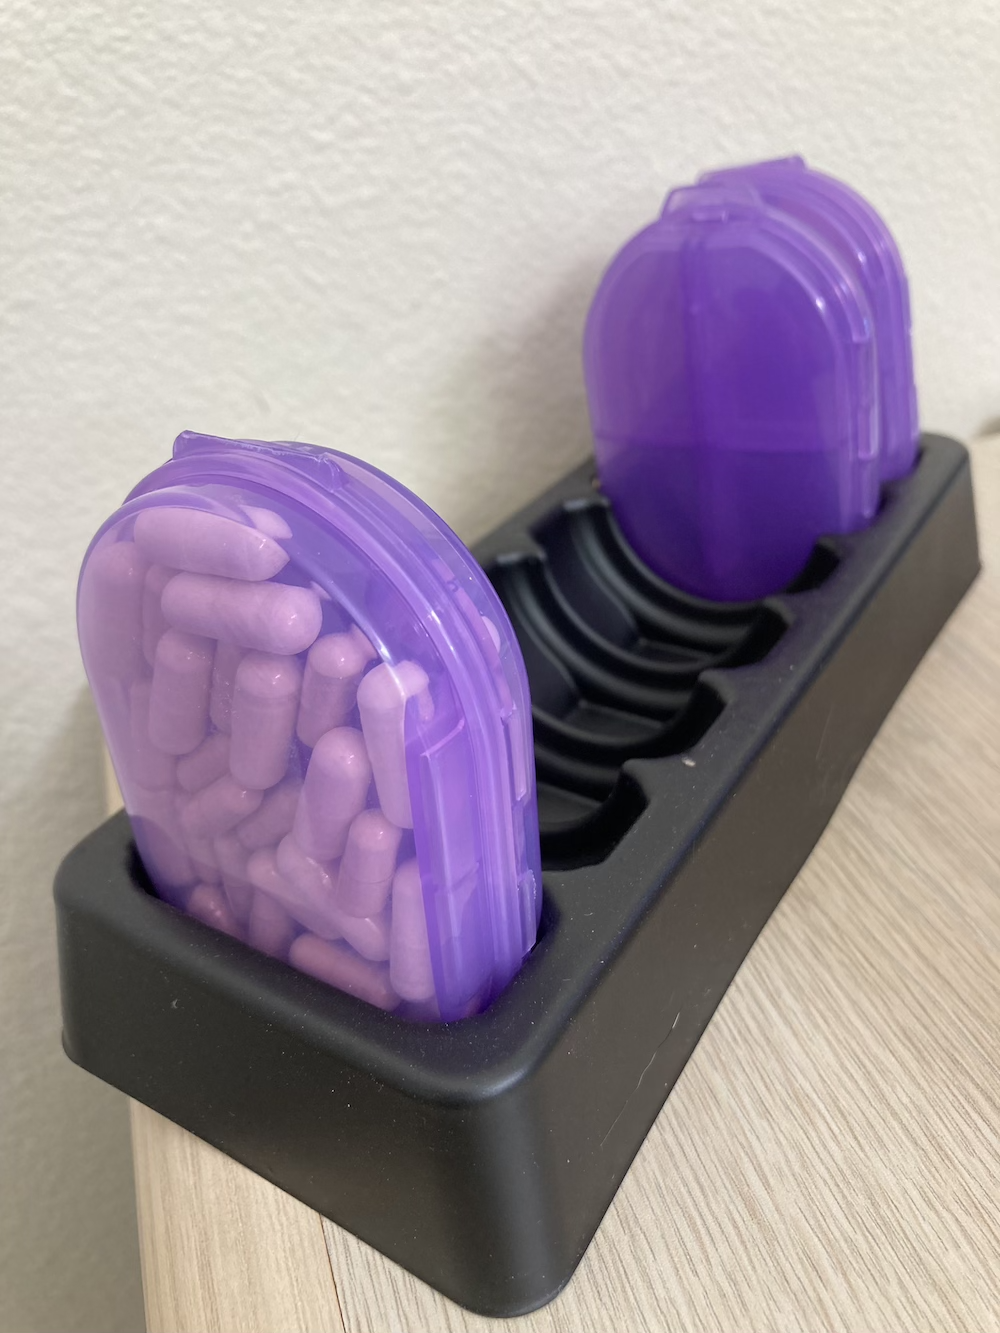
- Another thing I have now that I didn’t use last time is easy to open pill containers for pain relievers, that can hold several doses at a time. Last time I described leaving a pile of ibuprofen on my bedside table, because we didn’t have kids or pets in our household. Now we have (adorable) kittens, so I can’t leave medication out. I have these multi-day pill containers that take up a lot less space than traditional multi-day pill containers, and the reason I got them was to have multiple compartments that take up less space (I don’t use days of the week at all). So I have one of these filled with ibuprofen and tylenol, each in several compartments, and one sits on my bedside table and one sits on my desk so that I have the medication in arm’s reach for whenever it’s time to take it, without having to get across the house to find it.
- The other thing I didn’t have last time that’s not likely going to be used by everyone with a broken toe is these multi-compartment pill containers (in purple!). I use these for enzymes (pancreatic enzyme replacement therapy (PERT) for exocrine pancreatic insufficiency (EPI or PEI)), which I have to take any time I eat something. Like pain medication, it’s nice to have these in arm’s reach. I bought these when I found out I had EPI and keep 1-2 filled to throw in a bag for when I go out. However, I ended up filling several more (it came in a set of 7) and now have one on my bedside table, in the living room, and at my desk so again, they’re always in arms reach. I have multiple enzyme options (one prescription type, two over the counter type), and so what I like about these is one side is a larger compartment where I have the two over-the-counter enzymes dumped in, and then the more expensive prescription enzyme pills I put 2-3 in each of the four smaller compartments, which makes it easy to see at a glance when a container is running low and needs to be swapped out or re-filled.

- Small fridge or insulated bags. We bought a small fridge a while back which can be plugged into a wall or in the car, and it’s come in handy for broken toe/non-weight bearing life so I can have extra hydration in arm’s reach. Last time, I used a portable cooler/cooler bag with ice packs in it to keep a day’s worth of drinks and snacks nearby. Having lots of hydration without having to ask Scott to keep bringing me drinks is nice for both of us, so having the fridge is nice. If I didn’t have the fridge, I’d be using our insulated bags that we use every weekend for car trips. And if I didn’t have cooler bags, I’d be using a styrofoam box with ice packs instead. (If you have any type of meal delivery service, save one of the boxes and some of the ice packs in the freezer, and you can keep food and drinks nice and cold by rotating out the ice packs every few hours or once or twice a day, depending on the size of the box and the ice packs!)
By the way – if you end up on this post searching for tips about broken toes, it might be worth still reading my other post about returning to weight bearing after a broken ankle as it has tips and reminders about the level of fatigue ANY broken bone brings, even when it’s “just” a toe!