Passive Impact (You Can Optimize For That)

Some of the popular use cases of AI agents are to build custom software for other people, and sell it cheaper than big corporate software but still giving you a really good return on your time. A lot of people are quickly making good chunks of money doing that, and automating their workflows so they can make money while they sleep, so to speak. It’s often referred to as passive income, whether that’s investments or a product or business that can generate income for you without you having to do everything.

Some of us, though, are taking a different approach. Not a new one, though, although AI is helping us scale our efforts. This type of approach has been common through open source software for decades. The idea is that you can build something that will help other people…including yes, while you sleep. Instead of passive income, it’s passive impact. 

We can think about using our time, skills, and output of our work not for financial profit, but for people’s benefit, by reaching more people and being useful to people we don’t even know. The goal isn’t making money, it’s to help more people.

Some people do pursue financial income to make an impact. I’m not saying not to do that, if that’s your path of choice. You can maximize your income, then donate to causes you care about. It’s a great strategy for a lot of people who have lucrative careers, and there are a lot of causes (like Life For a Child, which we estimate is the most cost-effective way to help people with diabetes worldwide) that can scale their work with your help through financial donations.

Other people maybe don’t have the same income earning potential or have chosen less financially lucrative careers where their work makes a difference, or they volunteer their time and elbow grease outside of their work to make a difference.

Both of those are great. Yet, I’m saying “yes and” there’s a third option we should talk about more in general society: scaling impact asynchronously and building things for passive impact.

These are things that don’t just solve a one-time problem for one person. They can solve a one-time problem for a lot of people, or a recurring problem for other people.

They scale.

They persist.

What are some examples of passive impact? Think about things that can run without you.

They don’t require a calendar invite or a Zoom link. They don’t need a customer service rep. They just… work. For someone. Somewhere. Every day.

Note that these tools don’t have to work for EVERYONE. Most of my stuff is considered “niche”. I was asked countless times early on why I thought OpenAPS would work for everyone with diabetes. People were surprised when I said I didn’t think it would work for everyone, but it would probably work for everyone who wanted it. (Then we did a lot of research and proved that). Not everyone needed or wanted it, but that doesn’t mean that it wasn’t worthwhile to build for me, or me plus the first dozen, or me plus the now tens of thousands of people using the OpenAPS algorithm in their AID system. But that’s “just” a “small fraction” of “only people with type 1 diabetes” who are “a tiny part of the population of the world”. It doesn’t matter; those people still matter and they (and I!) benefitted from that work, so it was worth doing. The impact scaled.

(You don’t have to quantify it all, but some metrics are helpful)

As someone who builds a lot of things with passive impact, it’s helpful to have data or some kind of analytics to see use of what I built over time. It’s useful for identifying where there are areas to improve, such as if people are stuck when using a feature or finding a bug, but also reinforcing the scale of your impact.

I love waking up and seeing the volume of meal data that’s been processed through Carb Pilot or PERT Pilot (measured via API use metrics), to know that while I was sleeping on the west coast of the US, several people woke up in (likely Europe or elsewhere) and used one of my apps to estimate what they had for breakfast. It’s great reinforcement and you can also see whether you’re gaining exponential growth (in terms of overall usage or new users) over time, and perhaps consider whether you should do a little more sharing about what you’ve built so it can reach the right people before it takes off on its own. Again, not for profit, but for helping.

(But passive impact doesn’t mean passive effort)

Creating something helpful is not passive in the beginning. It takes work, and elbow grease, to understand the problem you are (or someone else is) facing. To be able to determine a useful solution. To build, or write, something that other people can use, without needing to explain it every time. To deploy or share or host it in a way that is accessible and usable long-term. Of course, there are increasing numbers of tools (like LLMs – here are some of my tips for getting started if you’re new to prompting) that can help you get started more quickly, or find a fix to a bug or project blocker, or try something new you didn’t know how to do before.

But once it’s live, the math changes. One hour of your time can help hundreds of people, without requiring hundreds of hours. A lot of times it may be more than one hour, but nowadays, it’s often a lot less than it would have been otherwise. And more likely, you may find yourself spending multiple hours building something and be frustrated (well, I often get frustrated) at “how long it’s taking”, then realize that if you don’t build it, no one will. And without this effort, it wouldn’t get built at all. So it’s worth the >one hour time it’s taking to build it, even if it’s longer than expected.

That’s how a lot of my projects started: I needed something, I built it, and then I realized others needed it too. So I built (or wrote) it and shared it.

That’s passive impact, and it adds up.

Passive impact: Creating and building to help people you don’t know in ways that persist without always requiring your time or presence

I’d love to see more of this in the world. And I’d love to see an understanding that this IS the goal, not financial outcomes, and that’s a valid and celebratable goal. (This comment is motivated by having someone ask me in recent weeks asking how much royalties I’m getting from the open source code we released 10 years ago, intentionally free, with the goal of companies using it!) But preferably not followed with “I could never do that”, because, of course, you could. You can. You…should? Maybe, maybe not. But hopefully you think about it in the future. It’s not “either or” with financial income, either. You can do both! Society spends a lot of time talking about how to earn money passively. But not nearly enough time thinking about how we can create value for others passively. Especially in health, technology, and research spaces (fields where gaps are common and timely help matters), this way of thinking can change not just how we build, but who we build for. We can bring more people into using or building or doing, whether it’s active or passive. And we all win as a result.

Try, Try Again with AI

If you’ve scoffed at, dismissed, or tried using AI and felt disappointed in the past, you’re not alone. Maybe the result wasn’t quite right, or it missed the mark entirely. It’s easy to walk away thinking, “AI just doesn’t work.” But like learning any new tool, getting good results from AI takes a little persistence, a bit of creativity, and the willingness to try again. Plus an understanding that “AI” is not a single thing.

AI is not magic or a mind reader. AI is a tool. A powerful one, but it depends entirely on how you use it. I find it helpful to think of it as a coworker or intern that’s new to your field. It’s generally smart and able to do some things, but it needs clear requests and directions on what to do. When it misses the mark, it needs feedback, or for you to circle around and try again with fresh instructions.

If your first attempt doesn’t go perfectly, it doesn’t mean the technology is useless, just like your brand new coworker isn’t completely useless.

Imperfect Doesn’t Mean Impossible

One way to think of AI is that it is a new kitchen gadget. Imagine that you get a new mini blender or food processor. You’ve never made a smoothie before, but you want to. You toss in a bunch of ingredients and out comes…yuck.

Are you going to immediately throw away the blender? Probably not. You’re likely to try again, with some tweaks. You’ll try different ingredients, more or less liquid, and modify and try again.

I had that experience when I broke my ankle and needed to incorporate more protein in my diet. I got a protein powder and tried stirring it into chocolate milk. Gross. I figured out that putting it in a tupperware container and shaking it thoroughly, then leaving it overnight, turned out ok. Eventually when I got a blender, I found it did even better. But the perfect recipe for me ended up being chocolate milk, protein powder, and frozen bananas. Yum, it made it like a chocolate milkshake texture and I couldn’t tell there was powder in it. But I still had to tweak things: shoving in large pieces of frozen bananas didn’t work well with my mini blender. I figured out slices worked ok, and eventually Scott and I zeroed in that it was most efficient to slice the banana and put it into the freezer, that way I had ready-to-go frozen right-sized banana chunks to mix in.

I had some other flops, too. I had found a few other recipes I liked to do without protein powder. Frozen raspberry or frozen pineapple + a crystal light lemonade packet + water are two of my hot weather favorites. But one time it occurred to me to try the pineapple recipe with protein powder in it… ew. That protein powder did not go well with citrus. So I didn’t make that one again.

AI is like that blender. If the result isn’t what you wanted, you should try:

  • Rewriting your prompt. Try different words, try giving it more context (instructions).
  • Give it more detail or clearer instructions. “Make a smoothie” is a little vague; “blend chocolate milk, protein powder, and frozen banana” is a little more direction to tell it what you want.
  • Try a different tool. The models are different for LLMs, and the setup is different for every tool. How you might use ChatGPT to do something might end up being different for using Gemini or MidJourney.

Sometimes, small tweaks make a big difference.

If It Doesn’t Work Today, Try Again Tomorrow (or sometime in the future)

Some tasks are still on the edge of what AI can do in general, or a particular model at that time. That doesn’t mean they’ll always be unable to do that task. AI is improving constantly, and quickly. What didn’t work a few months ago might work today, either in the same model or a new model/tool.

A flowchart diagram titled “Try a task with AI” illustrates how to approach AI usage with persistence and iteration. At the top is a purple box labeled “Try a task with AI.” Two arrows extend downward. The left arrow leads to a peach-colored box labeled “Result is not quite right,” which then leads to another box with three bullet points: “Reword your prompt,” “Give it more instructions,” and “Try this prompt with a different model/tool.” Below that is a smaller orange box labeled “Still didn’t work?” which connects to a final box that says: “Park this project: ‘try again later’ list” and “Try a different task or project.” From this box, an arrow loops back to the top box, showing that users should try again. The right arrow from the top goes to a green box labeled “Result is pretty good,” which then leads to another green box that says “Keep going & use AI for other tasks and projects.” This green path also loops back to the top. The overall message of the diagram is that regardless of whether the result is good or not quite right, users should continue experimenting with AI and trying new tasks.
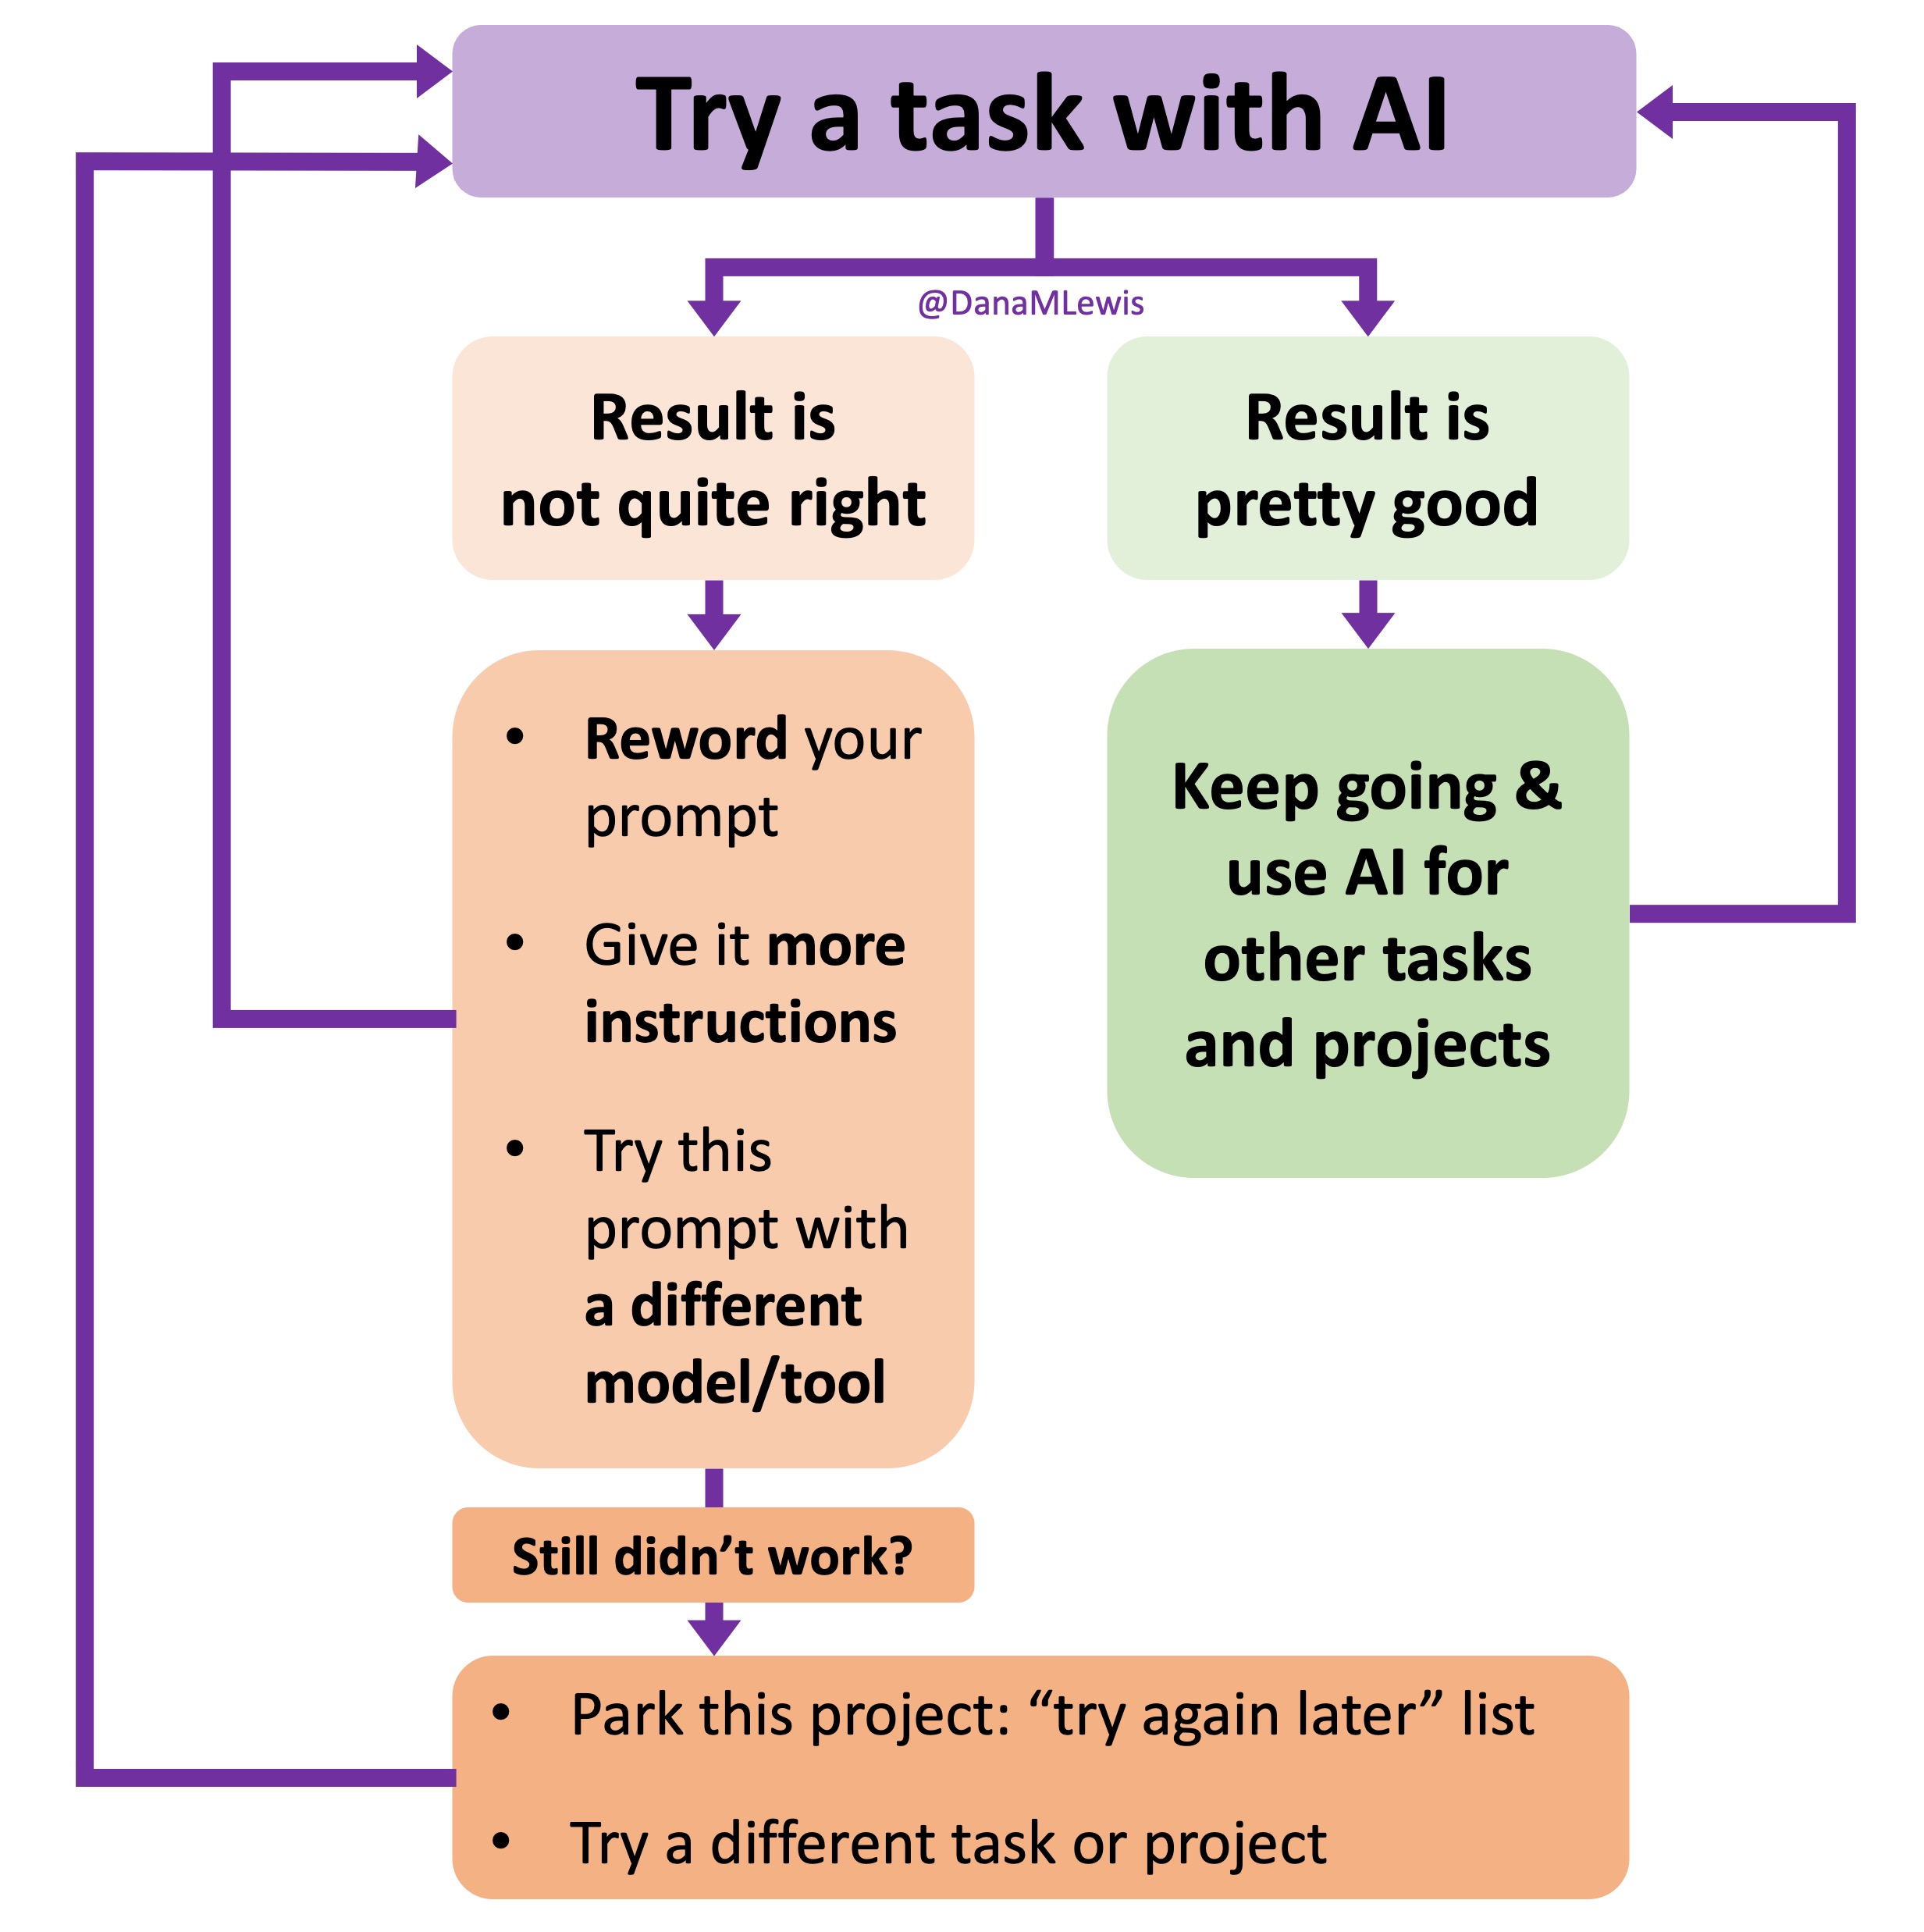
I’ve started making a list of projects or tasks I want to work on where the AI isn’t quite there yet and/or I haven’t figured out a good setup, the right tool, etc. A good example of this was when I wanted to make an Android version of PERT Pilot. It took me *four tries* over the course of an entire year before I made progress to a workable prototype. Ugh. I knew it wasn’t impossible, so I kept coming back to the project periodically and starting fresh with a new chat and new instructions to try to get going. In the course of a year, the models changed several times, and the latest models were even better at coding. Plus, I was better through practice at both prompting and troubleshooting when the output of the LLM wasn’t quite what I wanted. All of that over time added up, and I finally have an Android version of PERT Pilot (and it’s out on the Play Store now, too!) to match the iOS version of PERT Pilot. (AI also helped me quickly take the AI meal estimation feature from PERT Pilot, which is an app for people with EPI, and turn it into a general purpose app for iOS called Carb Pilot. If you’re interested in getting macronutrient (fat, protein, carb, and/or calorie) counts for meals, you might be interested in Carb Pilot.)

Try different tasks and projects

You don’t have to start with complex projects. In fact, it’s better if you don’t. Start with tasks you already know how to do, but maybe want to see how the AI does. This could be summarizing text, writing or rewriting an email, changing formats of information (eg json to csv, or raw text into a table formatted so you can easily copy/paste it elsewhere).

Then branch out. Try something new you don’t know how to do, or tackle a challenge you’ve been avoiding.

There are two good categories of tasks you can try with AI:

  • Tasks you already do, but want to do more efficiently
  • Tasks you want to do, but aren’t sure how to begin

AI is a Skill, and Skills Take Practice

Using AI well is a skill. And like any skill, it improves with practice. It’s probably like managing an intern or a new coworker who’s new to your organization or field. The first time you managed someone, it probably wasn’t as good as after you had 5 years of practice managing people or helping interns get up to speed quickly. Over time, you figure out how to right-size tasks; repeat instructions or give them differently to meet people’s learning or communication styles; and circle back when needed when it’s clear your instructions may have been misunderstood or they’re heading off in a slightly unexpected direction.

Don’t let one bad experience with AI close the door. The people who are getting the most out of AI right now are the ones who keep trying. We experimented, failed, re-tried, and learned. That can be you, too.

If AI didn’t wow you the first time for the first task you tried, don’t quit. Rephrase your prompt. Try another model/tool. (Some people like ChatGPT; some people like Claude; some people like Gemini….etc.) You can also ask for help. (You can ask the LLM itself for help! Or ask a friendly human, I’m a friendly human you can try asking, for example, if you’re reading this post. DM or email me and tell me what you’re stuck on. If I can make suggestions, I will!)

Come back in a week. Try a new type of task. Try the same task again, with a fresh prompt.

But most importantly: keep trying. The more you do, the better it gets.

iOS and Android development experience for newbies

Vibe coding apps is one things, but what about deploying and distributing them? That still requires some elbow grease, and I’ve described my experiences with both Apple and Google below for my first apps in each platform.

(I’m writing this from the perspective of someone familiar with coding primarily through bash scripts, JavaScript, Python, and various other languages, but with no prior IDE or mobile app development experience when I got started, as I typically work in vim through the terminal. I was brand new to IDEs and app development for both iOS and Android when I got started. For context, I have an iOS personal device.)

Being new to iOS app development

First, some notes on iOS development. If you only want to test your app on your own phone, it’s free. You can build the app in XCode and with a cord, deploy it directly on your phone. However, if you wish to distribute apps via TestFlight (digitally) to yourself or other users, Apple requires a paid developer account at $99 per year. (This cost can be annoying for people working on free apps who are doing this as not-a-business). Initially, figuring out the process to move an app from Xcode to TestFlight or the App Store is somewhat challenging. However, once you understand that archiving the app opens a popup to distribute it, the process becomes seamless. Sometimes there are errors if Apple has new development agreements for you to sign in the web interface, but the errors from the process just say your account is wrong. (So check the developer page in your account for things to sign, then go try again once you’ve done that.) TestFlight itself is intuitive even for newcomers, whether that is yourself or a friend or colleague you ask to test your app.

Submitting an app to the App Store through the web interface is relatively straightforward. Once you’ve got your app into TestFlight, you can go to app distribution, and create a version and listing for your app and add the build you put into TestFlight. Note that Apple is particular about promotional app screenshots and requires specific image sizes. Although there are free web-based tools to generate these images from your screenshots, if you use a tool without an account login, it becomes difficult to replicate the exact layout later. To simplify updates, I eventually switched to creating visuals manually using PowerPoint. This method made updating images easier when I had design changes to showcase, making me more likely to keep visuals current. Remember, you must generate screenshots for both iPhone and iPad, so don’t neglect testing your app on iPad, even if usage might seem minimal.

When submitting an app for the first time, the review process can take several days before beginning. My initial submission encountered bugs discovered by the reviewer and was rejected. After fixing the issues and resubmitting, the process was straightforward and quicker than expected. Subsequent submissions for new versions have been faster than the very first review (usually 1-3 days max, sometimes same-day), and evaluation by App Store reviewers seems more minimal for revisions versus new apps.

The main challenge I have faced with App Store reviews involved my second app, Carb Pilot. I had integrated an AI meal estimation feature into PERT Pilot and created Carb Pilot specifically for AI-based meal estimation and custom macronutrient tracking. Same feature, but plucked out to its own app. While this feature was approved swiftly in PERT Pilot as an app revision, Carb Pilot repeatedly faced rejections due to the reviewer testing it with non-food items. Same code as PERT Pilot, but obviously a different reviewer and this was the first version submitted. Eventually, I implemented enough additional error handling to ensure the user (or reviewer, in this case) entered valid meal information, including a meal name and a relevant description. If incorrect data was entered (identified by the API returning zero macronutrient counts), the app would alert users. After addressing these edge cases through several rounds of revisions, the app was finally approved. It might have been faster with a different reviewer, but it did ultimately make the app more resilient to unintended or unexpected user inputs.

Other than this instance, submitting to the App Store was straightforward, and it was always clear at what stage the process was, and the reviewer feedback was reasonable.

(Note that some features like HealthKit or audio have to be tested on physical devices, because these features aren’t available in the simulator, so depending on your app functionality, you’ll want to test both with the simulator and with physical iOS devices to test those. Otherwise, you don’t have to have access to test on a physical device.)

Being new to Android app development

In contrast, developing for Android was more challenging. I decided to create an Android version of PERT Pilot after receiving several requests. However, this effort took nearly two years and four separate attempts to even get a test version built. I flopped at the same stage three times in a row, even with LLM (AI) assistance in trying to debug the problem.

Despite assistance from language models (LLMs), I initially struggled to create a functional Android app from scratch. Android Studio uses multiple nested folder structures with Kotlin (.kt) files and separate XML files. The XML files handle layout design, while Kotlin files manage functionality and logic, unlike iOS development, which primarily consolidates both into fewer files or at least consistently uses a single language. Determining when and where to code specific features was confusing. (This is probably easier in 2025 with the advent of agent and IDE-integrated LLM tools! My attempts were with chat-based LLMs that could not access my code directly or see my IDE, circa 2023 and 2024.)

Additionally, Android development involves a project-wide “gradle” file that handles various settings. Changes made to this file require manually triggering a synchronization process. Experienced Android developers might find this trivial, but it is unintuitive for newcomers to locate both the synchronization warnings and the sync button. If synchronization isn’t performed, changes cannot be tested, causing blocks in development.

Dependency management also posed difficulties, and that plus the gradle confusion is what caused my issues on three different attempts. Initially, dependencies provided by the LLM were formatted incorrectly, breaking the build. Eventually (fourth time was the charm!), I discovered there are two separate gradle files, and pasting dependencies correctly and synchronizing appropriately resolved these issues. While partly user error (I kept thrashing around with the LLM trying to solve the dependency formatting, and finally on the fourth attempt realized it was giving me a language/formatting approach that was a different language than the default Android Studio gradle file, even though I had set up Android Studio’s project to match the LLM approach. It was like giving Android Studio Chinese characters to work with when it was expecting French), this issue significantly impacted my development experience, and it was not intuitive to resolve within Android Studio even with LLM help. But I finally got past that to a basic working prototype that could build in the simulator!

I know Android has different features than iOS, so I then had to do some research to figure out what gestures were different (since I’m not an Android user), as well as user research. We switched from swiping to long pressing on things to show menu options for repeat/edit/deleting meals, etc. That was pretty easy to swap out, as were most of the other cosmetic aspects of building PERT Pilot for Android.

Most of the heartache came down to the setup of the project and then the exporting and deploying to get it to the Play Store for testing and distribution.

Setting up a Google Play developer account was quick and straightforward, despite needing to upload identification documents for approval, which took a day to get verified. There’s a one-time cost ($25) for creating the development account, that’s a lot cheaper than the yearly fee for Apple ($99/year). But remember, above and below, that you’re paying with your time as opposed to money, in terms of a less intuitive IDE and web interface for moving forward with testing and deploying to production.

Also, you have to have hands-on access to a physical Android device. I have an old phone that I was able to use for this purpose. You only have to do this once during the account creation/approval process, so you may be able to use a friend’s device (involves scanning QR code and being logged in), but this is a little bit of a pain if you don’t have a modern physical Android device.

I found navigating the Play Store developer console more complicated than Apple’s, specifically when determining the correct processes for uploading test versions and managing testers. Google requires at least 12 users over a two-week testing period before allowing production access. Interestingly, it’s apparently pretty common to get denied production access even after you have 12 users, the minimum stated. It’s probably some secret requirement about app use frequency, although they didn’t say that. The reason for rejection was uninformative. Once denied, you then have a mandatory 14 day wait period before you can apply again. I did some research and found that it’s probably because they want a lot of active use in that time frame. Instead of chasing other testers (people who would test for the sake of testing but not be people with EPI), I waited the 14 days and applied again and made it clear that people wouldn’t be using the app every day, and otherwise left my answers the same…and this time lucked into approval. This meant I was allowed to submit for review for production access to the Play Store. I submitted….and was rejected, because there are rules that medical and medical education apps can only be distributed by developers tied to organizations that have a business number and have been approved. What?!

Apparently Google has a policy that medical “education” apps must be distributed by organizations with approved business credentials. The screenshots sent back to me seem to be flagging on the button I had on the home screen that described PERT and dosing PERT and information about the app. I am an individual (not an organization or a nonprofit or a company) and I’m making this app available for free to help people, so I didn’t want to have to go chase a nonprofit who might have android developer credentials to tie my app to.

What I tried next was removing the button with the ‘education’ info, changing the tags on my app to fall under health & fitness rather than ‘medical’, and resubmitting. No other changes.

This time…it was accepted!

Phew.

iOS or Android: which was easier? A newbie's perspective on iOS and Android development and app deployment, a blog by Dana M. Lewis from DIYPS.orgTL;DR: as more and more people are going to vibe code their way to having Android and/or iOS apps, it’s very feasible for people with less experience to do both and to distribute apps on both platforms (iOS App Store and Google Play Store for Android). However, there’s an up front higher cost to iOS ($99/year) but a slightly easier, more intuitive experience for deploying your apps and getting them reviewed and approved. Conversely, Android development, despite its lower entry cost ($25 once), involves navigating a more complicated development environment, less intuitive deployment processes, and opaque requirements for app approval. You pay with your time, but if you plan to eventually build multiple apps, once you figure it out you can repeat the process more easily. Both are viable paths for app distribution if you’re building iOS and Android apps in the LLM-era of assisted coding, but don’t be surprised if you hit bumps in the road for deploying for testing or production.

Which should you choose for your first app, iOS or Android? It depends on if you have a fondness for either iOS or Android ecosystem; if one is closer to development languages you already know; or if one is easier to integrate/work with your LLM of choice. (I now have both working with Cursor and both also can be pulled into the ChatGPT app). Cost may be an issue, if $99/year is out of reach as a recurring cost, but keep in mind you’ll pay with your time for Android development even though it’s a $25 single time user account setup fee for developers. You also may want to think about whether your first app is a one-off or if you think you might do more apps in the future, which may change the context for paying the Apple developer fee yearly. Given the requirements to test with a certain number of users for Play Store access, it’s easier to go from testing to production/store publication on Apple than it is for Google, which might factor into subsequent app and platform decisions, too.

iOS Android
Creating a developer account better (takes more time, ID verification), one time $25 fee, requires physical device access
Fees/costs $99/year Better: one time $25 fee for account creation
IDE better (more challenging with different languages/files and requires gradle syncing)
Physical device access required No (unless you need to test integrations like HealthKit or audio input or exporting files or sending emails) Yes, as part of the account setup but you could borrow someone’s phone to accomplish this
Getting your app to the web for testing Pretty clear once you realize you have to “archive” your app from XCode, pops up a window that then guides you through sending to TestFlight. (Whether or not you actually test in TestFlight, you can then add to submit for review).

Hiccups occasionally if Apple requires you to sign new agreements in the web interface (watch for email notifications and if you get errors about your account not being correct, if you haven’t changed which account you are logged into with XCode, check the Apple developer account page on the web. Accept agreements, try again to archive in XCode, and it should clear that error and proceed.

A little more complicated with generating signed bundles, finding where that file was saved on your computer, then dragging and dropping or attaching it and submitting for testing.

Also more challenging to manage adding testers and facilitate access to test.

Submitting for approval/production access Better, easy to see what stage of review your app is in. Challenging to navigate where/how to do this in web interface the first time, and Google has obtuse, unstated requirements about app usage during testing.
Expect to be rejected the first time (or more) and have to wait 14 days to resubmit.
Distribution once live on the store Same Same